• Steel Soldiers now has a few new forums, read more about it at: New Munitions Forums!

  • Microsoft MSN, Live, Hotmail, Outlook email users may not be receiving emails. We are working to resolve this issue. Please add support@steelsoldiers.com to your trusted contacts.

goldneagle's M936 Wrecker recovery and restore thread

goldneagle

Well-known member
4,434
868
113
Location
Slidell, LA
I know that roaring start was music to your ears. Good job getting it running again. :goodjob:
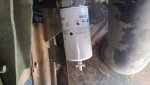
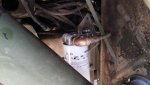
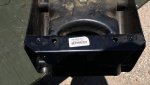
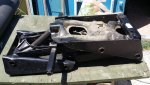
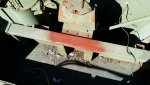
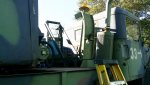
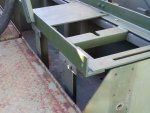
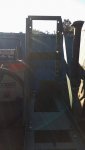
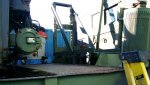
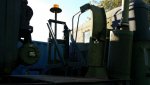
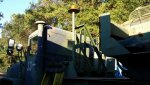
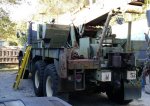
I think it still has a fuel issue. Going to upgrade the fuel filter while I am at it so I don't have to waste money on hoses or fittings that I will not need with the new filter housing. Hopefully it will not be too difficult to pinpoint the leak/clogging.
 

goldneagle

Well-known member
4,434
868
113
Location
Slidell, LA
Have you replaced your fuel lines yet ?? I have had to replace all the rubber lines on 2 trucks for the same reason .
Going to replace them as needed. I already have a new hose to use from the fuel filter housing to the IP. Just have to install the proper fitting on the new fuel housing end.
 

goldneagle

Well-known member
4,434
868
113
Location
Slidell, LA
Got a early delivery of brass fitting I ordered from AMAZON.com today. Decided to continue with fuel/water separator filter upgrade. Had to drill 2 new holes in the mounting plate and bolted the filter housing to the mounting plate. I tied in the copper line coming from the tank selector valve under the cab. Installed a new rubber hose from the filter housing to the IP. Filled up the spin on fuel filter with fresh diesel and attached to the filter base. I will test the fuel system Friday or Saturday. At least the project is done. Pictures will be added soon.
 

Attachments

Last edited:

Jeepsinker

Well-known member
5,341
329
83
Location
Dry Creek, Louisiana
Fwiw Zev, I have removed several of those "Upgrade" water filter/ separators because they are a sure fire source of an air leak every time you end up with an air leak. Not fun to service either. Hope you have better luck with yours than I've had with any of them.
 

goldneagle

Well-known member
4,434
868
113
Location
Slidell, LA
After charging my batteries for an hour I tried to start up the truck. On the first crank the starter was spinning well and the engine started. But it cut off shortly after. On the 2nd try it started again and this time it continued to run! I let it run for a while and build up air.

I tested the windshield wipers and found t he driver's side did not function. After pulling the hoses and adding some lube to the wiper motors still no go. When I looked at the way the hosess were attached to the passenger side I noticed that the hoses on the driver's side were on backwards. Once I switched the hoses the wiper worked properly. So if you have issues with the motor not turning try reversing the hoses.

After testing the truck a few times for starting I reactivated the solenoid fuel cut off valve. I had bypassed it in case it was not letting the fuel to the IP. The truck started with no issue and shut off when I turned the start switch off. So now I have a good running truck. I will retry tomorrow to make sure she is still starting easily.
 

goldneagle

Well-known member
4,434
868
113
Location
Slidell, LA
I had purchased a nice air ride seat on Ebay a couple of weeks ago. When I received it I noticed the base was not going to fit in the wrecker. It was a different design base that goes back as it rises. It takes too much room with that design. All the other air ride seats were straight up and down as you raise or lower it.

I ordered a used base off Ebay that goes straight up as it rises. I started to adapt the slide rails to fit the new base. Should have it done on Saturday.
 

Attachments

Last edited:

goldneagle

Well-known member
4,434
868
113
Location
Slidell, LA
Today i welded the adapter pieces on to the replacement base. I then bolted the tracks to the adapters. Painted up the base and let it dry. I then reattached the seat to the tracks and hooked up the 1/4" air hose to the base. Besides the unbearable heat and humidity all went smooth.

Next step will be to cut a 1/8" thick steel plate to bolt to the base. The plate will attach the seat to the existing nuts in the floor. All that will be required is to unbolt the springer seat from the floor and install the air ride seat in the same location and same bolt holes.
 

Attachments

goldneagle

Well-known member
4,434
868
113
Location
Slidell, LA
I went to Hattisburg, MS Wednesday to pick up some truck parts while the scrapper was still there. Ended up getting a complete spare tire rack assembly with toolbox attached from a M931. I also got some additional tractor tool boxes as well as a replacement hood for my M932.

I had them cut the tire carrier into 2 pieces so it would be easier to transport on my M1008. Basically it was cut after the tool box since I do not need it on the wrecker modification.

Yesterday I took the tire carrier apart. I removed the davit boom assembly from the spare storage rack. Since the wrecker has a boom i do not need the davit boom for lifting the spare tire into the holder. I also cut some large angle pieces that i welded today in place of the davit boom.

I ened up welding some heavy angle and cross members for the tire carrier. I got all the welding done today. I will clean up the welds on Saturday and prime the rack. Here are some pictures of the welded tire rack.
 

Attachments

goldneagle

Well-known member
4,434
868
113
Location
Slidell, LA
Here is another picture I took today after repairing the t-bolt and installing the tire for size. I had to repair the T-bolt because the t-nut was frozen in place. I tried to turn the nut and used penetrating oil but it would not budge. Since I could not remove the t-nut and it was attached to the back plate i decided to cut the rod and use the bench vise to hold the rod while I tried to turn the t-nut off. Had to use a pipe wrench on the rod to get it to budge. Once removed I used a thread chaser to clean the threads (male and female). I welded the 2 pieces back together but my weld failed when I tightened the t-bolt to secure the spare tire in the new rack.

Since it is important that the t-bolt does not fail holding the heavy spare tire in place I decided to use a different method to connect the two pieces together. I bought a all-thread splice connector at Home Depot today. I then used a 1/2" -13 die to cut threads on both pieces and then spliced the t-bolt together. Next step is to sand and prime the rack.
 

Attachments

goldneagle

Well-known member
4,434
868
113
Location
Slidell, LA
I finally got a chance to clean up the welds and sand the metal ready to prime on the tire carrier. I then primed the tire rack with rusty metal primer. While the primer was drying I used the angle grinder to cut the welds that held the original spare tire mount to the back wall of the truck bed. I left the warning light pole attached to it to help remove it from the wall. Once I cut through the 3 sides of the tire carrier I was able to use the light pole to pry the tire mount off the wall by rocking it back and forth. See picture after I removed it. I then sanded and primed the spot.

After the primer was dry I applied Rapco Green CARC substitute paint to the tire rack. See pictures.
 

Attachments

goldneagle

Well-known member
4,434
868
113
Location
Slidell, LA
I decided to do a test install of the tire rack. I lifted it into place and attached the end piece to see how it looks.

Rack_up_1.jpgRack_up_1a.jpg

I decided it did not fit right in that direction. So I had to cut off the small antenna mount that was welded to the side of the bottom angle iron. I sanded the area and primed and painted it. Then i rotated the tire rack 180 degrees so that the load opening faced the passenger side. Next will be making up the support legs for the other iron angle.

Rack_up_2.jpgRack_up_2a.jpg
 

goldneagle

Well-known member
4,434
868
113
Location
Slidell, LA
Today I continued the tire rack project. I cut some metal to make 3 legs that will support the tire rack. I drilled and bolted the pieced together using 5/16" bolts. I then primed and painted the metal pieces.

Support_Legs_1.jpgSupport_Legs_1a.jpg

While the primer was drying I cut out the back panel from the rear compartment of the truck. The panel was all dented and mangled. I will make a swinging door to replace it so it is easier to remove the heavy bulky items stored there. You can see the corner columns I plan to weld there in the 3rd photo.

Rear_Compartment_1.jpgRear_Compartment_1a.jpgRear_Compartment_1b.jpg
 

goldneagle

Well-known member
4,434
868
113
Location
Slidell, LA
Weather was cool today so good time to work on the wrecker's tire carrier. I vacuumed up the recessed area and did some touch-up priming and painting on the top of the wall that the tire carrier is going to sit. I lifted the tire carrier on top of the wall and inserted a support leg on the other side to hold it in place. I then drilled (3) 3/8" holes through the angle and the top of wall iron channel. I secured the tire carrier tot he top of the wall with (3) 3/8" hardened bolts. I then placed 1 leg assembly under the other angle of the tire rack. I drilled (2) 3/8" holes to secure the leg to the angle. I then placed the other 2 leg assemblies under the angle and secured them to the angle with (2) 3/8" bolts each.

I then vacuumed the metal shavings from the recessed area. I install the end tire keeper plate to the base.

I will install the tire once i figure out how I am going to mount the flashing light pole.
 

Attachments

goldneagle

Well-known member
4,434
868
113
Location
Slidell, LA
Today's project was to relocate the convoy light on the truck. It was originally attached to the back of the tire mount that i removed. I unbolted the pole mount bracket from the tire mount. I decided to remount the strobe light since it was not attached very well. I drilled and tapped a 10-32 hole for the ground screw. Used a new eyelet terminal for the ground wire. I drilled out the holes in the strobe housing to accept 1/4" bolts. I bolted the strobe light to base using 1/4" bolts.

I made a cardboard template of the hole pattern in the pipe mount bracket. I used the template to mark 4 holes in the of the wall that is attached to the welding tank storage area. See the picture for better detail. I drilled (4) 5/16" holes in the wall. I then secured the strobe light assembly to the wall using 5/16" hardened bolts. All I have left to do is reconnect the power wire.
 

Attachments

goldneagle

Well-known member
4,434
868
113
Location
Slidell, LA
Finally finished the tire mount! I lifted the tire on top of the truck deck and rolled the tire into the tire mount. Once I had it in place I secured the end cap with the T-bolt. I also spliced the power wire for the amber flasher. Looks good up there!
 

Attachments

goldneagle

Well-known member
4,434
868
113
Location
Slidell, LA
Any updates?
Right now she is down with a air compressor issues. Last time I fires her up she did not produce any air at all. I checked for leaks and the air dryer but no luck. I did find there was water in the copper tube that goes from the top of the compressor head to the governor. Have not had a chance to follow up on it since. Hopefully soon I will have some spare time to look into it further.
 
Top
AdBlock Detected

We get it, advertisements are annoying!

Sure, ad-blocking software does a great job at blocking ads, but it also blocks useful features of our website like our supporting vendors. Their ads help keep Steel Soldiers going. Please consider disabling your ad blockers for the site. Thanks!

I've Disabled AdBlock
No Thanks