• Steel Soldiers now has a few new forums, read more about it at: New Munitions Forums!

  • Microsoft MSN, Live, Hotmail, Outlook email users may not be receiving emails. We are working to resolve this issue. Please add support@steelsoldiers.com to your trusted contacts.


goldneagle's WMO filter system.

goldneagle

Well-known member
4,420
829
113
Location
Slidell, LA
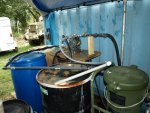
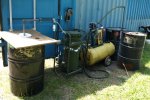
I finally got my WMO filter system put together. I've wanted to do this for a while but procrastinated until now. I have been reading threads on this site for a while learning how other members filtered and used their WMO in their Multifuel engines.

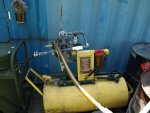
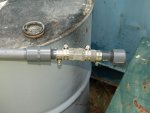
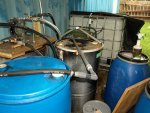
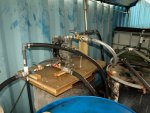
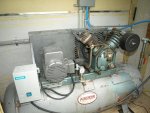
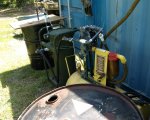
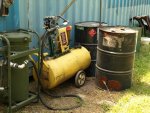
I decided to go with sock filters for most of the filtering process. I also incorporated a large Military fuel water separator into the system. The fuel-water separator is rated 75 gpm.

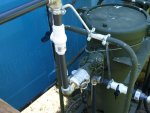
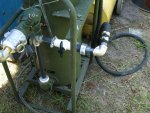
The Fuel Water Separator uses 1-1/2" quick connect hose fittings. I purchased 1 male and 1 female connector with 1-1/2" Female NPT on other end. I purchased two 1-1/2" to 3/4" NPT reducers. This way I could use 3/4" sch80 PVC pipes fro most of the system.

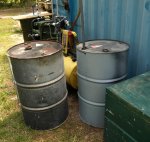
I ordered 5 of each 100 micron, 25 micron, 5 micron, 1 micron 32" long sock filters. I also purchased four 3/4" SS elbows.

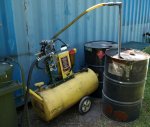
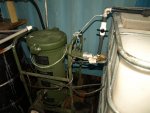
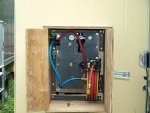
Now I needed a pump to move the WMO through the system. i found a Gas Buggy on Ebay fro $150 plus shipping. It has a 13 GPM air operated dual diaphragm pump on it.

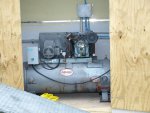
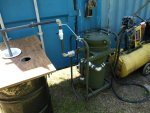
When I got the unit 3 days later I studied how it functioned and found a way to utilize it in my filter system. It has a 34 gallon tank that can be used to store oil. (It's the yellow piece of equipment in the pictures)

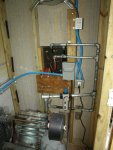
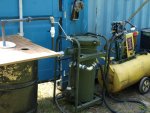
I used Unions to make it easier to disconnect certain components in the system for easy storage and moving.

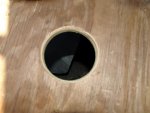
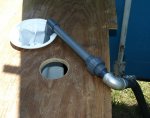
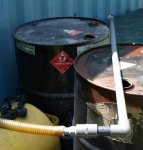
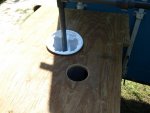
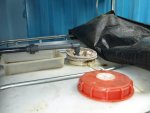
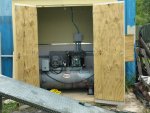
I used a 3/4" pressure treated plywood to hold the filters over the drum for filtering. I routed the edge round to keep it from damaging the filters.

Here is ow the system works:

Using the air operated Gas Buggy with the long pickup tube with the mesh strainer near the bottom inserted into the WMO tank at a pickup location. Insert the discharge hose into the capture container such as a drum or large container. Attach air source to the pump and start pumping the oil. Shut off when capture container is full.

To start the filtering process insert the pickup tube in the WMO container holding the dirty WMO. Insert the 100 micron sock into the 25 micron sock. Insert both socks into the large hole in the plywood lid. The discharge tube goes into the sock. Using an air source pump the dirty oil into the filters until drum is full.

Once the drum is full take the pickup tube a lightly clean it before inserting in to the 2nd drum with the partly filtered WMO (25 micron)

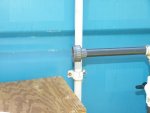
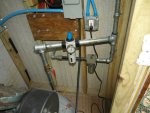
Insert the 5 micron sock filter into the 1 micron filter. Insert the sock filter into the hole in the plywood lid. Place filter over a clean drum. Disconnect the discharge tube at the UNION and reconnect it to the Union attached to the top of the Fuel Water Separator. Make sure the open end goes into the new sock filters. Take the hose with the other half of the Union and connect it to the Union at the bottom of the Fuel Water Separator.

Once the setup is connected, start the pump. The pump will push the 25 micron oil through the fuel water separator and then into the sock filters on the final filtering. When the drum is full turn off pump.

By reconnecting the pump as in phase 1 you can use it to transfer the finished 1 micron oil to a storage tank of the fuel tank of the truck.

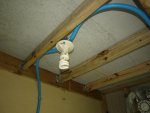
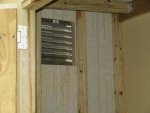
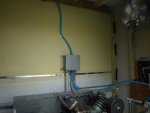
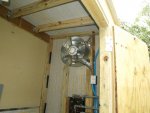
See the pictures for details of the system.
 

Attachments

goldneagle

Well-known member
4,420
829
113
Location
Slidell, LA
Is your last name rube or goldberg?


Just kidding, as long as it works, thats what matters!
I guess that is a compliment! The setup is not complicated! I just use unions to be able to reuse the device at different stages of the filtering process. It only takes 2 steps to filter the WMO. The other 2 steps were: 1 Getting the WMO from the source. 2 transferring the Clean WMO to the truck.
 

goldneagle

Well-known member
4,420
829
113
Location
Slidell, LA
It looks like it'll get it done! [thumbzup]

Have you figured out how fast it is, like how long will it take to filter 20 gallons?

oddshot
I hope to start using it sometimes this week. I ordered the proper hose for connecting the pump unit to the rest of the system. The hose that I used in the pictures is soft as bubble gum and was there for photographing only. The hose I ordered is made with 20% Viton. I ordered it from Dudadiesel. About $78 for 11 feet delivered. I will use 4 to 5 feet for connecting to the rest of the system and the remainder as an extension for the syphon end.

I added some 6" wheels to the fuel water separator today. It will make it easier to move around.
 

goldneagle

Well-known member
4,420
829
113
Location
Slidell, LA
Well I finally had a chance to try out the system. I had tested the pump back in June but could not get it running properly due to lack of air volume. Since then i have purchased an old large air compressor with a 120 gallon tank and rebuilt it. It came with a IR Type 30 pump and a 3 phase motor. I purchased a new 5 HP single phase Baldor motor for it. I also got a larger pulley to go with the motor. I also purchased the following items for the rebuild: New Pressure switch, new magnetic starter, new safety relief valves, new check valve with unloader port, new automatic drain valve, new belts.

I had to install new supports for the fan guard as well. When I got the compressor, the guard was only held in place by one head bolt and resting on the motor and pump shafts. The rebuild was a success and I now have a super nice compressor to use for all my air needs.

Since I did not have a shop to put the air compressor into I built a 4 foot by 8 foot shelter for it against my shipping container. The shelter is made of all pressure treated lumber and Hardi panels. I also installed a gable fan with louvers for in and out. The fan has a temperature controlled switch. Wait until you guys see the plumbing work I did for the air lines. I have one dedicated 1/2" line that has a glad hand connection so I can use my 1" impact gun with the same hoses and fittings that i use on the truck. I have 5 additional quick connects (one has a retractable hose reel attached) I WILL HAVE PICTURES TOMORROW IF THE WEATHER HOLD OUT

Back to the main topic...I hooked up the air line from my new compressor to the air operated pump on the filter system and tried to filter some WMO from one of the drums. Pump was running like crazy but could not prime! After tightening the hose clams, bypassing the selector, and removing the filter from the unit I could still not get it to prime!

I knew it was either a bad pump or a leak in the system. I had extended the original siphon hose with a barb coupling and new rubber hose. I thought I would shorten the hose to see if I could get better results. I removed the old clear hose from the system since it was easier to pull off the barbed connections. I attached the new rubber hose to the pump and tightened the hose clamp. I could tell almost immediately that the system was working better. Within a minute I had the system primed and pumping some serious oil into the sock filters in Stage 1. I had a 100 micron filter inside a 25 micron filter for Stage 1. Within a half hour or so I had 40 gallons filtered. Since it was late I decided to stop the work and close up the system.

While handling the oil soaked filters I had to pull them out with some oil in them because it was too slow to drain and my arms were getting tired. I set the filter socks inside a new 5 gallon bucket and closed the lid. I am sure by tomorrow I will have most the the oil drained out of the sock filters into the bucket.

I also noticed that I have to rethink how I will run the filtering system so I do not have spillage while I am changing hoses from the different stages of the filtering process. I also need containers to hold the pickup tubing after I remove them from the oil drums.

I decided to re-plumb the pump setup so I can leave the tubing in the same containers instead of swapping them out. This will keep the mess down to a minimal. i am sure I will come up with additional changes once I have run the system for a while.

At leasat the first stage of the system seems to work well. PICTURES TO FOLLOW TOMORROW.

I hope that all the detail that I am including will be helpful to someone. It seems like alot of the other threads do not go into real detail about the process and equipment used.
 

Attachments

Last edited:
I, for one, really appreciate every single detail you have provided for your setup. Including your trials and errors and equipment needs are going to be a great help to me, and other members here, when we get the time, space, and money to build set-ups of our own.
 

goldneagle

Well-known member
4,420
829
113
Location
Slidell, LA
Sorry for the delay on the pictures. I have been busy and the weather is not cooperating.

I did get a chance to run the next stage of filtering. After cleaning the two 275 gallon totes with a pressure washer to get the residue from the WVO out I set up the system to pump the Stage 1 filtered oil through the Military Fuel/Water separator and through a 5 micron and 1 micron sock filters.

I inserted the 5 micron sock filter into the 1 micron sock filter. i then installed the sock filters into the top 6" opening of the 275 gallon tote. i then inserted the discharge tube into the sock filters. The pickup tube with a wire strainer was inserted into the Stage 1 drum. Using the air diaphragm pump I started to pump the oil. I noticed some oil coming out under the Military filter. I stopped the pump to check for the leak. I had left the tiny water drain valve open on the bottom of the Military Filter cylinder. Turned the valve off and the leak stopped!

I am only mentioning this goof to make you aware that it is important to carefully check all the connections and valves to make sure you don't make a BIG mess! Make sure you have plenty of rags and containers for possible oil leaks or spills.

Once the leak was contained i restarted the pump and the oil took awhile to fill the Military Filter Cylinder. Once the cylinder was filled the oil started to flow through the discharge tube into the sock filters. I had to cut the pump speed in order to keep the sock filter from over flowing. I managed to filter all the of the oil from Stage 1 drum into the Stage 2 tote.

Looks to me like the system is functional. Since then i decided to redo the plumbing to and from the pump so that there is less disassembly required and therefor less spillage.

Today I removed the air diaphragm pump from the Gas Buggy it was attached to. I then re-plumbed the intake and discharge pipes from the pump. By installing a T junction in the intake and a ball valve for each of the 2 input lines I can control which tank I am siphoning from. I also installed a T junction on the output of the pump with a ball valve for each of the 2 discharge pipes. This allows me to control which container I will output the oil to. I will be labeling the valves and tubes so i do not make mistakes during filtering.

I hope to finish the plumbing tomorrow.
 

goldneagle

Well-known member
4,420
829
113
Location
Slidell, LA
Today I went back to Home Depot to get some additional plumbing supplies. While I was shopping the sky opened up and it poured cats and dogs! I was stuck in the store for almost an hour before the rail let up a bit. Still got wet running for the car.

Once the rain let up a bit I went out grabbed the pump and some tools and took them to my SHIPPING DEPARTMENT trailer. (See my thread on restoring an 1684 RTA maintenance trailer) I was able to complete the plumbing for the filtering system. Now all I need to do is mount the pump on some plywood and support some of the pipes.

Hopefully Saturday I can continue to filter oil with the new improved system.
 

goldneagle

Well-known member
4,420
829
113
Location
Slidell, LA
Weather has been lousy lately. **** thunderstorms. I did manage to mount the pump to a base and connect up all the hoses ready for pumping. Unfortunately the thunder and dark sky kept me from opening the drums and running the filter system. Maybe tomorrow?
 

Attachments

Last edited:

goldneagle

Well-known member
4,420
829
113
Location
Slidell, LA
Yesterday I finally got a break in the weather long enough to run the filter system. The first drum I filtered had some really black oil in it. It was kinda thick and dirty. I had to run the pump really slow to keep the oil from overflowing the sock filters. I ran the oil through the 100/25 micron filter set (Stage 1) Then I ran it through the Military water separator filter and 5/1 micron filters into the large tote. All went well, just slow.

Next on the batch was a narrow pickle barrel filed with oil. The oil looked golden color and was thin. It didn't smell like cooking oil. It pumped through Stage 1 at full speed. I then pumped it through the rest of the system without any issues. 3rd barrel had a darker oil but was still thin. Filtered through the system at full speed. The last drum was about 1/2 full of oil with some brake cleaner mixed in. You can smell the brake cleaner. I filtered it through Stage 1 but left it sealed in there.

So far I have 1/2 a 275 gallon tote filled with oil.

I then proceeded to dump the bottom contents of the drums I emptied into 1 drum. The last drum I tried to dump was heavy. I managed to lift it but missed aligning the 2" spout with the opening of the pickle barrel and dumped some of the oil on the wood planks i had made a floor out of for the filter system. What a mess. THis was oil/water mix! Yuk! Tossed a bunch of rags on the oil and spent 30 minutes soaking up the mess.

I have been storing the dirty rags in a bucket that i will take to my friend's garage for disposal. I don't want to throw them out with the regular trash!

I still need to set up an open drum that I can set my sock filters to drain into. I guess I am learning as I go.
 

gimpyrobb

dumpsterlandingfromorbit!
27,786
746
113
Location
Cincy Ohio
I found it was good to have rags and big bags of oildry on hand. It doesn't matter how carefull you are, you will end up making a mess! Might want to mount a fire extinguisher somewheres close by. Finally, if you can find a 10-15gal tank and plumb it from your compressor's main tank, it will pull out most of the water condensation. Hope this helps.
 

oddshot

Active member
770
95
28
Location
Jasper, Georgia
I found it was good to have rags and big bags of oildry on hand.

It doesn't matter how careful you are, you will end up making a mess!
+1

Good words of advice!

Also ... since I pick up oil in other peoples shops/yards ... I always put a pan under hoses when I have to disconnect or move them ... plugs and caps on EVERYTHING.

I'm also careful to drain my hoses and store them hanging into a 5 gallon bucket.

No matter how hard or long you shake them ... it seems there's always 3 drops left to makes a BIG mess.

:wink:

oddshot
 
Top
AdBlock Detected

We get it, advertisements are annoying!

Sure, ad-blocking software does a great job at blocking ads, but it also blocks useful features of our website like our supporting vendors. Their ads help keep Steel Soldiers going. Please consider disabling your ad blockers for the site. Thanks!

I've Disabled AdBlock
No Thanks