Stan
Member
- 488
- 7
- 18
- Location
- St.Louis, Mo.
Nice job, Kinda gutsy next day trip after so much work.
Steel Soldiers now has a few new forums, read more about it at: New Munitions Forums!


Glad to see you got your truck fixed. I have all the parts I need now, so tomorrow is my day off and thats what I will be doing. How long did it take you to reassemble? I plan on this being an all day project as I will be taking my time and cleaning, oiling everything as I go.
Diecorpse,
What did you findout about your heads when you took them in?
Denny
Can anyone give me the number and size of the head freeze plugs? My truck is two hours away and I'd like to prepare in advance.
Can anyone give me the number and size of the head freeze plugs? My truck is two hours away and I'd like to prepare in advance.
Post #23: http://www.steelsoldiers.com/showthread.php?11295-All-this-for-a-freeze-plug-!There are 8 freeze plugs per head (16 in all) and a total of 3 separate sizes. I looked forever for the sizes to no avail. It doesn't say in the TM I used 9-2320-209-34-2-1 but I could swear I had it written down around here somewhere. I'll keep looking unless someone else chimes in. If you look at the 4th post to this thread a fellow SS member “cattlerepairman” did some research and compiled a laundry list of head gasket threads. I looked through the top 20 threads but might have missed something.
I left the intake loose, but yet, the exhaust manifold still wouldn't go on, it was bumping the intake, it would come really close to fitting but not quite. I wonder if it would be easier with two people to get lined up with all the bolts.
8 per head? are you sure? well the plugs at the ends of each head are 1" shallow total of 4, and there are 1 1/4" plugs total of 6, i think these are under the rocket arms.
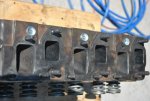
Let me know if I've got it right:
The Dorman Part #'s are
555-012 (3/4" x 0.25”), Intake side of head, three per head
555-018 (1" x 0.26”), Front and back of head, two per head
555-024 (1 1/4" x 0.28”), Under rocker arms, three per head
555-069 (2” x 0.42”), block, five total
Yes, but I'm not completely sure if the block had three or four along the side.Looks right to me. Did you account for the freeze plug on the right bank of the block under the data plate.