

The Name Is Fred
New member
- 1
- 6
- 0
- Location
- Florida
I have recently been working on modifying military antenna bases for CB and had a friend asking how and asking me to "show" it here. After looking over this site I’ve seen a lot of posts asking about using military bases for CB radios and 10 meter export radios. Most of the answers in these posts are “yes you can”… followed by no other information… or… helpful but wordy which is hard to follow if you are messing with something beyond ones normal comfort zone. Some is just poorly thought out to the limitations of “Average Joe’s” (non-radio guys) understanding. Or… actually snide and downright wrong with the arrogant intent of frustrating anyone without a HAM background.
If there is one there are 100 different surplus bases out there none of them to my knowledge that will work for 11 meter (CB radio). The base I am going to direct you to an AN-3916VRC which was developed for the military after they figured out that vehicle fired rockets tend to melt sectional antennas. It is a very cheap base, usually selling for $20-$30 dollars ($40 if you are lazy on Ebay). It uses a plan ole SS whip antenna that can be purchased just about anywhere for $25 and once built can be tuned (SWR) like any other CB whip antenna. The base comes with a BNC connector that can be used “as is” or you can easily swap it out for a PL-259 connector (standard CB coax connector). They dissemble easily and only need basic modification to work like an off the shelf “CB antenna”. Best of all when you are done with it you have a true ¼ wave whip which is about the best mobile antenna one can have and for only about $70.
Tools Required
If your antenna is too short, it is necessary to increase its physical length. Most instances where the antenna length is too short are caused by a lack of ground plane. In modern antennas, there's usually a method for adding length built in to the antenna.
So here's one with pictures...
If there is one there are 100 different surplus bases out there none of them to my knowledge that will work for 11 meter (CB radio). The base I am going to direct you to an AN-3916VRC which was developed for the military after they figured out that vehicle fired rockets tend to melt sectional antennas. It is a very cheap base, usually selling for $20-$30 dollars ($40 if you are lazy on Ebay). It uses a plan ole SS whip antenna that can be purchased just about anywhere for $25 and once built can be tuned (SWR) like any other CB whip antenna. The base comes with a BNC connector that can be used “as is” or you can easily swap it out for a PL-259 connector (standard CB coax connector). They dissemble easily and only need basic modification to work like an off the shelf “CB antenna”. Best of all when you are done with it you have a true ¼ wave whip which is about the best mobile antenna one can have and for only about $70.
Tools Required
Basic soldering stuff… Iron, solder, a solder sucker helps but is not required.
Basic hand tools
A number 7 drill bit and hand drill.
If you are changing out the BNC connector for a PL-259 you will also need…
A 5/8 drill bit
Round file
Basic hand tools
A number 7 drill bit and hand drill.
If you are changing out the BNC connector for a PL-259 you will also need…
A 5/8 drill bit
Round file
Materials Required
AN-3916 base $20-$40
102” (sometimes 103”) SS whip antenna $18-$30
Random piece of 18ga wire (maybe, maybe not)
Silicone
Larsen Whip tip for a W490 & W450 PN “Ball1” (they sell these on Ebay for $10 each, a bag of 10 is under $7 online if you search for them)
If you are changing the connector
Female chassis mounted PL-259 connector. (google it) $5 and worth doing.
A few notes on materials and methods…
When buying the AN-3916VRC, if it is missing the Jam Nut from the top… DO NOT BUY IT! They are almost impossible to find on any consistent basis.

The Larsen Ball1 whip tip is not a “suggestion”… Whips put out eyeballs! Don’t be the douche that sticks a 100+ inch antenna on to his truck and blinds someone!!!!

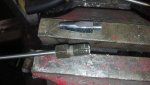
What we’re doing here is “unloading” this antenna base which is currently tuned for 6 meter military frequencies. In laymen’s terms… were gutting it and bypassing all of the fancies making the coaxial core go straight though the base and into the whip.
As someone(s) will inevitably point out…
You could unload this base by simply jumping from one side to the other, however the proposed method leaves you room to go backwards later or repurpose the base by reloading it for other uses. It also preserves the ability to split the base into 2 halves for easy working. You can stick a whip on the base “as is” and probably trim it to work within proper tuning… It would however be a VERY short (worthless) antenna.
Doing The Deed

Dont fret, were actually going to rip out and destroy every internal part while only changing 2 things!

1. Mounting the base upside down in a vice and remove the 8 stainless steel Philips head screws around the outside and gently pry upwards on the base bottom exposing the insides.

2. Put the base bottom section in the vise and remove the three #8 screws and one #4 screw as shown. This will allow you to pull out the coil plate and expose the back side of the BNC connector.

If you are not changing the BNC connector unsolder the wire shown and skip to step 7

3. Unsolder the white wire shown at the back of the BNC connector.
4. Using a 5/8 socket remove the connector from the base.
5. Use a 5/8 drill bit to enlarge the connector hole.
6. Use a file for final fitting in install your new PL-259 connector.

7. Cut the resistor leads as shown in the picture

8. Solder the white wire (some are too short to move and must be replaced, use 18ga primary wire) to the screw base as shown. Set the antenna bottom off to the side, that part is finished.

9. Turning your attention to the coil plate, note the parts to cut and unsolder in the photo. You are basically disconnecting all pathways on the coil plate from each other.

10. Install a jumper wire to bridge as shown. (A piece of one of the removed coils works well for this once you burn off the red coating.)

11. Reinstall the now coil(less) plate back into the antennas bottom section. DO NOT OVERTIGHTEN THESE SCREWS!!!!

12. Apply a SMALL amount of silicone to the edge of the antennas top section as shown. (Unless you are still active military, then apply the whole **** tube to it.)
13. Reassemble the top and bottom halves, reinstalling the 8 screws taken out in step one. Again… DO NOT OVERTIGHTEN THESE!
14. Clean off any excess silicone. (unless active military, if so, just leave it all over for the next guy)

15. Turn you attention to the jamb nut on top of the base. The ID of this is slightly smaller (.200) than needed for the new whip (roughly .220) to fit into. Using the number 7 drill bit, enlarge this hole with the jam nut installed (hand tight) in the top as shown.
If you do not drill the nut in the base as shown the bottom section will expand on the bit and not remove enough material when drilling.

16. Cut the threaded portion of the SS whip antenna off, file the edges, install into your newly modified base.

17. Install and tune following the instructions below…
Notes on vehicle mounting locations
If you have the opportunity to mount the base in a forward position on the vehicle so you antenna(s) tie to the rear do it. This helps prevent folding the antenna forward which will eventually get snagged on something and destroy it… Watching the whole event unfold in front of your eyes is about the only positive thing I can think of for rear mounting. Mid vehicle mounting with at least 70% of the antenna above the vehicle will usually perform better than corner mounting.
The Larsen Ball1 whip tip is not a “suggestion”… Whips put out eyeballs! Don’t be the douche that sticks a 100+ inch antenna on to his truck and blinds someone!!!!
What we’re doing here is “unloading” this antenna base which is currently tuned for 6 meter military frequencies. In laymen’s terms… were gutting it and bypassing all of the fancies making the coaxial core go straight though the base and into the whip.
As someone(s) will inevitably point out…
You could unload this base by simply jumping from one side to the other, however the proposed method leaves you room to go backwards later or repurpose the base by reloading it for other uses. It also preserves the ability to split the base into 2 halves for easy working. You can stick a whip on the base “as is” and probably trim it to work within proper tuning… It would however be a VERY short (worthless) antenna.
Doing The Deed
Dont fret, were actually going to rip out and destroy every internal part while only changing 2 things!
1. Mounting the base upside down in a vice and remove the 8 stainless steel Philips head screws around the outside and gently pry upwards on the base bottom exposing the insides.
2. Put the base bottom section in the vise and remove the three #8 screws and one #4 screw as shown. This will allow you to pull out the coil plate and expose the back side of the BNC connector.
If you are not changing the BNC connector unsolder the wire shown and skip to step 7
3. Unsolder the white wire shown at the back of the BNC connector.
4. Using a 5/8 socket remove the connector from the base.
5. Use a 5/8 drill bit to enlarge the connector hole.
6. Use a file for final fitting in install your new PL-259 connector.
7. Cut the resistor leads as shown in the picture
8. Solder the white wire (some are too short to move and must be replaced, use 18ga primary wire) to the screw base as shown. Set the antenna bottom off to the side, that part is finished.
9. Turning your attention to the coil plate, note the parts to cut and unsolder in the photo. You are basically disconnecting all pathways on the coil plate from each other.
10. Install a jumper wire to bridge as shown. (A piece of one of the removed coils works well for this once you burn off the red coating.)
11. Reinstall the now coil(less) plate back into the antennas bottom section. DO NOT OVERTIGHTEN THESE SCREWS!!!!
12. Apply a SMALL amount of silicone to the edge of the antennas top section as shown. (Unless you are still active military, then apply the whole **** tube to it.)
13. Reassemble the top and bottom halves, reinstalling the 8 screws taken out in step one. Again… DO NOT OVERTIGHTEN THESE!
14. Clean off any excess silicone. (unless active military, if so, just leave it all over for the next guy)
15. Turn you attention to the jamb nut on top of the base. The ID of this is slightly smaller (.200) than needed for the new whip (roughly .220) to fit into. Using the number 7 drill bit, enlarge this hole with the jam nut installed (hand tight) in the top as shown.
If you do not drill the nut in the base as shown the bottom section will expand on the bit and not remove enough material when drilling.
16. Cut the threaded portion of the SS whip antenna off, file the edges, install into your newly modified base.
17. Install and tune following the instructions below…
Notes on vehicle mounting locations
If you have the opportunity to mount the base in a forward position on the vehicle so you antenna(s) tie to the rear do it. This helps prevent folding the antenna forward which will eventually get snagged on something and destroy it… Watching the whole event unfold in front of your eyes is about the only positive thing I can think of for rear mounting. Mid vehicle mounting with at least 70% of the antenna above the vehicle will usually perform better than corner mounting.
Stolen, entirely from Right Channel Radio
- The first thing you need to do is find a suitable location to park your vehicle. There should be no obstructions, such as trees or buildings, within 10 to 15 meters of your antenna. Neither you nor your buddies should be hanging out around the car, either. Make sure that you’re inside with the doors and windows closed to ensure an accurate reading.
- The next step is to hook up the SWR meter. First, disconnect the coaxial cable from the back of the radio. Reconnect this end of the cable, which is going to the antenna, to the SWR meter in the connector marked “antenna” or “ANT.” Next, use the jumper lead to connect your radio and the SWR meter through the connection marked “transmitter” or “XMIT.”
- Now you are ready to measure the SWR on a few different channels. Remember, throughout this process it's important to keep the microphone the same distance from the meter for each test.
- Set the switch on the SWR meter to “FWD.”
- Turn the radio to channel 1.
- Key the microphone (depress the button and hold it).
- Turn the knob on the SWR meter labeled “SET” or “ADJUST” until the needle reaches the setting position at the end of its range.
- While still keying the microphone, flip the switch on the SWR meter to the “REF” or “SWR” position.
- Quickly record the reading given by your SWR meter and release the transmit key on your microphone.
- You are now going to repeat this process for channel 40. Follow steps 4 through 9.
- If the SWR on channel 40 is higher than that on channel 1, your antenna is too long.
- If the SWR on channel 1 is higher than that on channel 40, your antenna is too short.
If your antenna is too short, it is necessary to increase its physical length. Most instances where the antenna length is too short are caused by a lack of ground plane. In modern antennas, there's usually a method for adding length built in to the antenna.
End of stolen materials…
There should be no issues with being too short when using a 102” whip. If however… for some reason… somehow… you find this to be the case, remove the spring section from the top of the base and change the shielded wire inside the spring out to a longer unshielded insulated wire such as automotive 14ga primary wire and retune.
Hopefully this helps a few people out and who knows, if the mod takes off maybe we’ll see it become the “Dog Head CB antenna mod”.
Attachments
-
 41.8 KB Views: 226
 opcorn:
