• Steel Soldiers now has a few new forums, read more about it at: New Munitions Forums!

  • Microsoft MSN, Live, Hotmail, Outlook email users may not be receiving emails. We are working to resolve this issue. Please add support@steelsoldiers.com to your trusted contacts.

I have air conditioning AND a running M1009!

Napoleon_Tanerite

New member
201
3
0
Location
Warner Robins GA
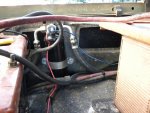
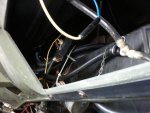
Only cost me $85 too. If you've been following along at home you will recall I had a Nostalgic Air Parts A/C kit installed in my M1009. This led to some electrical issues. Apparently there was a short under the dash that was aggravated by the A/C install. I had the truck towed back to the A/C shop where the fixed the short, but I was still having starting issues. Come to find that the front battery went to ****, likely killed by the short. Well, a new front battery later, and the truck runs like new.

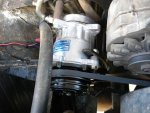
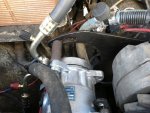
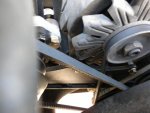
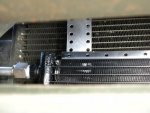
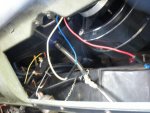
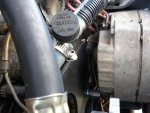
Now about the A/C. I went with the NAP kit after OD Iron raised their price $400. NAP still has their kit for $950, with FREE shipping so it was a no brainer. I had the kit professionally installed because it was WAAAAY over my head to do the work myself. Here's my early impression on the NAP kit:

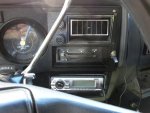
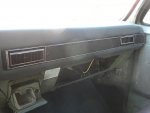
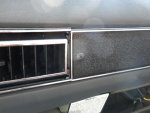
--The plastic is cheap and brittle. The louvers that go in the dash were originally one piece. The plastic strip that connects them is very thin and VERY easy to break. I found this out when I broke the left side louver off unpackaging the kit, and broke the right side louver AND the bit of plastic that connects to it while reinstalliing my dash pad. So now instead of one continuous piece of trim with AC louvers, I have 4 separate pieces... 2 louvers and two pieces of decorative trim.

--This sucker blows COLD! I'm pretty impressed by the quality and volume of cold air that comes out of there. I imagine the truck will get even colder tomorrow after the window tint is done and the green green house gets some shade inside.

--If you are inclined to do the install yourself, the instructions are MUCH better than the OD Iron kit (unless OD Iron includes much more documentation with their kits than is provided on the website). NAP sends about 10 pages of instructions. I didn't know enough about A/C to be confident putting it in myself, but the shop I took the truck to had it done in an afternoon.

--The "complete" kit is not quite complete. You will need to purchase ducting and some various hardware such as screws, etc in order to fully install the kit.


Overall I'm VERY happy with this air conditioner, and was a desperately needed improvement to my truck for the GA summer.
 

niferous

Member
715
6
18
Location
Houston, TX
I've got an OD Iron kit that I have been waiting to install now for a while. I may just take it over to a mechanic I know who is good with AC systems and let him do it. It's not that I'm worried about tackling it I just don't have the time right now. I bought a house last month and I'm getting married Friday. So no free time for working on truck right now. :evil:
 

Napoleon_Tanerite

New member
201
3
0
Location
Warner Robins GA
I've got an OD Iron kit that I have been waiting to install now for a while. I may just take it over to a mechanic I know who is good with AC systems and let him do it. It's not that I'm worried about tackling it I just don't have the time right now. I bought a house last month and I'm getting married Friday. So no free time for working on truck right now. :evil:
If you do decide to do the OD Iron kit yourself, check out NAP's website and get their directions. It might help you out
 

YellowHammer

New member
49
0
0
Location
Augusta, GA
How much were you charged for the installation? I've had mine for a while but haven't had time to tackle it. I just got back from a military school and am pressed for time. If it's not too awful much, I think I'd be better off avoiding the headache.
 

Napoleon_Tanerite

New member
201
3
0
Location
Warner Robins GA
The fuse block under the dash near the evaporator is no part of the kit, it's something I put in for accessory power
 

Attachments

Napoleon_Tanerite

New member
201
3
0
Location
Warner Robins GA
Ok, so I explain the fuse block with the last two pictures (that actually show it) weren't included into the first pic dump.

Also, the ash tray is like that because it's as far in as it currently goes. I'm going to have to modify the frame to see if it fits in, or just weld that little hole shut and put an accessory outlet on the outside.

And I didn't remove the glove box for the pictures... the glove box currently does not fit and will have to be modified to clear the blower motor and drain tubes
 

Attachments

davo727

New member
742
2
0
Location
Cleveland, TX , Spring , TX
Thanks for the pics. did they add a different crank pulley? do you have a pic of it? That compressor bracket setup is interesting- hard to figure out where it attaches to the engine


Thanks Dave
 

Napoleon_Tanerite

New member
201
3
0
Location
Warner Robins GA
Thanks for the pics. did they add a different crank pulley? do you have a pic of it? That compressor bracket setup is interesting- hard to figure out where it attaches to the engine


Thanks Dave
It's actually an insert that goes into the existing crank pulley... basically unbolt the existing pulley, insert new pulley in the center, rebolt, run belts.

I took a few pics of it, one is from me laying on my back looking up at it, and the other is the best angle I could get looking down from the top. I also took another picture of how the bracket bolts up to the engine.

If any of you guys are considering getting this kit and want pics of the finished install, let me know and I'll do what I can. Since I didn't do the install myself i won't be too helpful on the "how-to" stuff, but I'd be more than happy to help with taking pictures and describing the finished product.
 

Attachments

YellowHammer

New member
49
0
0
Location
Augusta, GA
How long did it take for them to install it? It may well be worth it for me to drive down that way since they already have experience with these vehicles.

It will be a tough decision. I could do alot with $500. But the more I think about tackling it, the more $500 doesn't seem like a whole lot.
 

davo727

New member
742
2
0
Location
Cleveland, TX , Spring , TX
Thanks very much for the pics and info. Im going to give them a call and buy that crank pulley and maybe the brackets.

I have a sanden pump and a streetrod evap unit from southern rods air that I ran for a while in my dads old 85 dodge, after he passed I scrapped the truck and pulled all the good parts off it I can adapt it for my cucv no problem.
 

YellowHammer

New member
49
0
0
Location
Augusta, GA
Where did you end up putting your blackout and service drive switches? I was guessing I'd just drill 2 holes under the left vent but wanted to see how they did yours. I'm about done with mine but they didn't provide enough #6 hose for me. I'll get that and get all the hoses crimped tomorrow and hopefully finish up shortly.

I have drill this weekend for the Guard so it may be Monday before I get it charged and going. I'll tell you one thing. You certainly did the right thing by paying to get it professionally done. This has been quite a task indeed.
 

Napoleon_Tanerite

New member
201
3
0
Location
Warner Robins GA
Where did you end up putting your blackout and service drive switches? I was guessing I'd just drill 2 holes under the left vent but wanted to see how they did yours. I'm about done with mine but they didn't provide enough #6 hose for me. I'll get that and get all the hoses crimped tomorrow and hopefully finish up shortly.

I have drill this weekend for the Guard so it may be Monday before I get it charged and going. I'll tell you one thing. You certainly did the right thing by paying to get it professionally done. This has been quite a task indeed.
Actually that vent wasn't installed at all. The air shop didn't move the switches, and I haven't figured out what I'm going to do with it yet. Right now the duct terminates behind the instrument cluster. I'd like to track down a frog eye vent like you see on airplanes and install that, either that or just block off that duct altogether and use the extra volume to supplement the three dash vents.
 

jag7720

New member
494
2
0
Location
Kansas City, MO
Looks like this system will NOT work with a Banks turbo installed... right? Or are there instructions for mounting the compressor on the let side as well?
 

Napoleon_Tanerite

New member
201
3
0
Location
Warner Robins GA
Looks like this system will NOT work with a Banks turbo installed... right? Or are there instructions for mounting the compressor on the let side as well?
I don't have a turbo, so I can't say for sure. I do know that the instructions that came with the kit made no provisions for trucks with a turbo setup, and it appears that the compressor brackets are made strictly to work on the right side of the truck. I would contact NAP directly and see what they say. They were quite pleasant to do business with, and should be a good bit more helpful than I can be.
 
Top