• Steel Soldiers now has a few new forums, read more about it at: New Munitions Forums!

  • Microsoft MSN, Live, Hotmail, Outlook email users may not be receiving emails. We are working to resolve this issue. Please add support@steelsoldiers.com to your trusted contacts.


Keith's M1078A1 Project Overland

Keith Knight

Well-known member
Steel Soldiers Supporter
708
1,478
93
Location
Wauchula, FL
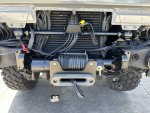
Thanks geo but I’m just finishing the new generator installation. 0915EB78-5CBD-4511-B864-53F721012620.jpegF81ADA02-6E52-4CC6-B89F-933F7E334AA1.jpeg
I made it able to swing out for servicing.
6027535A-8863-4765-8502-32543A8B7447.jpeg501EBB99-FEAD-4A4B-A1C4-A1ACFE24BCEC.jpegFreshly fabricated and leak tested 50 gallon gasoline tank. 0722553F-30DE-4221-A9E8-484896F47282.jpeg
Finale resting place for the tank. The gas cap is getting painted, that’s why it’s not on there.5E4C44CF-6086-48E0-A1C6-3F5BE112F9DD.jpeg
I even put a spark arrestor on there. But it’s definitely not needed the tail pipe is so long the exhaust is cold by the time it exits and it allows condensation and I get water droplets coming out.
 

Keith Knight

Well-known member
Steel Soldiers Supporter
708
1,478
93
Location
Wauchula, FL
So a couple days ago I go to open the passenger door and “SNAP” the door handle breaks. This same thing happened to me in the driver side 6 years ago right after I got it home. Back then there were no options so I replicated the broken piece, so I find myself doing it again. To add insult to injury while removing the door handle taking the locking rods off, BOTH of the plastic rod clips broke! Mid west sells some 3-D printed ones but not wanting to pay and wait I decided to make them out of delrin. 2E0A6B72-E651-42F0-BE91-E3D198978F6D.jpegThe red circle is the broken door handle part. E8AD1BDA-3586-4F6D-9E0A-062AB3F40B98.jpegThe beginnings of the broken part.
 

coachgeo

Well-known member
4,972
3,341
113
Location
North of Cincy OH
So a couple days ago I go to open the passenger door and “SNAP” the door handle breaks. This same thing happened to me in the driver side 6 years ago right after I got it home. Back then there were no options so I replicated the broken piece, so I find myself doing it again. To add insult to injury while removing the door handle taking the locking rods off, BOTH of the plastic rod clips broke! Mid west sells some 3-D printed ones but not wanting to pay and wait I decided to make them out of delrin. View attachment 887135The red circle is the broken door handle part. The beginnings of the broken part.
in a way you paid out your arse for all these parts already.... aka your wealth of tools and knowledge is what you paid already...... kudo's. Definitely would become an overtly cost to buy them now..... cause it would be like paying twice in your case if you did.
 
Last edited:

Third From Texas

Well-known member
2,704
6,327
113
Location
Corpus Christi Texas
Pretty slick ! Wish I had your shop. :)

I didn't like constantly replacing the NOS retainers (especially at $50/ea surplus value). I tried the metal rod keepers that the A1R came with. They are sort of like carb rod keepers from the 50's-60's. They worked but were a total pita to assemble in a tight space and after one failed on me I decided to seek out another alternative..

I decided to make a new rod in one door to test a theory and it worked better than expected.

I bent a little dog leg into the upper end of the rod that would allow it to be slipped into the hole, then twisted to secure. Then the bottom bend is like stock, but I made it a wee bit longer and threaded the tip. So assembly goes: slip rod into upper hole, twist to secure, poke other end thru latch hole, secure with lock nut.

Damned if it didn't work like a charm. No vibration, no rattle, no retainers to worry about, and can be removed/reinstalled with the twist of the retainer nut.

Here's a pic of the first prototype I was playing with to get the dog leg right. I had to double-up the thinner rood that I had on-hand so it wouldn't flex, but as ugly as it is it works and is so much easier to install/remove. Next adventure into the door will be to see just how many of the rods would accept this adaptation.

*this is the "door handle latch" rod which pushes UP to activate

20220806_175758.jpg
 
Last edited:

Keith Knight

Well-known member
Steel Soldiers Supporter
708
1,478
93
Location
Wauchula, FL
So here’s a question my power windows stop working months ago. Yes the cheap ones from Amazon….I’ve tried looking for a higher quality product but have come to the realization that I might just have to replace them every couple of years they’re cheap enough. But the question is I think I’m going to hook them up to 24 Vdc. I know they’ll run a light faster but will it be any stronger???
I hooked one of the old motors to 24 Vdc and ran it for about 3 minutes and it didn’t heat up or anything so I don’t see a big down fall. Any thoughts?
 

Keith Knight

Well-known member
Steel Soldiers Supporter
708
1,478
93
Location
Wauchula, FL
We finally finished the build and left out for our first trip in it. We left February 27 going out for two months and today we are in Ocoee National Forest on a lake front with drizzling rain so I have some downtime to post the progress. 8E59D594-54D9-4E96-949C-2091143ADD71.jpegF08840A4-2EC1-4D2E-B0F5-F4E6A2BB1988.jpegB28C0B26-4233-40C7-958D-BE17B530C3B6.jpeg851293E6-8FBC-4702-ADA0-00F720B6A2C1.jpeg
Test fitting accomplished now to take it all apart weld in a piece across the top of the bumper to give it some rigidity prep it for powder coating.
 

Keith Knight

Well-known member
Steel Soldiers Supporter
708
1,478
93
Location
Wauchula, FL
EBAE93EF-88DD-46EE-ACFC-90547F716A9E.jpegPulled the winch apart for painting.
D4FCC894-1059-47E1-98C3-3EA2226D1CC9.jpeg
I figured I should paint some other items while it was all apart.
C77E1424-F0B8-471F-882F-3BAA3B770AD0.jpeg
FE8DF02D-846F-4CBF-9774-7DB2F56D341E.jpeg
7811F608-117E-4BAC-8241-A6C7BD04A818.jpeg
BF19B08B-6872-4DA5-8BF8-F72246807E45.jpeg
Loads of fun trying to find just the right mounting position for the winch controller and that’s the wireless remote controller plugged in, inorder for the wires to reach but also miss the bottom of the grill when the cab tilts forward.
D99AF4B3-1C3B-4831-AC9E-C4B1D0EB2778.jpeg
Mounted the 500 amp fuse and the disconnect here and didn’t have to lengthen any of the provided cables on the winch. Also want the disconnect so the remote control or any RF signals accidentally do something with the winch.
 

Attachments

Last edited:
Top
AdBlock Detected

We get it, advertisements are annoying!

Sure, ad-blocking software does a great job at blocking ads, but it also blocks useful features of our website like our supporting vendors. Their ads help keep Steel Soldiers going. Please consider disabling your ad blockers for the site. Thanks!

I've Disabled AdBlock
No Thanks