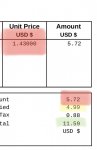
- 2,330
- 4,198
- 113
- Location
- Massachusetts
Steel Soldiers now has a few new forums, read more about it at: New Munitions Forums!


Thank you’ll , I went ahead with Kurt’s suggestion and a few from Amazon. I ordered a few extra (4) . Shipping and all was around $11 not to bad . I will post when they come in - let everyone know which work best.19320-100 | Technology Research Corp
tecrescorp.com
Looks like TRC is still in business. I could not find the bulb cover on the drawing. Contact info here: https://tecrescorp.com/contact-us
After looking closer at Kurt's suggestion, I think I'd go with a Digi-Key order before calling TRC......
definitely planning on using glue on whichever matches best, already have it ready.People. I wrote you that it was a non stocked part. The fault indicator was a pluck and chuck item. No repairs. The red lens you bought might fit in the hole. Better use glue.
")
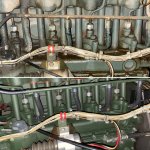
Take a dremel and cut the metal crimp long ways. Then take a flat head screwdriver to seperate the metal crimp and pull off. Be careful not to cut all the way through the hose because you don't want to cut the brass hard line. Also take it off the fuel filter housing so you can work with it. For future reference, it's alot easier to pull off with the entire hose still attached.how have you guys removed these crimped lines?
I’m having some trouble at this point. I already removed allot of the other stuff. It’s Moving along well excerpt these.
I have a quick question about original equipment/ grounding the gen set. This weekend, I have a master Electirican coming to show me safety procedures and take a look around the panel for future interlock.Yeah all of the soft lines you have photographed need to go. You can go with the OEM Contitech stuff, or go with Gates 27000 1/8" fuel line (available on the spool at a lot of local auto stores). Use hose clamps wherever possible on the primary lines, and little zip ties up on the returns.
Edit: And definitely if you have the roof off to do the return lines, take the side panel off near the separator so you can attack it with minimal swearing.
Open to read commentsI have a quick question about original equipment/ grounding the gen set. This weekend, I have a master Electirican coming to show me safety procedures and take a look around the panel for future interlock.
But, in the lead time im doing a little research thru TM, youtube and SS posts .
But, the (3) 3’ rods bolted to the generator frame - I assume are for grounding - along with 3 joints to connect the rods + and solid cable . The cable has two ends, one is open. The other has a “tab” or connection end. (You do not have to use the "Tab". Most people just remove it and stick it in the ground stud. The other end is help in place by the ground rod wire clamp. Correct. You can use a ground wire with isolation. The army rarely bought that. Bulk wire, uninsulated. ) I noticed everyone’s post and videos always have colored flexible electrical wire
(not sure of the technical terms)
my question is , will he be able to utilize these fittings and accessories to ground my generator. (Of course!)
I also have an alternate slide hammer ground rod I picked up.
Messaging with @Guyfang , he gave me some solid advice . I only intend to use the units convenience receptacles for now .
Howdy,I have a quick question about original equipment/ grounding the gen set. This weekend, I have a master Electirican coming to show me safety procedures and take a look around the panel for future interlock.
But, in the lead time im doing a little research thru TM, youtube and SS posts .
But, the (3) 3’ rods bolted to the generator frame - I assume are for grounding - along with 3 joints to connect the rods + and solid cable . The cable has two ends, one is open. The other has a “tab” or connection end. I noticed everyone’s post and videos always have colored flexible electrical wire
(not sure of the technical terms)
my question is , will he be able to utilize these fittings and accessories to ground my generator.
I also have an alternate slide hammer ground rod I picked up.
Messaging with @Guyfang , he gave me some solid advice . I only intend to use the units convenience receptacles for now .
FinishedYeah all of the soft lines you have photographed need to go. You can go with the OEM Contitech stuff, or go with Gates 27000 1/8" fuel line (available on the spool at a lot of local auto stores). Use hose clamps wherever possible on the primary lines, and little zip ties up on the returns.
Edit: And definitely if you have the roof off to do the return lines, take the side panel off near the separator so you can attack it with minimal swearing.
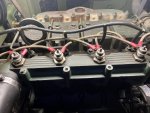
 ! (Just Need zip ties) thanks for everyone for the advice on methods and techniques. A dozen toothbrushes and close to a gallon of degreaser (and stovebright). Some of my hose connections may be a little to long (first time doing this) pushing the hose into the plastic connections was killer at first (even with a little diesel) then I started wiggling pliers back and forth , that helped.
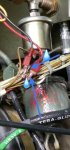
 MEP803a new to me, is leaking diesel. I filled with a little diesel (all I had on hand)
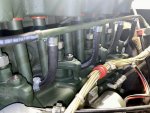
hit the dead crank switch, turned the master switch & it runs nice . except it was covered in diesel after I turned it off. (oil filter side only)
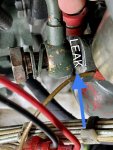
I plan to clean her up and pinpoint the leak, thought I’d ask: Any idea of where the problem is coming from?
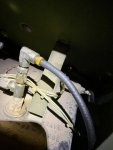
Also does anyone know where to get replacement light covers for the fault indicator panel ?
I have a few missing (see photo)
Ok thank you ! Much appreciated.Looks great!
As an FYI, the Stove Brite paint needs to be heat cured by running the engine at temperature. It will not be very resistant to fuel spills or other chemicals until it is cured. The details are listed on their data sheet , but I learned it the hard way... so just be careful until you have a chance to run it for a while.
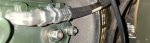
It sure doesn’t , this is the only line I did not replace. When I started the set I found a leak that just barely dripped onto the paint and took it right off .Looks great!
As an FYI, the Stove Brite paint needs to be heat cured by running the engine at temperature. It will not be very resistant to fuel spills or other chemicals until it is cured. The details are listed on their data sheet , but I learned it the hard way... so just be careful until you have a chance to run it for a while.
 to take off .
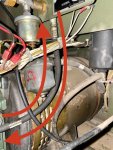
| CROSS-SECTIONAL SHAPE STYLE | ROUND | |
| THREAD CLASS | 2B 1ST END | |
| THREAD DIRECTION | RIGHT-HAND 1ST END | |
| INSIDE DIAMETER | 0 47/250 INCHES NOMINAL | |
| TEMP RATING | -45 DEG FAHRENHEIT AND 302 DEG FAHRENHEIT SINGLE RESPONSE | |
| OUTSIDE DIAMETER | 0 1/2 INCHES NOMINAL | |
| MINIMUM INSIDE BENDING RADIUS | 3 INCHES | |
| CONNECTION STYLE | SWIVEL NUT FLARE 1ST END | |
| END CONNECTION DESIGN | STRAIGHT 1ST END | |
| CONNECTION TYPE | THREADED INTERNAL TUBE 1ST END | |
| BURST TEST PRESSURE | 12000 POUNDS PER SQUARE INCH | |
| LAYER COMPOSITION AND LOCATION | 1ST LAYER BRAIDED STEEL WIRE AND 2ND LAYER BRAIDED POLYESTER CORD AND OUTER LAYER MOLDED RUBBER, SYNTHETIC | |
| MAXIMUM OPERATING PRESSURE | 3000 POUNDS PER SQUARE INCH | |
| NOMINAL THREAD SIZE | 0 219/500 INCHES 1ST END | |
| SEAT ANGLE | 37 DEGREES 1ST END | |
| HYDROSTATIC TEST PRESSURE | 6000 POUNDS PER SQUARE INCH | |
| INSIDE SURFACE CONDITION | SMOOTH | |
| MEASURING METHOD AND LENGTH | 16 INCHES NOMINAL OVERALL | |
| PROPRIETARY CHARACTERISTICS | PACS | |
| THREAD SERIES DESIGNATOR | UNF 1ST END |
This area is the source of my diesel leak. I must be reassembling this incorrectly, or it’s defective and been the culprit all along .Howdy,
You would be better off going to a local hardware store and buying a 8ft ground rod. The ground wire can be any type. Solid, braided, bare, or covered.
NOTE: hooking to your house, your electrician will want 4 wires connected, and bonding strap disconnected.
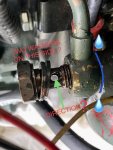
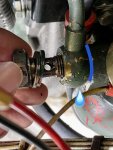
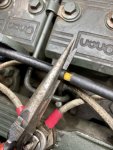
OkayYou want 1 washer on each side.

If there is ever a question on assembly order, thats where the respective -24P manual shines.Okay

Ok I see , perfect ! Thank youIf there is ever a question on assembly order, thats where the respective -24P manual shines.
View attachment 858795
