- 2,200
- 3,384
- 113
- Location
- Florence, SC
Subscribed for updates!
Steel Soldiers now has a few new forums, read more about it at: New Munitions Forums!


I agree. This is what makes the difference between a good job and a great job. You do a great job and never forget to have fun with it. It’s a hobby and hobbies should make you happy. Setbacks are here to learn and to think about what we do and how we could do better next time. No setbacks no progress. Easy. Take care. Be safe.shrink·age
[ˈSHriNGkij]
NOUN
This is the word of the week. It has cost me some time and effort, but it will not stop me. The door jambs were thoroughly sanded and cleaned and all the seams in the door jambs and on the doors were caulked and allowed to dry. They were primed sanded again and sealed. I then top coated all the jambs. That was over a year ago. When I put the M1009 back in the work bay on Monday and opened the doors I could see small cracks in the topcoat and gray lines in the sealer. I could have ignored them and brushed a thin coat of green on them. But NO, I had to grind out the sealer and scuff sand the entire door jamb areas. Do it right or don't do it at all. Last night was a busy night hand sanding and spending money.
- the process, fact, or amount of shrinking:
I dropped off the 5 wheels at the tire shop and went to pick up body shop supplies. A gallon of Rage filler is $125. and the light finish filler is $50 a tube. I bought Genuine 3M seam sealer this time. I knew better and used a sealant caulk because I was short on supplies last year. Now I do it all over again. I am smiling and making it right. No pictures today. After spending $1800. yesterday on my project I think I will just take a day off after work and go out and dine. Friday is another day. Take Care and Be Safe. And as I always say. "Do it right the first time" and no half fast work is acceptable.
 I am not sure you can see them, but they are there, and I have hand scuffed the entire jamb and inside of the doors. Practice makes perfect or at least extra effort. I picked up the new tires and placed them in the storage area till they are needed.
 That was an expensive night out. But these tires look great on my Trail Boss and I am sure they will look great on the M1009. Take Care and Be Safe. I have a work weekend planned but not on the CUCV. I have my rock crusher project I need to dedicate time to also. I have a lot of time and money in that project, and it does me no good setting apart waiting for paint. Progress is a time-consuming job.


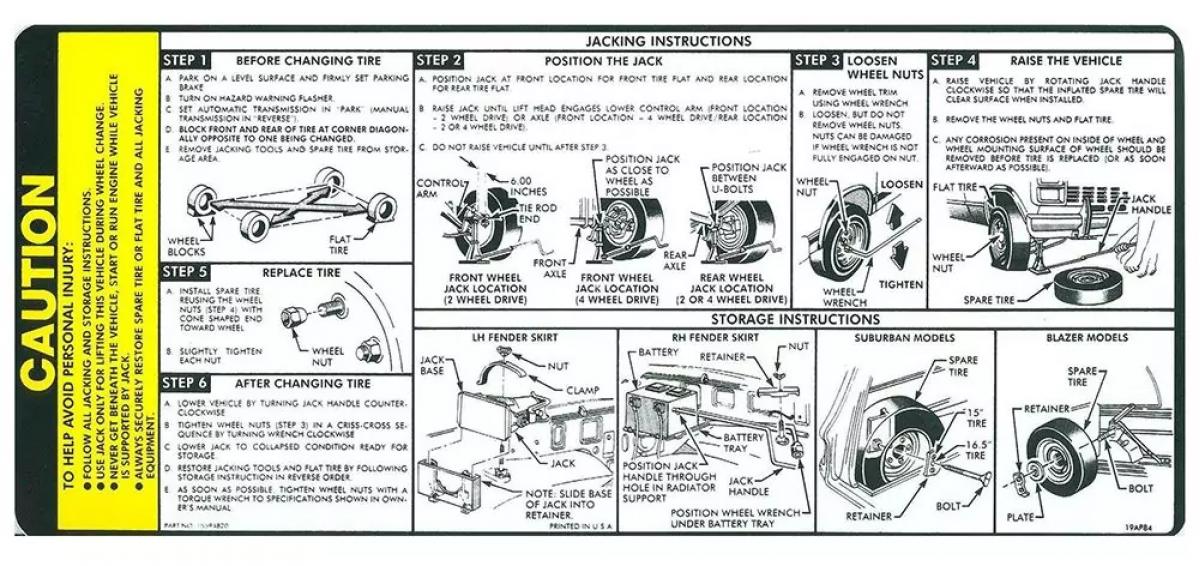
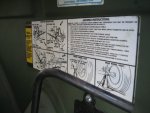
 I am not very proud of the jacking instructions decal. I am still searching for one.
  I am proud of the condition of the floor and cargo area.
 www.musclecarsandclassics.ca
A little squirt of WD-40 and some elbow grease will clean up that jacking decal like new.Just a few sneak peeks of my progress. It has been a long-drawn-out job and I am not completed yet. Someone brush painted CARC in the cargo area and was very sloppy about it. They sprinkled non-skid grit in it and that made a real mess. I have been digging, sanding, wire brushing my way thru that poor job they done. I started a few years ago and I am still at it. Really. I will paint no floor until I think it is ready for paint. LineX would have been easier. But who wants easy? With a floor this nice I want to paint it and flaunt it. View attachment 900148 View attachment 900149 View attachment 900150 View attachment 900151 View attachment 900152 I am not very proud of the jacking instructions decal. I am still searching for one. View attachment 900153 I am proud of the condition of the floor and cargo area. View attachment 900154
Thank you for looking and Be Safe. I am determined to get this project as perfect as possible.
Just what I need. Oils and silicone all over a sanded surface that I am ready to paint. I can just ignore it and cover it or scrape it off and paint it. I never needed a picture to show me how the jack, tools and tire needed to be stored. But I do want it as original as possible. I am looking at other options. i wish i could find a clean decal to get a picture. Thank you, Doug but I think the WD40 is not a valid option.A little squirt of WD-40 and some elbow grease will clean up that jacking decal like new.
RickJust what I need. Oils and silicone all over a sanded surface that I am ready to paint. I can just ignore it and cover it or scrape it off and paint it. I never needed a picture to show me how the jack, tools and tire needed to be stored. But I do want it as original as possible. I am looking at other options. i wish i could find a clean decal to get a picture. Thank you, Doug but I think the WD40 is not a valid option.
 I suspect the windows leaked a bit like most M1009's do. The silicone sealer had great adhesion and was a challenge to remove. After trying several easy ways that were a danger to the fiberglass surface, I went with a plastic razor blade and that failed. The small 3M rolock discs were too abrasive and ate into the fiberglass quickly.
 My final solution was a blunt straight screwdriver that had a square unsharp end on it. After a few attempts I was mastering the caulk removal.
  I found the perfect tool in my arsenal of tools.
  After I had both of the side windows clean and sanded smooth in the jams I moved to the front roof seal.
 That was a bit more challenging. I have been by myself all day and with the top setting up right it was not as easy. I made do with the situation and removed that seal and cleaned it as well as I could in this position.
  I have a lot of work to do here, and this is something that needs to be completed and gets me away from the mindless sanding of CARC paint. I more than likely sanding more then I must but when the new paint is on, and I see a spot that should have been sanded better it is way past that time to fix it right. It rained heavily last night and washed the sanded top off well. I will stay on task and get this sanding of the top and interior completed by weeks end. It is my goal. The side window jams are sanded and complete and now I must move to the rear window seal and top area. That seems to be CARC less.
 Oh Joy. Take Care and Be Safe. See you in church.
 I I will take that out when I recover from sweat blindness. I mowed grass and split wood today also. The camera lense is even fogging up as it was in the house in the A/C. The back is completely sanded.
  I removed the brake pedal and the e brake pedal assembly. Why would I have gone thru all this and looked up under the dash to see this horror.
  I will clean and paint everything as it is being installed. The wiring harness will look like new after a good cleaning and all the connections cleaned and greased. The steering column can be rebuilt, and everything cleaned and serviced.
  I left the wiring harness attached to the steering column so if I need to I can plug in the bulkhead connector and start the vehicle. I will say it sure made taping up the interior a lot easier. I don't have to tape up anything. I can even remove the 4WD shifter that I cleaned, sanded and painted. That was easy. I could not even get tape to stick onto the dash edge to cover it. the dust and flat paint made that a mess.
  Thanks for looking. I have lots of work to do. I should have done this from the get/go. Be Safe. See you in Church.