• Steel Soldiers now has a few new forums, read more about it at: New Munitions Forums!

  • Microsoft MSN, Live, Hotmail, Outlook email users may not be receiving emails. We are working to resolve this issue. Please add support@steelsoldiers.com to your trusted contacts.


M1009 Wheel bearing servicing and hub replacement

top_prop

Member
243
8
18
Location
Suffolk, VA
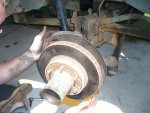
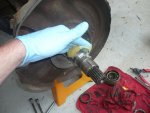
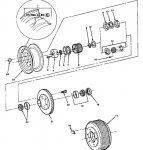
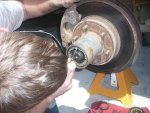
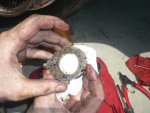
Well Shade_tree and I finally finished servicing the front wheel bearings and when we did the second one I took pics... please review the TM... this is only meant to serve as a pictoral illustration of the information found there.

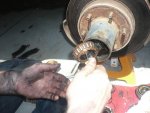
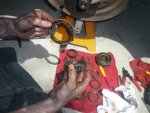
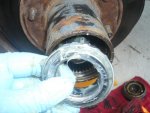
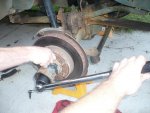
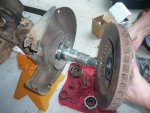
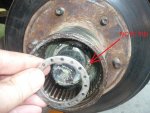
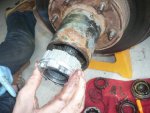
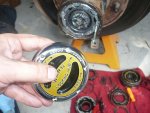
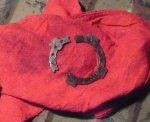
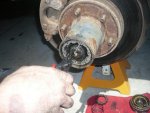
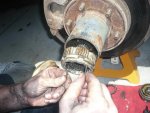
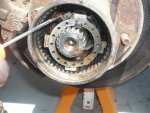
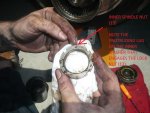
We found the retaining washer for the spindle nuts broken on the front left so I ordered Warn replacement nuts and washer (WARN Manual Hub Spindle Nut Kit 32720) and while I was at it bought premium hubs and put those in as well. I'll sometimes refer to things per their number as in the TM exploded view (figure 97 of -20P) below as well... FYI my m1009 had 19spline hubs....

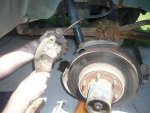
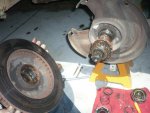
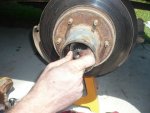
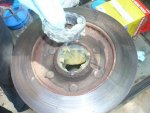
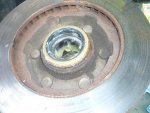
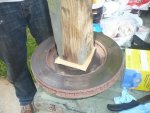
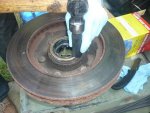
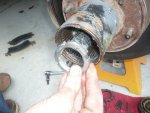
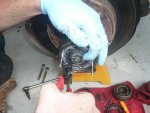
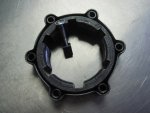
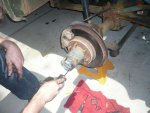
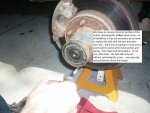
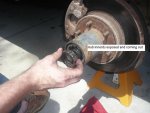
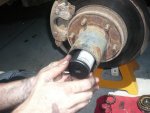
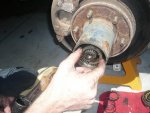
Again, review the TM... First remove the wheel and then the hub (-20 section 8-3) by removing the six torqs head screws (3) holding it on:
 

Attachments

Last edited:

top_prop

Member
243
8
18
Location
Suffolk, VA
We then decided to remove the hub body's(#8 ) innerds, though it is not really necessary as they will come out all together...

Then pry out the outer snap ring (7) {its just a round wire with a break in it, that engages and sits in the outer portion of the hub]... its a little tricky to get out, but we did just fine using a couple picks.
 

Attachments

Last edited:

top_prop

Member
243
8
18
Location
Suffolk, VA
Then the inner snap ring (5) comes out with standard snap ring plyers allowing the inner hub body ( 8 ) to come out... I don't think my 1986 M1009 had parts 9 nor 10 unless they were somehow in the inner hub body... and I know it didn't have a washer behind the snap ring as depicted in section 8-4 (pg 8-6) of the -20 ... anyways notice we used the hub screws to help with managing the hub body
 

Attachments

Last edited:

top_prop

Member
243
8
18
Location
Suffolk, VA
Now here is where an 84 will differ from all other m1009's.... they had 6 lug spindle/bearning nuts... depicted as 14... where as all others had 4 lug nuts 11 & 13 like you'll see here... I picked up the spindle nut socket in the tool isle at Autozone... I've seen similar with the tools at O'reilys for the same price as well... it listed tons of vehicles it would fit... 80's blazers and chevy 1/2 ton pickups were on the list.

(If I was working on an 84, I'd buy the Warn kit I used and replace the #14 set... as I understand it the 85 and on system is what all DANA 44 front axles and most other corperate 10bolt axels use)

Anyways, we were careful to be sure we'd engaged the 4 recesses in the outer nut (11) and removed it with a big breaker bar then pulled the lock washer (12) out with a pick. Note: the OEM lock washer (12 'washer key' ) has four outward lugs to keep you from putting the socket on the inner nut without first removing the lock washer. The warn kit I bought and other replacements I've seen do not have the tab, but would keep you from removing the inner nut due to their size... it would be bad if you tried to take the inner nut out with out removing the lock washer.

(Remember on my left axle this nut was broken and that's why I bought a replacement warn kit. The GI who put this together many moons ago probably broke it and over torqued the bearings... the wheel was getting hot, though the brakes may have been hanging up too... I'll never really know.)

We then put the socket back in and took out the inner nut... note it has a protrusion that locks it to the lock washer... this is important during installation!
 

Attachments

Last edited:

top_prop

Member
243
8
18
Location
Suffolk, VA
Next we removed the break caliper by removing the two allen head drive bolts... my 8mm allen was to small.. the 10 mm was to big... and that was all my metric allen drive kit had... luckily Shade_tree had a 3/8" and it fit perfect! :)

We also took the opportunity to replace the pads. It would be a great time to replace the caliper should you desire as well.

The disc now will slide easily, but we didn't take it off just yet... we removed the outer bearing, then placed the outer spindle nut (11) back on the threads a few turns (remember the outer nut doesn't have the protrusion). Then pulled the disc off the spindle leaving the inner bearing and seal on the hub... this drastically simplified their removal from the disc... making it a simple removal of the nut and the bearing/seal from the spindle.
 

Attachments

Last edited:

top_prop

Member
243
8
18
Location
Suffolk, VA
Be sure to clean any remnants of old grease and the seal from the spindle, the disc, and the bearings. Again read the -20 TM...

We used a bunch of brake cleaner and shot it on the bearings over a shallow container that caught the waste and was reused for dunking to get all the grease off. And we didn't break the races apart like the TM said... seemed to much work and the Chiltons/Haynes said to clean them with solvent, and dry them with compressed air, but be sure not to spin the bearings with the air unlubed. What ever you do, take your time and get all the nasty stuff out and then put nice new fresh heavy duty lithium grease back in....

Sorry no pictures as this was nasty dirty business... :)

Then it was time to repack grease in the bearings once they were clean and dry (read the TM).... we just put on clean gloves and got fingers full of new lithium wheel bearing grease and worked in in the races from both ends and from the gaps around the roller bearings...

Next we lubed the disc before we set the inner bearing, then placed the new seal on top of it and used shade_trees custom cut 6x6 to start seating the bearing, with cardboard above to keep contamenants out of the new grease and freshly packed bearing, and then we finished the seat by tapping the outer portion of the seal with his 'fine tuning' bearing seating deep wall impact socket... make sure you get the seal flush with the disc!
 

Attachments

Last edited:

top_prop

Member
243
8
18
Location
Suffolk, VA
Once done we noticed we'd gotten some more grease on the disc... that is bad for breaks, but break cleaner aint good for grease... so we shot it on a rag and wiped and wiped until it was clean... one of us put on new clean gloves (having a box of them helps work clean... you just take them off and replace them when needed)

Remember this will be your last opportunity to easily clean the inside face of the rotor disc... get the grease off now!

Then we lubed the spindle and set the disc back on carefully not wanting to damage the new seal...

then the new inner spindle nut went on (with the protrusion out!) and got torqued to 50 ftlbs per the -20 (spining the disc while tightening to evenly seat the bearings)... then backed off, retorqued, then -backed off- until its protrusion lined up with the closests hole in the lock washer.

Its important to emphasize the inner nut gets 'backed off' because you don't want any more than 50 ftlbs torque on the bearings... less is better, but not so much the bearing is lose...

Then install the outer spindle nut and torque to 160 ft lbs per the TM.
 

Attachments

Last edited:

top_prop

Member
243
8
18
Location
Suffolk, VA
Next we smeared fresh grease on and put in the new warn premium hub assembly, the outer snap ring, and threaded a new hub bolt in and checked for a little play (per the warn instructions)...

note the pick is in the grove in the picture below is where the snap ring will go next... if the grove is not visible, just reach behind the wheel assembly to the u joint and push the axle towards you...

once the inner snap ring is in, set the hub to free and then put the locking cap back on... then the break caliper (again make sure the disc is clean!).

Once the wheel is on you can test and see if it locks as well.

Always consult your tech manual!


Hope this has helped someone!

Tom
 

Attachments

Last edited:

Recovry4x4

LLM/Member 785
Super Moderator
Steel Soldiers Supporter
34,014
1,814
113
Location
GA Mountains
Good write up, should help quite a few people. FWIW the 4 tits sticking out of the lock washer are used as part of the auto locking hubs IIRC.
 

AceHigh

Well-known member
2,175
29
48
Location
Princeton WV Lake City FL
I started on the front bearings of my 1009, this is a great write up but I ran into this 6 prong spindle nut with a jack screw key instead of the 4 prong. I can't find a 6 prong tool so I am going with the hammer screwdriver method, it is working so far.
 

Attachments

wallew

Active member
Steel Soldiers Supporter
2,520
18
38
Location
San Angelo, Tx USA Planet Earth
AceHigh,

I got my socket at O'Reilly's - or maybe Checkers

For about $20 - $25

late last year - you REALLY need one of these if you are going to own CUCV's, you will use it many times in the coming years

EDIT - and I gotta say that is well written and documented thread on a very useful topic

YOU SHOW HOW EASY IT REALLY IS - ya just gotta take your time
 

AceHigh

Well-known member
2,175
29
48
Location
Princeton WV Lake City FL
Thanks, Wallew. I plan to get the socket, but there is not one here in this county. Bigger 6 points, but not this one. I sure don't mind acquiring the proper tools, my problem is finding them once I own them!
 

top_prop

Member
243
8
18
Location
Suffolk, VA
Thanks, Wallew. I plan to get the socket, but there is not one here in this county. Bigger 6 points, but not this one. I sure don't mind acquiring the proper tools, my problem is finding them once I own them!
\

looks like you got the '84 six lug that I've only read about... Why not just buy the 4 lug hub nut system and retrofit it... you could buy the warn like I did, and there are others out there...
 
Last edited:

mr.travo

Member
422
0
16
Location
Comfort, TX
Top-prop, you the man!!!! Can we have a CUCV "How to" section and make this a sticky in there? The write up was so good and detailed. I will be doing this in the next month or so and have never done it before. I will be printing this all out and putting it in my personal reference manual.

Thanks for the write up brother!
 

mktopside

Banned
467
6
0
Location
Gainesville, Va
I started on the front bearings of my 1009, this is a great write up but I ran into this 6 prong spindle nut with a jack screw key instead of the 4 prong. I can't find a 6 prong tool so I am going with the hammer screwdriver method, it is working so far.
Ruh roh.... You bought a CUCV? Welcome to the club..... Call me when you get fed up and decide to drive your A3 over it. We drive over mine at the same time. Lol
 

top_prop

Member
243
8
18
Location
Suffolk, VA
Top-prop, you the man!!!! Can we have a CUCV "How to" section and make this a sticky in there? The write up was so good and detailed. I will be doing this in the next month or so and have never done it before. I will be printing this all out and putting it in my personal reference manual.

Thanks for the write up brother!

Thanks for the kind words.... but there wouldn't been any thread like this if I didn't have a good friend like Shade_Tree who pitches in and gets it done. He just helped me bypass a mech pump on a civie truck today!

Shade_tree doesn't talk much... and posts even less. :wink:
 

jdeoliveira74

New member
744
2
0
Location
wilmington nc
top great write up. although I am confident I can do mine. My place is a sand pit so I am going to have to bring mine to the mechanic which sucks cause he is gonna charge me my first born i am sure!
 
Top
AdBlock Detected

We get it, advertisements are annoying!

Sure, ad-blocking software does a great job at blocking ads, but it also blocks useful features of our website like our supporting vendors. Their ads help keep Steel Soldiers going. Please consider disabling your ad blockers for the site. Thanks!

I've Disabled AdBlock
No Thanks