Maintnace and modifications
These 2 items are highly recommended to get when it comes to maintenance and modifications. But, be for warned that they can be very difficult to get, and possibly expensive. But they are an absolute life saver for the M1070 owner. First is the proper DDEC reader/computer straight from Detroit diesel WITH ALL of the unlock keys and codes. The reader shouldn't be to difficult to get, but you might have to cut threw red tape and jump threw hoops in order to get the keys and codes. Second thing is the expanded wiring diagram.
Back when the 92 series was an over the road power plant, it was a common though that "if its not leaking, something's wrong!" The fact is this couldn't be farther from the truth. The only oil that should drip is a very slight drip from the slobber tubes, the tubes for the Crank Case Ventilation system, or CCV. And in most cases, a properly running engine shouldn't even have drips from there. We have found that using full synthetic engine oil, transmission fluid, hub and differential lubricants by far out perform regular lubricants.
Starting at the air intake, good filtration of the air is key to making good power and protecting the turbo. Its highly advisable to thoroughly blow out the air filter, from the inside out using a compressed air source other than the truck, after every trip, or at every rest stop. The higher pressure the air, the better. This will also cut down on the amount of money spent on replacing air filters. Be sure to keep the air filter box seal free from rolls, rips and tears. This item will compress permanently over time so it should be replaced in order to keep a good seal. NOTE: when tightening down the bolts on the filter, DO NOT OVER TIGHTEN! Its extremely easy to brake the studs off, and the only way to replace them it to get a new air box. There is an up date service kit that includes a closure ring with 4 hand nobs and only needs 4 of the studs to close/seal properly. If you come across this item, GET IT! You can thank me later. It's also a good practice to blow out and clean the air box assembly on occasion. The vortices it creates from the "air scoop" going on the air box its self stores dust and solid particles in areas the eye cant see.
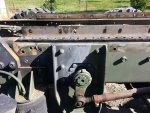
On the back side of the upper air box is a flexible tube. The other end of this tube is attached to the exhaust stack. On the air box side, there is a flapper valve that doesn't create a very good seal new, and over time the return spring goes bad. Due to this, it acts like a crude Exhaust Gas Re-circulation system. Taking in solid particulate matter and soot is going to damage turbo seals, sand blast the inducer wheel blades, and continues through the internals of the motor. We have found that by deleting or bypassing this, it cuts down on over all maintenance issues by 60%. First remove the hose clamps on the tube connected to the air box, and the connector that is connected to the air box. Pull the tube off the collector and the collector off the air box. Remove and discard the cotter pin, return spring and flapper from the air box. what's left is the 2 ears that held the cotter pin. You can break these off. I at this point sand what's left smooth, but not necessary. I've used JB weld putty and a piece of duct tape. Cover the hole in the air box with a piece of duct tap, but don't overly cover it. The duct tape is just there as a backing piece for the putty. completely cover the hole and the duct tape with the putty, ensuring you spread it out trying to get as much contact with the air box as possible. After curing, you can now sand the putty smooth if you like, again not necessary. You can leave the parts removed off, or re-install them for a stock looking appearance. If you decide to do the latter, I would recommend covering the hole in the coupler that goes in side the tube. I use duct tape and aluminized tape to not only seal the opening, but to act as a thermal barrier. The next step is to block and seal the exhaust side of the tube. Getting on the cat walk, you will see hose attached to the bottom to mid portion of the exhaust stack. Remove the hose clamp, and cover the opening on the exhaust pipe. Again, I first use aluminized tape, then Duct tape, and one more layer of aluminized tape; re-assemble.
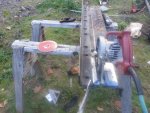
The turbo intake tube, also called the turbo mouth piece, is attached to the air box and the turbo with T-bolt clamps. Under heavy loads we have experienced blow offs of ether end of this tube. This has been researched and studied and fond that the cause of this situation is a combination of engine vibrations and harmonics, and jarring/road vibrations. Causing the bolt to back off. We replaced these clamps with wider, stronger clamps that have locking threads on the bolt and eliminated this situation. It's suggested you do the same.
The drivers side exhaust manifold gasket for some reason is prone to leaking at the first exhaust port (farthest port forward/closest to the front of the vehicle). Red River Army Depot, Oshkosh defense, or Detroit Diesel have no known fix for this besides replacing the gasket.
The turbocharger is a Borg Warner unit from what I recall. Its got a .80 A/R, and is rebuild-able. Common failure is the inducer wheel blades leading edges being "dulled" by solid particulates being ingested. See above statements about good filtration to remedy this condition. Another common failure is the turbo seal going bad, allowing engine oil to leak past it and in worst cases, causing a runaway. The only known fix for this is to rebuild the charger with the upgraded center section; a ball bearing unit. This part DOES NOT have a NSN or part number through the TAMMS or any other ordering system through the DOD. But it can be purchased through Detroit Diesel, Borg Warner, or marine engine service and repair retailers. It is also through these outlets that you can get the rest of the hardware and replacement parts for the turbo rebuild. This engine is also equipped with a roots style supercharger. The only common issue the failure of the drive-shaft. This supercharger is not belt driven like most applications. Rather, its shaft driven from the camshaft. The drive shaft has about the same diameter as a standard No. 2 pencil. The only known cure for this is to replace when failure occurs. The symptoms for a shaft failure is low power out put and thick black smoke out of the exhaust under any load, and it doesn't clear up.
The above stated problems are the only most common issues in the drive train. There are other problems that do arise, but I cant possibly cover them all. There is an army wide though that the HET is the biggest POS in the army's inventory. This reputation is caused by operators that don't take care of their assigned vehicles. I'll admit that its a huge task to stay on top of preventive maintenance, and having a close attention to detail on all the systems and services. For example, there are a lot of lubrication points on this vehicle. And unfortunately, 75% of all HET operators will over look them due to pure laziness and no motivation. But ALL of these lube points need to be greased at least every 3 months. And as the proud owner of a FMV HET, lubing these points and replacing ball joint seals and other seals and bushings will save the owner tremendous amounts of money in the long run.
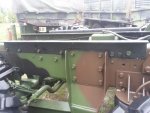
The dog house, what basically is the equivalent of a civilian center console on steroids, houses virtually all the solenoids and circuit breakers. The breakers are all on the drivers side, and the reset buttons are labeled with a data plate in the corresponding location of that breaker. The little white buttons, when pressed, will re-set the breaker if that white button is extended. The top of the dog house is removable to gain access to the breakers them self and the solenoids. The top of the dog house comes off in 2 pieces. Being made of flimsy sheet steel, more likely aluminum, can bed and flex easily if you lean on it, or if heavy objects are placed on it while driven; think radio mount, 2 radios and applicable equipment for communications. If this bends to much, witch isn't much to begin with, it can and will short out the solenoids under it; the most common one being the starter solenoid. In Iraq, we replaced the cover with diamond plate aluminum. This material is significantly stronger, easily cut and machined for a perfect and totally custom fit, and easily drilled to be secured in the factory location using factory hardware. Another advantage is a 1 piece design and personal placement of equipment for easy use. I would recommend the owner do the same of something similar.
The M1070P1 (up armored), is equipped with a very effective A/C system. Yes its a huge pain the butt to completely install. But in the heat of Texas, Iraq, and Afghanistan is a huge life saver and combat multiplier for the troops. If one chooses to install this, please be aware that its going to almost completely take away the storage ability of the bottom part of the dog house, and is going to require ether a new dog house door or cutting of the dog house door for the rear vents. But, this system is extremely efficient. Example; when I have passengers, I ensure I leave a heavy blanket or sleeping bag for them to use, it WILL give rear seat passengers frost bite on their knees from prolonged exposure. In the July heat of Iraq, running heavily loaded for more than 6 hours straight, my rear seat passengers could see their breath and were shivering. The rear vents have a sort of tray that guides the A/C air in to the vents. It has a slight down ward angle and gradually narrows as it gets to the fan/discharge. Its common practice to place drinks in the tray (as long as they aren't small enough to roll in to the fan. standard side soda cans and above are ok) to keep drinks cold. We also place the rest of the drinks (24 pack of soda and things of that dimensions) in the dog house its self to keep them cool as well. a word of caution though, don't reach to far in to the vent while the fan/A/C is on, the fan will slice up your fingers with out a problem.
The advantage of having the DDEC computer is that it can tell you any faults or issues that are present, but not sever enough to cause and warnings or check lights to come on. Things such as low voltage from the charging system, low engine oil level, high or low boost pressures, exc. Also, depending upon what version of the system the truck has, it can also give you fuel mileage data and other interesting information.
There is a lot of electrical wiring and systems. Thus it makes life so much easier when trying to trouble shoot electrical issues if you have an expanded wiring diagram.
If there ever comes a time to pull the motor, take that time to track down any electrical issues and air/fluid leaks that weren't noticeable while the motor is in the truck, or weren't accessible with the motor in the truck. also take this time to delete any electrical and fluid passages/systems that are not needed. This motor was used in various other pieces of equipment and thus were all made with the systems in place so any engine can go in to any other vehicle that used the 8V92 motor. I personally experienced in Iraq when the motor of my truck needed to be pulled for other issues. after doing what is stated with in this paragraph, the motor ran 90% better, smoother, more fuel efficient, and with more power than before.
If the time ever comes, and I hope not, the block is sleeved and each sleeve can be replaced. The same holds true for scheduled over hauls.
Next I will cover deeper in to modifications for power, economy and crew comfort/user ease.


 84.2 KB Views: 128