• Steel Soldiers now has a few new forums, read more about it at: New Munitions Forums!

  • Microsoft MSN, Live, Hotmail, Outlook email users may not be receiving emails. We are working to resolve this issue. Please add support@steelsoldiers.com to your trusted contacts.


M656 steering rehabilitation

sangamon

New member
49
0
0
Location
Seattle / Blaine
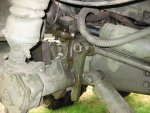
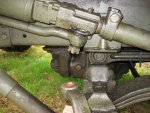
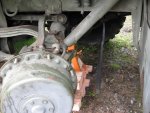
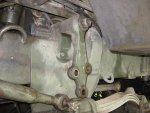
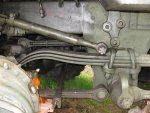
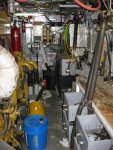
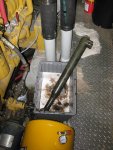
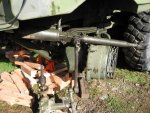
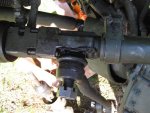
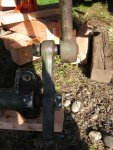
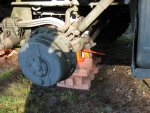
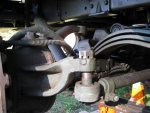
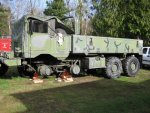
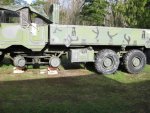
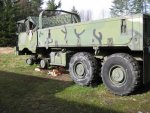
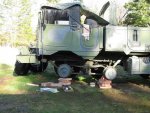
[FONT=Liberation Sans, sans-serif]I've started my project to loosen up the steering on my M656. This will reduce the torque required to move the tie rod ends from 100+ foot pounds to about 10 foot pounds. Since there are eleven of these ends, they add up to a lot of torque resistance. The two main external symptoms are very stiff steering, and wandering as the joints suddenly move as the force builds. I haven't put a torque wrench on anything yet. However, trying to move a six or seven foot long tie rod with one end still attached was very difficult.[/FONT]

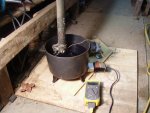
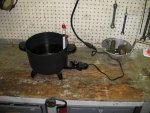
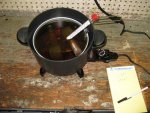
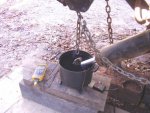
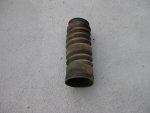
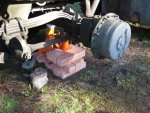
[FONT=Liberation Sans, sans-serif]There are eleven tie rod ends that need to be removed. Then, the ends are heated for four hours in 280 degree oil. This technique was developed by cranetruck.[/FONT]

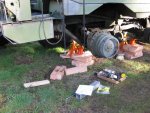
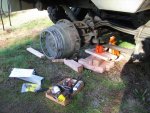
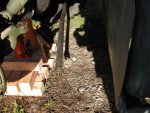
[FONT=Liberation Sans, sans-serif]I have attached a variety of pictures that I took during the first part of the project.[/FONT]

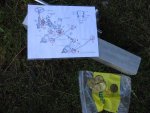
[FONT=Liberation Sans, sans-serif]The first picture is the steering diagram from the tech manual with the rod ends circled (thanks to cranetruck), with my numbers. I use this diagram to tag each end for reassembly.[/FONT]

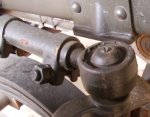
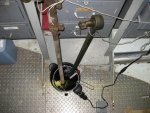
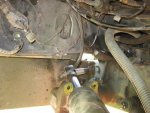
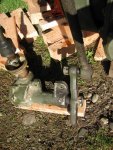
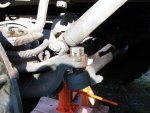
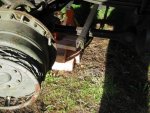
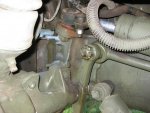
[FONT=Liberation Sans, sans-serif]I was able to “easily” loosen numbers 3, 4, 5, 6, 7, and 10. I used a pickle fork (KD Tools 3316), along with side-tapping, and end tapping. The easiest only took three taps with my hammer.[/FONT]

[FONT=Liberation Sans, sans-serif]I have not yet tried number 1, which connects the steering cylinder rod to the frame.[/FONT]

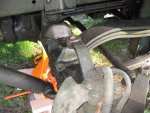
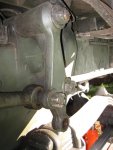
[FONT=Liberation Sans, sans-serif]For number 2, which connects the pitman arm to the front drag link, I can't get the castle nut to move, even with a long pipe. This is odd, because the other nuts were easy. I'll try with an impact wrench next trip.[/FONT]

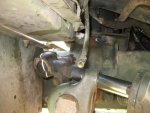
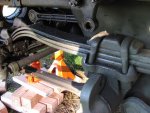
[FONT=Liberation Sans, sans-serif]Number 9, which connects the rear reach rod to the second steering axle driver side wheel, absolutely will not move. I've used a wide variety of banging and prying to no avail. I suspect that there's pressure on it from number 5 at the front of the reach rod, where it connects to the idler arm. Next trip, I'm going to put number 5 back in place, which will hopefully reduce any side loading, and try again.[/FONT]

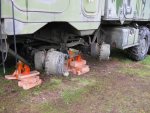
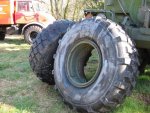
[FONT=Liberation Sans, sans-serif]I haven't seriously tried removing number 8 and number 10, because the right side tires are still on the truck.[/FONT]

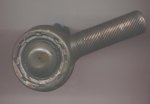
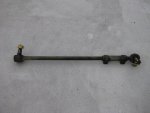
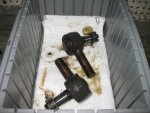
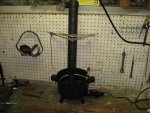
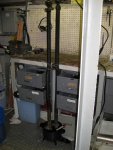
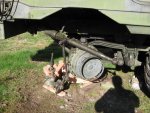
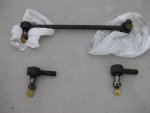
[FONT=Liberation Sans, sans-serif]I brought home numbers 3, 6, 7, and 10. Even though 4 and 5 are loose, the other ends of the rods are keeping them on the truck. And, while writing this I note that the (removed) rod with two ends in one picture is incorrectly tagged as 3 and 4, when it should be 3 and 6.[/FONT]

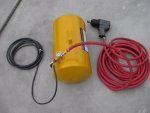
[FONT=Liberation Sans, sans-serif]I'll pick up a cheap electric deep fryer and thermometer this weekend and start cooking.[/FONT]

[FONT=Liberation Sans, sans-serif]Oh, and the M656 doesn't have left hand threads on lug nuts on the left side. It's righty-tighty on both sides.[/FONT]

[FONT=Liberation Sans, sans-serif]More later.[/FONT]
 

Attachments

Stalwart

Well-known member
1,739
33
48
Location
Redmond, WA
Nice going Brad, I see you had some nice weather up by the border.

I haven't dug out the cover yet but I'll let you know when its ready for pickup. It will be at your convenience, I think it's in the garage under the staircase.
 

m-35tom

Well-known member
Supporting Vendor
3,021
220
63
Location
eldersburg maryland
well good luck, i'm sure it will help a lot. i would do it in an altogeather different way, but that is just me. i would use a flycutter in a milling machine to remove the crimps that hold the covers on and take the joints apart and start from scratch cleaning and reassymbling them. i have one here that i cut in half to see a cross section from to see how they were made. cooking them will only do so much and nothing for the 40 years of corrosion.
 

cranetruck

Moderator
Super Moderator
Steel Soldiers Supporter
10,350
74
48
Location
Meadows of Dan, Virginia
Good to see you getting started on this project, Brad!
Here are some images from the work I did. The process involved drilling the end cap before treating it with hot oil for good penetration. The hole was sealed with a screw. On some, I tapped the hole on others self tapping screws were used with sealant.
After going on 3 years now, the steering is as nice as can be, so the process seems to work pretty well, IMHO.
I did not unscrew the tierod ends, but if you do, make sure they go back exactly as they were and recheck the alignment per TM (-20, p 2-295ff). The separated tierod end is an extra one).

BTW, the process also works on the torque rods, which are "sealed for life" too.
Note: The "seal" in image #4 was not present on my truck, but is shown in the TM...
 

Attachments

Last edited:

sangamon

New member
49
0
0
Location
Seattle / Blaine
[FONT=Liberation Sans, sans-serif]m-35tom,[/FONT]

[FONT=Liberation Sans, sans-serif]It would be terrific to have the skills and equipment to fix up the joints like you describe. I had to use google to find out what a “fly cutter” was. So, I have a way to go before I'm ready to make such repairs. I'm also waiting on a “wetlands delineation” to get my shop built. Until then, I'm working in the yard. Some day …[/FONT]

[FONT=Liberation Sans, sans-serif]cranetruck,[/FONT]

[FONT=Liberation Sans, sans-serif]I was wondering if the end cap was thick enough to tap. Removing the tierod ends is for transportation. I'm really not set up in Blaine to do the cooking. I have to drive to Seattle, schlepp the parts down stairs, down a 500 foot dock, to get to my boat. I'd prefer to carry just the joints, rather than the six or seven foot tie rod. The short drag links and reach rods will be left assembled. Both of the left tie rod ends (7, 10) that I've removed were screwed 39 turns into the tie rods. It will be interesting to see if the right side ends (8, 11) are also 39 turns. The seal is also missing on all of the joints on my truck.[/FONT]


[FONT=Liberation Sans, sans-serif]I'm heading to Blaine tomorrow. Hopefully I'll be able to get the remaining ends removed. I'll try to cook them all from Sunday through Tuesday. If I'm lucky, they can go back on Wednesday.[/FONT]

[FONT=Liberation Sans, sans-serif]What could possibly go worng?[/FONT]

[FONT=Liberation Sans, sans-serif]Thanks to everybody for your advice.[/FONT]
 

sangamon

New member
49
0
0
Location
Seattle / Blaine
[FONT=Liberation Sans, sans-serif]Here's more steering fun.[/FONT]

[FONT=Liberation Sans, sans-serif]I managed to release number 9 end between the rear reach rod and left hand second steering axle. I'm going to give credit to the fact that I reconnected end 5 to the idler arm, thus reducing the side load on end 9. I had to disconnect the axle nut on the idler arm (which holds 4,5,6) in order to remove number 5.[/FONT]

[FONT=Liberation Sans, sans-serif]The stuck castle nut on number 2 on the front drag link came loose with about three seconds of effort with the trusty impact wrench.[/FONT]

[FONT=Liberation Sans, sans-serif]There's a picture of the rig that I used to power the wrench. I'm using 90-110 psi air from my Unimog so I don't have to run the M656 while it's up on blocks. The air goes into the eleven gallon air tank from the Unimog tire hose. Then, there's a half inch air hose to the impact wrench.[/FONT]

[FONT=Liberation Sans, sans-serif]Yes, I know the half inch hose is too long, the connection from the half inch hose to the air tank is too small, and there are no proper couplers anywhere. Fixing all those problems is on the list, but I made do with the parts that I had at the time.[/FONT]

[FONT=Liberation Sans, sans-serif]I can't yet get the number 2 tie rod end loose from the pitman arm. I'll try it again on Wednesday. I haven't yet tried to release number 1.[/FONT]

[FONT=Liberation Sans, sans-serif]The back of the rear drag link (connected to the power steering cylinder by number 4) is loose from the idler arm. I'll have to cook it up north, rather than taking apart the adjusting clamp or removing the power steering cylinder.[/FONT]

[FONT=Liberation Sans, sans-serif]I tested the existing torque needed to twist end number 10. It's somewhere between 150 and 200 foot pounds. Yikes![/FONT]

[FONT=Liberation Sans, sans-serif]Both of the driver side wheels are now disconnected from any tie rods and reach rods. They both move VERY easily. They can be moved through full steering travel with only finger pressure. The only resistance to movement is the two spring-covered air hoses on each wheel.[/FONT]

[FONT=Liberation Sans, sans-serif]The passenger side tires are still installed, so I haven't removed number 8 and 11. I was too tired to block, jack, and wrestle with the two tires.[/FONT]

[FONT=Liberation Sans, sans-serif]Number 7 and number 10 are now in the hot oil at about 270-280 degrees. I used an on-sale Presto fryer from K-Mart ($25). The oil is 30 weight Delo 100 that I bought for an old marine genset that I've since replaced. I can see bubbling from the drilled hole in the end cap, as well as the open side.[/FONT]

[FONT=Liberation Sans, sans-serif]I'm looking forward to 1530 when I can pull the parts out, and 1600 when they're cool enough to test.[/FONT]
 

Attachments

cranetruck

Moderator
Super Moderator
Steel Soldiers Supporter
10,350
74
48
Location
Meadows of Dan, Virginia
Thanks for posting!
My experience was very similar with about 100 ft-lb torque required to turn the ball in the socket. After cooking for 4 hours, like you are doing, the required torque went to about 10 to 20....
When all done, go over the alignment procedure to make sure. The steering will return to straight ahead after a turn when done correctly...
 

sangamon

New member
49
0
0
Location
Seattle / Blaine
[FONT=Liberation Sans, sans-serif]Here's a Sunday afternoon update - GREAT so far. The ends are still a little hot to handle easily, but I couldn't resist some initial tests.[/FONT]

[FONT=Liberation Sans, sans-serif]I didn't take an actual numerical reading, but the joint mobility is much better. I performed an initial break-loose with the socket wrench. The joints for both 7 and 10 can now be rotated by hand, using the short threaded stud for the lever. That's quite an improvement from “barely moveable with a seven foot tie rod as lever.”[/FONT]

[FONT=Liberation Sans, sans-serif]I note that “frying bubbles” come out of both sides of each joint, and reduce significantly towards the end of the four hours.[/FONT]

[FONT=Liberation Sans, sans-serif]The front and rear reach rods are now cooking.[/FONT]
 

Attachments

sangamon

New member
49
0
0
Location
Seattle / Blaine
[FONT=Liberation Sans, sans-serif]I was able to remove three more tie rod ends on Wednesday.[/FONT]

[FONT=Liberation Sans, sans-serif]It was necessary to remove the rear drag link from the power steering cylinder to get to end number 4, which connects to the idler arm.[/FONT]

[FONT=Liberation Sans, sans-serif]The right hand ends (8, 11) for the tie rods came loose from the wheels easily. It was just a matter of removing the right side tires so I could get access. I left those ends connected to the tie rods. The tie rods weren't as heavy as I expected, so I decided that carrying them would be easier than making 156 total turns on the threads (two ends with 39 turns out, then back in).[/FONT]

[FONT=Liberation Sans, sans-serif]I still can't remove number 2 which connects the pitman arm to the front drag link. If I can't get it this coming Saturday, I'll just leave it for now. I'm not overly worried about number 1, which connects the power steering cylinder to the frame. It doesn't move very much.[/FONT]

[FONT=Liberation Sans, sans-serif]I will have renovated nine of the eleven ends, and that's quite an improvement. Once I get my shop built, I'll finish the other two. I'm tired of working in the grass and mud.

I don't think I've mentioned this before, but thanks to Stalwart for installing the wheels without excessive torque. I was able to loosen the lug nuts manually with only about two or three feet of lever.

So far, I've only needed an impact wrench on the castle nut on number 2, and even that only took about three seconds.
[/FONT]
 

Attachments

Stalwart

Well-known member
1,739
33
48
Location
Redmond, WA
Sorry Brad, it wasn't me I never had the wheels off I just checked the torque and tire pressure. They went "click" on the torque wrench and I left 'em alone.

Not driving down Sat. for the Meet? I found your cargo cover, it was "hiding" under some heavy tarps.
 

hippiedude

Active member
1,175
3
38
Location
Granby , Ct.
If you went as far as tapping the hole in the end cap would it be beneficial to use a grease fitting so you could add grease to the joint ..... Tim
 

sangamon

New member
49
0
0
Location
Seattle / Blaine
Stuart,

Unfortunately, the M656 won't be ready on Saturday morning. I had thought about taking the Mog, but it's not highway-ready right now, either.

What I really want is to get the M656 put back together. It was fun to drive, even with the somewhat stiff steering. I'm looking forward to driving it around rural Whatcom county this weekend to get familiar with it.

I'll email you separately about picking up the cover.

Thanks.

Brad
 

sangamon

New member
49
0
0
Location
Seattle / Blaine
Tim,

I thought about grease fittings, but decided to follow cranetruck's procedure.

cranetruck is the canonical resource for the rehabilitation of this steering system as far as I'm concerned. He did this process two or three years ago, and his truck steering is still fine.

Of course, the actual driving around will show for sure, but the individual parts show very great improvement.
 

cranetruck

Moderator
Super Moderator
Steel Soldiers Supporter
10,350
74
48
Location
Meadows of Dan, Virginia
If you went as far as tapping the hole in the end cap would it be beneficial to use a grease fitting so you could add grease to the joint ..... Tim
Right, the joints are not designed for grease, but rely on a Delrin (Teflon like plastic) for low friction operation and a wowen packing material for sealing. The cooking procedure allows the oil at very low viscosity to penetrate and lube the surfaces. The joints are again sealed, so any remaining oil should stay in for the duration and no need for a grease fitting.
Like Brad mentioned, the joints are still perfect after almost 3 years.

The TMs show an external seal, which was not present on Brad's or my truck, so I put some grease around the outside of the ball joints now and then instead. It's possible that an external seal may trap water.
 

sangamon

New member
49
0
0
Location
Seattle / Blaine
The last two tie rods ends are cooking right now. They should be done around 1930 tonight.

plan for Saturday:

pack (now cool) tie rods in truck
drive to Blaine
reinstall tie rods and reach rods
torque castle nuts
reinstall two remaining tires
torque lug nuts on all four steering wheels
recheck torque on castle nuts
install cotter pins in castle nuts
recheck torque on lug nuts
verify that safety items and documents are in truck
drive to Yorky's to buy fuel
drive wherever

I've attached some pictures of the cooking operation in the engine room on my boat. I'm looking forward to having a 2500 square foot shop for doing this type of work.
 

Attachments

cranetruck

Moderator
Super Moderator
Steel Soldiers Supporter
10,350
74
48
Location
Meadows of Dan, Virginia
Brad, checking your to-do list, I don't see the alignment procedure, it doesn't take long and is in the -20 TM. Do the toe-in like you would on any vehicle, just twice and the other critical measurements are in the TM.
Not doing the #1 ball joint may have little effect on the outcome (like you stated), however, the first image below shows how I did that particular one. Check the oil level in the steering box while you are at it...
 

Attachments

Last edited:

sangamon

New member
49
0
0
Location
Seattle / Blaine
[FONT=Liberation Sans, sans-serif]I reinstalled the rear drag link between the power steering cylinder and the idler arm. That's the only part of the steering system installed. That is, the front and rear reach rods were not installed. So, there were only three moving joints. Number 1 connects the frame to the power steering ram. Number 2 connects the pitman arm to the front drag link. Number 4 connects the power steering cylinder to the idler arm. Both joint 4 and the pivot for the idler arm were verified to move freely.[/FONT]

[FONT=Liberation Sans, sans-serif]I started the engine, let it develop oil and air pressure, and warm up a bit. Trying the steering with only the parts installed as listed above, the wheel pressure was still excessive. It was not nearly as bad as before, but certainly much more than would be expected in moving almost nothing. I thought that I could weasel out of cooking number 2, which has been impossible to remove so far.[/FONT]

[FONT=Liberation Sans, sans-serif]After a bit more bludgeoning to separate number 2, I decided that I'd try removing the steering gear. By doing that, I would not only be able to cook number 2 joint, but hopefully have enough access to remove number 1. As it turns out, removing the steering gear wasn't hard at all. I removed the bellows over the U-joint connecting the steering gear and upper steering shaft. Then, the bolt holding the U-joint to the upper steering shaft was easy. Finally, the four bolts holding the steering gear to the frame were less easy, but straight forward.[/FONT]

[FONT=Liberation Sans, sans-serif]Even with more access to joint number 2, it's still not going to come apart. I'll take my cooker up north on Wednesday. Hopefully I'll be able to maneuver things around so I can get the joint into the cooker.[/FONT]

[FONT=Liberation Sans, sans-serif]Joint number 1, which connects the steering cylinder rod to the frame, came out very easily. The castle nut wasn't even tight. The end easily came off the rod in the cylinder, and is cooking in Seattle as I type this.[/FONT]

[FONT=Liberation Sans, sans-serif]Cranetruck, thanks for the suggestions. I checked the steering gear oil level. It turns out it was somewhat low, but the shaft turns easily. The oil slightly leaks out of the top of the gear, where the steering shaft comes out of the top. I've also updated my checklist to add the wheel alignment.[/FONT]

[FONT=Liberation Sans, sans-serif]I'm not going to make any more predictions for how far I get Wednesday, since my optimism is clearly greater than my skills. That's OK, I'll get it.
[/FONT]
 

Attachments

Top
AdBlock Detected

We get it, advertisements are annoying!

Sure, ad-blocking software does a great job at blocking ads, but it also blocks useful features of our website like our supporting vendors. Their ads help keep Steel Soldiers going. Please consider disabling your ad blockers for the site. Thanks!

I've Disabled AdBlock
No Thanks