• Steel Soldiers now has a few new forums, read more about it at: New Munitions Forums!

  • Microsoft MSN, Live, Hotmail, Outlook email users may not be receiving emails. We are working to resolve this issue. Please add support@steelsoldiers.com to your trusted contacts.


M656 steering rehabilitation

sangamon

New member
49
0
0
Location
Seattle / Blaine
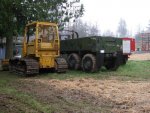
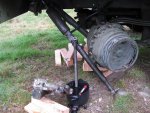
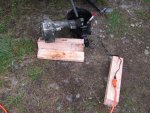
[FONT=Liberation Sans, sans-serif]I finished cooking the last joint this afternoon. This is the evil number 2, which is connected to the pitman arm. I still can't remove the joint from the pitman arm.[/FONT]

[FONT=Liberation Sans, sans-serif]The joint was super stiff before cooking, but nice and loose now.[/FONT]

[FONT=Liberation Sans, sans-serif]I'll start putting the steering back together next Wednesday.[/FONT]
 

Attachments

sangamon

New member
49
0
0
Location
Seattle / Blaine
I sent bid requests to six companies.

Four haven't bothered to respond.

One responded with a no-bid ($1000 minimum).

HC Pacific out of Walnut CA has the nuts for $20 each.

I haven't decided how many to order yet.
 

sangamon

New member
49
0
0
Location
Seattle / Blaine
I'm almost finished.

Wednesday I replaced all the castle nuts for the tie rod ends. I also replaced the two tires that I had previously removed for clearance. I went for a quick drive in the yard to remove any stress (mine and the steering system's). There wasn't anything tricky involved, it was just hard work.

I then went to the county office to pick up the building permit for my new (50x74) shop. I always hear horror stories about building permits, but everybody I dealt with was very helpful and nice.

Thursday I set the proper torque on the castle nuts and installed cotter pins. I wish I had the tool that the manufacturers use to make cotter pins look nice. Or is it just a matter of not being a klutz? I still need to properly torque the lug nuts before going on the road. Setting 250-270 torque on 32 lug nuts was more than my tired arms could handle.

Quite a bit of my time Thursday was spent with the excavation contractor and building contractor. I did manage to get another spin around the yard. Next week I'll hopefully finish up the lug nuts and get out on the road.

The steering is GREAT now. It's not quite one-finger, but is very easy. I still haven't aligned the steering system. I should have my shop in about a month, so I'll do the alignment on the concrete rather than the mud.

You all know what castle nuts look like, so I didn't bother adding to my already extensive catalog of castle nut pictures. Instead, here's a picture of the start of site prep for my shop. The tire tracks in the foreground are both Unimog and M656 tracks in the soggy ground. The contractor is going to do some drainage work, as well.
 

Attachments

cranetruck

Moderator
Super Moderator
Steel Soldiers Supporter
10,350
74
48
Location
Meadows of Dan, Virginia
[thumbzup]
Nice large shop! that 's what we need here, not much get done in a foot of snow and the wind blowing... most snow on the ground for the longest period of time since we moved here twenty years ago.
If I may suggest, don't drive too much in the grass, those tracks will become permanent under those conditions...
 

sangamon

New member
49
0
0
Location
Seattle / Blaine
Bjorn,

Not to worry about the yard. The soft spots are all being fixed. We're using the soil that's dug out for the shop and driveway to fill holes in the yard.

I've attached a couple of pix of the construction from my web cams. The yard is mostly level but the cameras are tilted. I guess I need a cinematographer.

Brad
 

Attachments

hippiedude

Active member
1,175
3
38
Location
Granby , Ct.
Glad tou got the truck back together ...... The shop will be sweet .... I bet the contractor was all over that 8x8 , did he get any work done the first day ??? Hehe ... [thumbzup] Tim
 

sangamon

New member
49
0
0
Location
Seattle / Blaine
I was hoping to finish the tires and get a quick ride Wednesday.

Unfortunately/fortunately my yard and driveway were full of heavy equipment for putting up my new shop.

The last thing I wanted to do was distract anybody from their work.

I've attached a few pictures of the significant progess in the past week.
 

Attachments

Stalwart

Well-known member
1,739
33
48
Location
Redmond, WA
Holy CRAP, those guys don't muck around! It's like an instant shop, it took me 5 x longer to get my permits than for you to get the whole thing done. :beer:
 

sangamon

New member
49
0
0
Location
Seattle / Blaine
I've been unable to drive the M656 for the past couple of weeks. All the equipment and supplies for my shop construction have been taking up my driveway and turnaround space.

Today I finally got it out on the road with the non-tight tie rod ends. Wow - it's so nice to drive. I still have to align the steering, but that will wait until the shop is done.

I don't have any "action" pictures because there's no easy stopping place out here in the country. When I get into town, I'll take some action pix.

I've attached a few pictures of my shop under construction. The pictures are from Feb 27, Mar 3, and Mar 7. There are a also couple of pictures of my vehicles waiting to get into the shop. The bulldozer isn't mine.

And finally, I couldn't resist including a picture of the biffy farm in Mount Vernon. I always figured that biffies were a manufactured product, but here they are, grazing in the field. Note that there are no pens; these are free range biffies. Of course, all biffies are organic.
 

Attachments

cranetruck

Moderator
Super Moderator
Steel Soldiers Supporter
10,350
74
48
Location
Meadows of Dan, Virginia
Brad, it's great that you were able to repeat the rehabilitation process successfully. How did you end up sealing the holes drilled in the caps? I would also recommend that you smear some bearing grease in the exposed spaces (where a seal is shown in the manuals).
Nice progress on the shop.
 

Stalwart

Well-known member
1,739
33
48
Location
Redmond, WA
I'm glad I wasn't drinking coffee while reading that last paragraph.:wink:

WOW, floor in next week and a week or two to cure, and your 3 rigs will be inside from then on . . . VERY nice! :jumpin:
 

Stalwart

Well-known member
1,739
33
48
Location
Redmond, WA
You know, they have these little tapered grease needles you could stick in the hole and add a little from time to time. I was thinking that cleaning the area with brake cleaner solaked rag, and after it's dry a dab of silicone would allow you to pick it out when desired but still keep the crud out.
 

sangamon

New member
49
0
0
Location
Seattle / Blaine
Bjorn,

I drilled and tapped the caps, and then installed short #8 screws. Instead of grease on the exposed parts of the ball, I used Never Seize. I also used Never Sieze where the tie rod tapered pins fit into the sockets.

Stuart,

I've been very happy with progress on the shop. For the pad, there will be two inches of pink foam under six inches of concrete. I haven't decided what to do about heat. I may put a couple of solar collectors on the roof, and then send the water to a couple of Modine-type unit heaters in the shop. That will keep the shop warmer than the outside all the time, which solves humidity problems. The shop lies in a NE/SW direction, and gets sun most of the day. We get a lot of sun up here, which allows mass quantities of agriculture. You haven't lived until you drive by a farm field with is being "fertilized" with thousands of gallons of liquid poo, sprayed with a huge lawn sprinkler.

That's a good idea about the grease needles. I don't know if Never Seize would go through it, but it's worth a shot.

Thanks.

Brad
 
Top
AdBlock Detected

We get it, advertisements are annoying!

Sure, ad-blocking software does a great job at blocking ads, but it also blocks useful features of our website like our supporting vendors. Their ads help keep Steel Soldiers going. Please consider disabling your ad blockers for the site. Thanks!

I've Disabled AdBlock
No Thanks