• Steel Soldiers now has a few new forums, read more about it at: New Munitions Forums!

  • Microsoft MSN, Live, Hotmail, Outlook email users may not be receiving emails. We are working to resolve this issue. Please add support@steelsoldiers.com to your trusted contacts.


M923A2 Battery Relocation Project

DeuceRoadTripper

New member
33
1
0
Location
Coleman, WI
M923A2 Battery Relocation Project: This week I have been having some problems with my batteries not charging. I disconnected each of them and charged them manually. Found one of the original batteries was shot and not taking a charge. This caused the whole system to not charge properly. (My Guess) However, this was a huge pain to work under the front seat. So I decided to relocate the entire battery box. Also for the price of the replacement battery; I purchased four new larger amperage batteries. Here is the project:

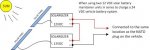
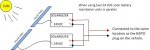
First, I removed the old batteries from under the seat; disconnected the ground, hot lead and the 12 volt lead. Make sure to label all your leads; especially the 12 volt lead. Then remove the clamps, the vertical tie down bars lay down and fold out. You’re done with these. Pull the foam matt out and the blocks of wood under them. Use some baking soda and warm water with a sponge to neutralize any battery acid collecting in the box. Clean it out to the bottom. I am no longer using the solar charging unit as it was already disconnected when I purchased the vehicle. The two charging units have been removed and an cut the leads to the solar panels and taped them off.

20140830_084539.jpg 20140830_084048.jpg 20140830_083418.jpg
 

DeuceRoadTripper

New member
33
1
0
Location
Coleman, WI
The batteries are going to be located in the external cargo box on the passenger side. I have seen some postings and (well) made a better box. Remove the box and the mounting plate. Using a cut off grinder cut the cover off the box completely. I will get some better pictures of the engineering for this box tomorrow.

Then I squared the cover up and welded the door to the cover 90’ solid; And added a bit of 18 ga steel to the sides to stiffen it up. Used some spray on bed liner to cote in the inside and bottom of the box. Re-painted it green and added some back to match the original pattern on the truck.

Then I dripped a 1/2" hole for a 12/2 S.O. cord. This will be for my 12 volt lead. Drilled two 3/4" holes for the two 2 aw S.O. cords which will be the new ground and 24 volt leads back to the old battery box to run the truck.

20140830_093924.jpg 20140829_171849.jpg
 

DeuceRoadTripper

New member
33
1
0
Location
Coleman, WI
I used some 1/2" angle iron and welded two sticks on the right & left (outside) of the box. This will serve as a better shelf for the cover to sit back on. The original box lid already had an overhang, so this worked out well to rest my new cover on - and also added a stick to the back (inside) for the cover to rest on as well. The idea here is that I wanted to make the cover removable for working on the batteries. And I did not want my wrench to strike the frame.

I placed the cover back on the box, and using a slim spacer; then welded another stick of angle iron on the back of the box (outside) over the cover. This served as a “slot” for the cover to fit into. Once back on top the original locks would still work and I could bad lock the cover also.


20140902_135719.jpg 20140902_125511.jpg 20140901_142100.jpg 20140831_125727.jpg 20140831_085836.jpg 20140831_085821.jpg
 

DeuceRoadTripper

New member
33
1
0
Location
Coleman, WI
Batteries: Go down to your local “Batteries Plus” and pick up four (4) 1100 Amp Duracell ProCell batteries for about $98 each. These have more than enough cranking amps to turn over a 5 ton and run your lights for a while when you forget to turn off the switch.

As for the battery holder: I went down to my local Menards store and picked up a 1/2 sheet (4’ x 4’) of 1/2" treated ply wood; And (1) one 2x4 8’ long. Cut the treated ply wood to fit the new box, not so tight so it can’t be removed later. Then I set the batteries on and measure out a frame. Cut the 2x4 up and screwed it from the bottom an side to make a battery hold. I also added the width of a couple pieces of plywood between each battery to keep them from rubbing on each other.

After the box was remounted to the truck, set your battery holder frame in. I also drilled out either side and added (2) two I-Hooks for a rubber bungee strip to hold the batteries in from bouncing out. Install the batteries and start building your new wire harness.

20140902_125535.jpg 20140902_134215.jpg
 
Last edited:

goldneagle

Well-known member
4,428
858
113
Location
Slidell, LA
I recommend going with larger than #2 cables for the power cables. Maybe 2/0 Distance makes a lot of difference with DC power. Ask Edison. That is why we use AC power in homes.
 

DeuceRoadTripper

New member
33
1
0
Location
Coleman, WI
Here is a diagram of the battery connections. I purchased 25’ of #2 S.O. cable from the local electrical shop. This is the same size cable that is currently installed in the vehicle. The only difference is the cable the military uses has a heavy rubber hose over the copper instead of a thinner rubber sheath you find in industrial cable and home electrical.


CONNECTION.jpg

I measured an cut two 10' long lengths for the battery power. Had about 5' left over to make the (2) two extra cross ties for the style of batteries I used. This was the only thing I couldn't re-use. Clean all the old battery connectors or replace them.
 
Last edited:

74M35A2

Well-known member
4,145
312
83
Location
Livonia, MI
Just FYI, the 1100CCA batteries will have a much shorter life than a lower rated battery of the same group (physical) size, because the plates are much thinner. Most over-the-road truck batteries are group size 31. Most higher end factory trucks use 650CCA batteries because they will get 5-7 years out of them. Once at the dealership, people want the highest CCA battery they can get.

An example is Kenworth and Peterbuilt use 4 x 650CCA batteries. Lower cost Freightliner or International will use 3 x 1000CCA batteries. The 3 x 1000CCA is lower cost, but will not last nearly as long as the 4 x 650CCA.
 

DeuceRoadTripper

New member
33
1
0
Location
Coleman, WI
Here are a couple of pictures from the old battery box. In a previous post I included the wire diagram for connecting the batteries in series to get your 24 volts; then paralleled them with another set of batteries to double up the cranking amps. Most of you should still have your battery wiring diagram under the seat. This is the same wiring layout the truck originally used.

In the old battery box, I connected the new leads along with the connection to the Nato plug so the truck can still be jump started. I used a stainless steel bolt and stainless steel washers along with a locking lock nut to secure them together. Then wrapped the connections with heavy underground 3M rubber tape; then covered them in standard 3M electrical tape. I used a couple of tie wraps to then secure the cables so they would not rub anything to cause a short.

In the old battery box there might still be a third hole in the frame. I used this location along with a 1-5/8” step bit to enlarge it; then inserted a large grommet to protect the cables. Feed the new harness down through the center of the cab, under the frame to the new battery box. Take care to keep your harness way from the exhaust or it could eventually melt causing a short. There is enough wiring tie downs in that location to secure the cable so it does not rub or get caught on anything.

20140908_162901.jpg
20140908_162913.jpg 20140908_163406.jpg 20140908_163340.jpg

I also wrapped the entire harness both #2 cables and the 12/2 S.O. cord in regular 3M electrical tape to help protect and secure the cables to the truck. It’s just what I did – up to you on how far you want to go.

[End Project]
 

KaiserM109

New member
1,108
4
0
Location
SE Aurora, CO
I hope that you don't use the '12 Volt' connection significantly. It will deplete your batteries unevenly and cause the other batteries to overcharge, bad for the life of your batteries. If you really need a lot of 12 volt juice, get a DC to DC converter.
 

DeuceRoadTripper

New member
33
1
0
Location
Coleman, WI
Please see the TM's as the 12 Volt lead is required for normal vehicle operations. The wiring diagram under the M923A2 passenger seat explains the connection point requirement.
 

Bonzai30

New member
13
0
0
Location
Weston, FL
Thanks for this; it's really helpful. If I wanted to hook up solargizers to the bank of 4 batteries, would I need two 24v solargizers (I think the answer is yes) and, if so, where would they connect?

Also, if I wanted to add a 12v converter, where would that connect? I apologize for the basic questions, but I'm not used to a 4 battery setup.
 

DeuceRoadTripper

New member
33
1
0
Location
Coleman, WI
Please refer to my previous electrical diagram: the M923A2 is a 24 VDC system. To use a solargizer system on this vehicle I would suggest purchasing 24 VDC units. Depending on the wattage these devices are rated for, you may want to use two of them in parallel to decrease the charging time and maintain your batteries better in low light conditions.

If for some reason you only have access to 12 VDC solargizers (not recommended) you would need at least two of them in series to obtain the 24 VDC needed to charge the vehicles battery system.

In either case, the final 24 VDC output (Red(+) & Black(-) leads) would be connected to the same point as the NATO plug on the vehicle. In my case I have the connection under the passenger seat where I made my initial connection to the existing vehicle battery leads. Attached are a couple of basic diagrams for connection solar units in various configurations.

If you are planning on using 12 VDC in the vehicle for lights, cell charger, radio, etc. I would suggest using a 24VDC to 12VDC converter. This way you are utilizing the vehicles natural 24 VDC system and not draining a half battery which could damage the battery bank. Again, connect the converters 24VDC input leads (red & black) to the same point as the NATO plug is connected. Then on the 12VDC output side of the converter would be for your accessories.
 

Attachments

524
1
18
Location
Hamilton, NJ 08690
DeuceRoadTripper,
I'm not an electric guru so I'm a little lost on your pictures. Are the standard military Solargizers the government installed on the M939s 24v or 12v units? I have 2 gov. installed Solargizers but have changed to a 2 12v battery setup. How would I run the Solargizers?
thank you.
 

DeuceRoadTripper

New member
33
1
0
Location
Coleman, WI
If the solar battery maintainers were originally installed by the U.S. Military in the vehicle they are 24VDC devices. They are connected to the same location as the end leads of the NATO plug. Just as shown in my diagram and the diagram found in the installation and operation instructions for the device. Yes, the U.S. army contractors installed two of these devices in the vehicles as the output wattage on these devices was not sufficient to maintain the larger battery banks on the M923 and M939 trucks. The two solar maintains are connected in parallel and connected to the same location as the end leads of the NATO plug. Just follow the leads from the outside of the vehicle to the battery and connect the black (-) and red (+) leads to the same location.

From your comment you are running (2) two 12VDC batteries wired in series to provide 24VDC power to the M939 vehicle. Both solar units would be wired in parallel with those two batteries. Here is a quick diagram of what I assume is your setup. Please verify the part number on the solar units before connecting.
 

Attachments

Last edited:
Top
AdBlock Detected

We get it, advertisements are annoying!

Sure, ad-blocking software does a great job at blocking ads, but it also blocks useful features of our website like our supporting vendors. Their ads help keep Steel Soldiers going. Please consider disabling your ad blockers for the site. Thanks!

I've Disabled AdBlock
No Thanks