• Steel Soldiers now has a few new forums, read more about it at: New Munitions Forums!

  • Microsoft MSN, Live, Hotmail, Outlook email users may not be receiving emails. We are working to resolve this issue. Please add support@steelsoldiers.com to your trusted contacts.


M939 winch install (Pics & Video)

clinto

Moderator, wonderful human being & practicing Deuc
Staff member
Administrator
Super Moderator
Steel Soldiers Supporter
Supporting Vendor
12,596
1,120
113
Location
Athens, Ga.
I applaud the information contained within this thread and appreciate the time it takes to gather such knowledge.

I haven't looked through everything here yet, but I can say this as a "correction" -

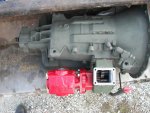
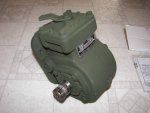
The M932 hydraulic reservoir is located between the passenger side fuel tank and the quarter fender. Somewhere, I have a photo, but I'm not able to find it right now. I don't know if it sits on the same bracket as the cargo trucks or is different. The M932A1 and M932A2 have it behind the cab as pictured above.

I'm also thinking that the level wind doesn't change the way the cable is spooled - it is over the top of the drum whether or not it has a level wind.
I'll have to go upstairs and correct those posts because I think you're right on both counts. EDIT: posts above corrected.

On the rope spooling, I guess I got mixed up looking at it, thinking which way the rope would exit the drum to engage the lower rollers. Looking at it some more, I guess they both spool the same way and my example was simply done wrong.

On the M932 tank, it appears you're correct. GovPlanet has multiple M932s that all have the tank as you describe. See below:

612523_6006_353_0001.jpg573858_6006_353_0001.jpg573858_6002_10099_0001.jpg

I have to say, even after using the military TMs after 10+ years, I loathe 'em. Hard to find what you're after and apparently no one proofs them.

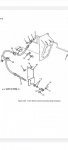
So in the 272-24P2, the following 4 images are all the hydraulic tanks shown:


1. "Front winch filter and reservoir assy (M939)". To me, I'd think that every M939 series model that has a hydraulic reservoir, has it here with these components. I guess since the M930 has it here and the cargo trucks do, maybe that's so.
Front winch filter and reservoir assy (M939).jpg

2. "Front Winch Reservoir Assembly and Mounting Hardware (M939 A1/A2)." Again, this wording would make you think any A1/A2 model has a tractor style tank, when obviously the cargo models do not. I don't understand why this doesn't say "M932A1/M932A2" instead.

Front winch reservoir assy and mounting hardware (M939A1 M939A2).jpg

3. "Front Winch Hydraulic Reservoir Assembly and Mounting Hardware - Non AoA Vehicles". Then you get the last two. I think AoA means the uparmored trucks with the tall hardtop. So if that's the case, what is this tank setup for? If it's for non-armored models, how is it different than the #2 setup shown above?

Front winch hydraulic reservoir assy and mounting hardware  Non AoA vehicles.jpg

4. "Front Winch Hydraulic Reservoir Assembly and Mounting Hardware - After AoA Armor Removed
(M939 A1/A2)." Finally, you get this one, the last hydraulic reservoir schematic. If this image depicts the system after the armor is removed, it must be for an AoA vehicle.

Front winch hydraulic reservoir assy and mounting hardware  After AoA armor removed (M939A1 M939.jpg

I used the #2 schematic for ordering all my parts and everything worked, so I guess I guessed correctly.
 
Last edited:

Csm Davis

Well-known member
4,151
376
83
Location
Hattiesburg, Mississippi
Okay great write-up, but couldn't you use the behind the cab mount for any of the 939 series? And is there that much difference between the tractor and cargo side mounts? Yes I see the hose length differences but I would probably make new hoses because as was said earlier the stock setup hangs way to low. So I know the A2 has things in a different position from front to rear, but A1 setup should fit a 939 basic and vise versa right? Also I will throw this in as I know it to be fact there are 3 different models of pto that Chelsea makes for these transmissions and down I have seen 4 different manufacturers pto on these trucks and all were different outside castings some have better clearance to the frame than others.

Sent from my SM-G900V using Tapatalk
 

86m1028

Active member
1,687
16
38
Location
Murphy TEXAS
Okay great write-up, but couldn't you use the behind the cab mount for any of the 939 series? And is there that much difference between the tractor and cargo side mounts? Yes I see the hose length differences but I would probably make new hoses because as was said earlier the stock setup hangs way to low. So I know the A2 has things in a different position from front to rear, but A1 setup should fit a 939 basic and vise versa right? Also I will throw this in as I know it to be fact there are 3 different models of pto that Chelsea makes for these transmissions and down I have seen 4 different manufacturers pto on these trucks and all were different outside castings some have better clearance to the frame than others.
Sent from my SM-G900V using Tapatalk

Not doubting you but do you have any pics or detailed info you can share ?
 

lindsey97

Member
736
13
18
Location
wynnewood, oklahoma
I would like add to this thread with my recent winch install on my M923A0. I installed everything but the winch, frame extensions and pto in about 10 hours. The pto itself took about 7 hours, with a transmission oil change also done at the same time.

There are definitely 2 different styles of pto that fit the M939 trucks. I have the earlier one, which has a long bolt that goes in the center top mounting hole of the pto, and is tightened from the outside of the pto.

The second PTO style has a SHORT bolt that goes in the top center mounting hole, and is tightened from the INSIDE of the pto, with the actuator cover off. The actuator cover is also moved into a top position, in order to clear the frame and allow removal of the cover without COMPLETE removal of the pto from the transmission in order to check backlash, or make repairs.

Here is how I installed my pto, and what I found that made it significantly easier, WITHOUT removing transmission mount bolts, engine mount bolts, or anything else crazy that would make it a 3 day job.

First remove your trans dipstick assembly, and both trans cooler lines. Now is a good time to change your trans oil and filter. Removing these item buys you some room to work. Install your (2) pto studs in the lower holes, be sure to get them threaded in all the way, keep in mind you are screwing an iron stud into an aluminum case. If you have the earlier style pto like I do, remove the pto actuator cover(4 bolts), and begin install. If you have the earlier pto, you will be installing the pto twice, once to check backlash, and the second time to complete install.

The way I found easiest to get the pto onto the trans with the 2 studs installed is to place the pto inside of the passenger side frame rail, at the very rear of the trans, near the transfer case, and move it forward slowly with the pto's output shaft pointed at the transmission. When you get the studs, swing the pto around and align it with the 2 studs. HERE is where I ran into clearance issues. I had to remove 2 bolts that secure the front toolbox mount to the frame. There are 4 of them on the inside of the frame, and when installed with the nut side towards the pto, they protrude approx. 1", and you desperately need that 1" to complete your mounting of the pto to the transmission.

DSCN3294.jpg
Pic shows the bolts I removed to gain clearance from the outside of the truck. Once these 2 bolts were removed, the pto literally fell onto the truck.

It's that easy. Anybody could do it. So I wound up with 3 gaskets for shims, one thin and two thick, for a total of 0.050". For the final install, place the pto actuator and cover into the pto, but LEAVE the 4 mounting bolts out for now. Mount the pto onto the trans, be sure to get the really long bolt into the pto before placing it into the frame; this bolt goes in the very bottom center mount hole, it is too long to install after the pto is mounted onto the trans, unless you plan on drilling a hole into the frame. I suggest using a liberal amount of duct tape to hold the bolt in the pto while sliding it thru the frame.

I used blue medium threadlocker on all my fasteners to complete the install. A good thin 12pt. snap-on wrench will also make life easier while tightening the 6 bolts/studs that secure the pto.

I you have the earlier pto like I do, you will have to tilt the pto actuator cover up in order to install the pto actuator arm onto the pto cover. You will also need to know the indexing(clocking) position of the arm in order to get the throw of the cable correct. This is tedious at best. The reason for this is the bolt does not have room to thread into the cover, because of the frame.

I am guessing that the later style of pto alleviates this, because the position of its actuator cover appears to be on the very top, instead of tilted onto the side somewhat like my earlier style pto. This would mean that you could install the pto once, check the backlash, then simply install the actuator cover and actuator arm WITHOUT any grief or cursing.

Overall I found the pto install to be not that bad, and certainly not as painful as some make it out to be. I suspect that the reason opinions vary on this install is that there are big differences in A0/A1 and A2 trucks. Just guessing here, but installation on an A2 could be harder, due to the powertrain being located forward in the truck chassis several inches, and thus the pto not being directly below the in cab access door. Also guessing, but I bet that when the A2 trucks came into production, is also when the second later style of pto was produced because of unique clearance issues.
 
Last edited:

tobyS

Well-known member
4,820
815
113
Location
IN
Good write-up lindsey97. Easy to follow. If the cab access is further back in relation to the PTO mount in the A2, I can see why it could be harder to get to the shift plate and top mount bolts.

According to the Chelsea rep. the new style is 1/2" wider. How would having 1/2" of additional width affect it's install?

I have a few of the old style for sale, new in box, cheap.

http://www.steelsoldiers.com/showthread.php?162668-PTO-for-M939-series
 

lindsey97

Member
736
13
18
Location
wynnewood, oklahoma
tobyS, your pto's look skinny. I will probably buy one from you soon, I have more than one truck. An additional 1/2" will affect it, but I believe the pto will still install with the 2 toolbox/step support bolts removed. Will check what clearance I have and report back in this thread.

Please post a few pics of your pto's you have. I would like to try one of the type that has the short bolt in the top center hole, that requires the shift actuator plate to be removed in order to tighten it.
 

lindsey97

Member
736
13
18
Location
wynnewood, oklahoma
Got around to assembling everything onto my new rebuilt winch today. Have a question about the winch input shaft and the parts that connect the pump to the input shaft. I understand how the woodruff key works, it is definitely not a shear pin.

Is the gold pin that goes thru the input shaft, and has a cotter key in one end a shear pin, or does it just connect the input shaft to the adapter and never break no matter what? if it is a shear pin, where would a person acquire a spare?
 

lindsey97

Member
736
13
18
Location
wynnewood, oklahoma
DSCN3299.jpgDSCN3300.jpgDSCN3301.jpgDSCN3298.jpgDSCN3297.jpg

Finally got my winch setup installed. Front bolts are 1/2-20, with lengths of 1.0", 1.5", and 2.0".

Oil capacity of the reservoir is approx. 7.25 gallons. Hydraulic filter is a Fram C1666 or Wix 51467.

Specs on the 2 hoses going to the winch from the valve body are: 91" in length, 3/4" hose, JIC #10 female fittings on each end, with a 90 deg. male to female JIC #10 elbow on each hose for the pump end.
 

86m1028

Active member
1,687
16
38
Location
Murphy TEXAS
Great write up !!!

I would like to add a few things I have learned.
This is firsthand experience not guessing not what I thought fit or didn’t.
My “experience” is as follows
Removed complete setup from an AM General m925a1
Installed most of this “kit” onto a bmy 923a2
Removed all of this from the bmy.
Found shift towers different, pto shaft length, pto is different, hood rod different length.
The a1 pto would NOT fit in the bmy frame.
I dont understand the issues removing or installing the pto in an A0 or A1 frame.
I had plenty of clearance, no jacking or moving of trans.
The only issue I had again was trying to install the earlier style pto in the bmy a2.
It will NOT fit, even installing pto with trans completely out of truck.
Yes, it bolts up BUT comes in contact with frame when trying to reinstall trans in truck.
My bmy did not need any holes drilled in frame.
 

fuzzytoaster

Well-known member
Steel Soldiers Supporter
4,218
2,879
113
Location
Fort Worth, Texas
A customer of mine tasked me with installing a winch on his M923A2 and was provided a cobbled together kit from Army6x6. It was half pulled from an M932A0 and half any ones guess of an A1 truck, which I feared would happen, so we had lots of components missing or miss matched. After time and struggle almost everything is in place except I'm unable to find this lower L bracket for the winch directional cable.

This picture is off my M936A2 and should be identical for an M925A2 but the TM hasn't shown the bracket in question. Does anyone know what/where this bracket is in the TM? The A0/A1 depiction shows the wrong mount (obviously) and the A2 depiction doesn't show any bracket.
 

Attachments

juanprado

Well-known member
Steel Soldiers Supporter
5,504
2,700
113
Location
Metairie/La (N'awlins)
Don't know part numbers as I pulled mine off the scrapers coming out of Hattiesburg. CSM Davis might have one on a parts truck but it rather simple critter you could probably weld/manufacture.

I can measure mine if you need measurements?
 

fuzzytoaster

Well-known member
Steel Soldiers Supporter
4,218
2,879
113
Location
Fort Worth, Texas
Don't know part numbers as I pulled mine off the scrapers coming out of Hattiesburg. CSM Davis might have one on a parts truck but it rather simple critter you could probably weld/manufacture.

I can measure mine if you need measurements?
I managed to do some google-fu and crossed it over to a sub nsn that fits. I thought of fabing it but for liability and invoicing sake I found and bought one.
 
Top
AdBlock Detected

We get it, advertisements are annoying!

Sure, ad-blocking software does a great job at blocking ads, but it also blocks useful features of our website like our supporting vendors. Their ads help keep Steel Soldiers going. Please consider disabling your ad blockers for the site. Thanks!

I've Disabled AdBlock
No Thanks