• Steel Soldiers now has a few new forums, read more about it at: New Munitions Forums!

  • Microsoft MSN, Live, Hotmail, Outlook email users may not be receiving emails. We are working to resolve this issue. Please add support@steelsoldiers.com to your trusted contacts.


Mep802a shorted out, running rough

Korgoth1

New member
191
2
0
Location
radford, va
I have a 802 that has somehow burnt ground wires 100e (goes from starter ground to tb2 ground) and I believe 100g( goes from tb4 to control box ground) Luckily the insulation on the neighboring wires saved them.

I originally thought that maybe they put 100e on starter Hot terminal, shorting the battery through the wire, but that 100g wire is burnt up too. Any ideas what could have happened?

Some details on machine, It makes power, the generator end looks new. The engine is only running on one cylinder, so I haven't load tested it yet. Once I saw the burnt 100e wire I decided not to run it anymore, and started disassembling it to inspect the harness.
 

Korgoth1

New member
191
2
0
Location
radford, va
Got the harness repaired. At some point, every ground wire in this sucker got burnt, the easy to access grounds were replaced. Im betting thats why it has a new generator end.

So I got it back together and started diagnosing why the front cylinder isn't firing, just knocking. Took the pump out, its been replaced before, and seems to be in good shape. I will pull the injector tomorrow.
 

Korgoth1

New member
191
2
0
Location
radford, va
Ok, on one pump I have 5 shims and on the other pump I have no shims, Im going to assume I should at least have one shim on it. Im going to time the pumps to see what shims I need.
 

DieselAddict

Well-known member
Steel Soldiers Supporter
2,482
1,881
113
Location
Efland, NC
Was there any evidence that the injector pumps had been removed recently? Any disturbed paint or anything?
 

Guyfang

Moderator
Staff member
Moderator
15,885
22,141
113
Location
Burgkunstadt, Germany
Greetings! I am new here. But worked my entire 20 years in the army with power generation. I will be reading up on some of the threads to get up to speed. I have seen several times the ground wires burnt on a gen set when someone slaved it off incorrectly. When you switch the plus and minus, (and yes you can, if you try hard!) then the ground wires will fry. Believe it or not, way long time ago, the army had positive ground gen sets. The 45 KW stewart and stevens was one I worked on and when we got the "NEW" MEP-60 KW, and jumped one set from another, the wires fried all over the MEP-60 KW. So someone could have tried to jump your set with normal battery cables and alligator clamps. If the gen set batteries were deader then a door nail, then you would get no spark when the clamps were hooked up, but sure would do bad things to the wire harness when you started it. Just a thought. later!
 

Guyfang

Moderator
Staff member
Moderator
15,885
22,141
113
Location
Burgkunstadt, Germany
This is NOT normal. Read the TM and replace the shims correctly. OH, never seen 5 shims on a injector before. When it was removed before, It could have happened that the shims from one injector remained on the engine and the shims remained on the other injector. The pumps were switched, thus all shims are on one side. Saw this on several TIER 2 repaired sets in Germany about 7-8 years ago.

Guyfang
 

Korgoth1

New member
191
2
0
Location
radford, va
That explains alot! Yes the pumps are new to the set(not painted) And I suspected they doubled up on shims, but wasn't sure. The shims are clear plastic, not color coded, but are various thicknesses.
 

Korgoth1

New member
191
2
0
Location
radford, va
Ok, quick question, according to the TM, The pumps are timed using the intake valve/piston contact and a dial indicator to find a point where the piston is 2.519 mm before tdc on compression stroke.

Now if one has an older, carbonated piston/valve tops (as I have), how is that measurement going to be accurate with .5 mm of cooked on carbon?
 

Korgoth1

New member
191
2
0
Location
radford, va
I guess as long as I rotate the valve alittle while against the piston, to make sure any carbon thats loose is off, It will work.
 

Korgoth1

New member
191
2
0
Location
radford, va
Ok, I have found a few issues with the TM

"Measure piston drop. Engine should then be rotated opposite normal crankshaft rotation (counterclockwise as
viewed from fan end) to approximately 0.01 in. (0.2544 mm) drop beyond specified piston drop of .99 in.
(2.519 mm). Then rotate in direction of normal crankshaft rotation until specified piston drop is reached. It is
important that specified piston drop be approached in direction of normal crankshaft rotation"

As you know .99 in is not 2.519 mm, so I went with the metric measurement to set my Piston Drop. The front cylinder needs .04 in. of shims, which is what it had pretty much (3) .01 shims, (1) .003 shim and (1) .005 shim

I did not switch to the other cylinder's intake valve because both pistons reach tdc at the same time, so setting Piston Drop on one should set the other correct?

The rear cylinder measured 2.06, meaning I would need to SHAVE...not shim .04 which is why they used no shims I presume...

It says to subtract the measurement on the depth gauge from the pump plunger length, which they specify as 2.02 in. Is this the correct length for the pump plunger because my pump measured different?
 
Last edited:

DieselAddict

Well-known member
Steel Soldiers Supporter
2,482
1,881
113
Location
Efland, NC
I would spin it 360 degrees and measure both again. See if the measurement changes. Being on the compression stroke I bet matters to the measurement.
 

Guyfang

Moderator
Staff member
Moderator
15,885
22,141
113
Location
Burgkunstadt, Germany
My mistake

Korgoth1,
Its been about 7-8 years since I did this procedure, but I seem to remember that no two pump plungers was the same length. Having said that, I also can not remember one being to short. If I was still in the army, I would simply order another plunger, shim it properly and see if that fixed the problem. For you, that might be an expensive way to go about it. I am going to see if I can ask the "Obi Wan" of army power generation to take a look at your last post, and give us "the word".

My mistake!! I should have waited to post, after I asked for guidence from Obi Wan.

I spoke, (called) with an Army LAR (Logistic Assistance Rep.) Master Tech here in Germany, who said that the engine should be rotated, and that BOTH cylinders should be measured. She said that both should be the same, but that "you never know" is the byword in this case. Is there a data plate with the last tier2 rebuild/repair facility listed on the set? She would be intrested in who put it back together wrong.
 
Last edited:

Korgoth1

New member
191
2
0
Location
radford, va
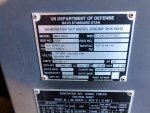
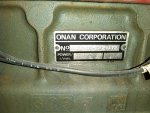
Guy, I looked all over the set and couldn't find anything with tier 2 or a reman tag, I did get a picture of the data plate from the set and engine...
IMG_20151204_161531_011.jpg

IMG_20151204_161302_317.jpg
 

Guyfang

Moderator
Staff member
Moderator
15,885
22,141
113
Location
Burgkunstadt, Germany
Thanks,

The data plate can be enlarged and the serial number cross referenced to see where it was last worked on. Sometimes when it goes in for tier 2 work, it doesn't get a data plate. Supposed to, but it happens.
 

Korgoth1

New member
191
2
0
Location
radford, va
Well I reread peter's rebuild thread to help add depth to the TM on re-installing the pumps, and I noticed he timed his pumps to the .99in piston drop and his seams to be running fine, so now I don't know which measurement the TM lists is right, I assumed the 2.519mm was correct and the .99 was a typo, meaning .099
 

Korgoth1

New member
191
2
0
Location
radford, va
I got it running today and loaded it for about 10 minutes with 6kw, how much are these 802 suppose to vibrate? It ran better the longer it went, but once the air was worked out of the system, it was still very shaky.

I have an oil leak somewhere up front, so gonna have to investigate that before I can run it much.
 

Korgoth1

New member
191
2
0
Location
radford, va
I had to take the check valves out, so I could work the fuel rail and visually confirm when the rear pump engaged the fuel rail, it was maddening. Also, it's a good idea to remove the stud from the case for extra room.
 
Top
AdBlock Detected

We get it, advertisements are annoying!

Sure, ad-blocking software does a great job at blocking ads, but it also blocks useful features of our website like our supporting vendors. Their ads help keep Steel Soldiers going. Please consider disabling your ad blockers for the site. Thanks!

I've Disabled AdBlock
No Thanks