• Steel Soldiers now has a few new forums, read more about it at: New Munitions Forums!

  • Microsoft MSN, Live, Hotmail, Outlook email users may not be receiving emails. We are working to resolve this issue. Please add support@steelsoldiers.com to your trusted contacts.


My M109A3 RV Project Blog

islandguydon

Well-known member
Steel Soldiers Supporter
3,724
782
113
Location
Michigan
exclent project

I just read the entire The Imperial Car Destroyer web site. I followed this thread as well. I like your attitude. I like the foam in the cab and the exhaust system I am sure your 109 is way quieter. I am going a different rout with the exhaust, but I will do the foam, this is a good insulating property as well and Michigan does get cold.

Hey, Since your ride is the CAR DESTROYER I would install a over and under bumper on the front. This way you can easily move disabled cars/trucks/debris out of the way. When I was down in GA last year I took a few pictures. The 109 pictured here has the bumper I am talking about.

Gimp's holding on to 2 deuce bumpers for me until I can get there for pick up. Mogger and I have the same trucks and 1 is for him. I really had a hard time locating 2 straight specimens. The one pictured has 8 grade H bolts bolted to the upper bumper and is re braced for bottom pushing. Just a thought for ya, It's what I'm doin.

You can get allot of good ideas off this truck.
 

Attachments

yarry23

Member
61
2
8
Location
Santa Cruz, CA
Islandguydon,

That's one seriously Bad Ass 109, I think Im in love! Would love to get a beefy bumper like that, although Im wondering if I would need to rent a forklift to remove the old one and lift the new one into place, lol! Also like where he mounted the spare jerry can.

I really like the placement of the ladder as well. I am planning on doing solar ont op, but only with part of the roof. The rest will be storage, and a 'kickin-it-with-beer-or-lemonade' deck. Can't wait to go to Super Singles as well, but thats quite a financial investment. Spend half as much as you bought the truck for on tires!

Any idea where I can find a roof rack as well? Its been in my plans forever, but I have no clue where to go find em.

Anyways, thanks for the feedback and inspiring pic. I have my first real major job coming up - removing the wheels and brake assembly and replacing my leaking front axle boot. Big job, but I want to do it right, and replace it with the single piece, non-zippered boot. Wish me luck! I will write about it one way or another. Hopefully you will see a success story posted soon.

*crosses fingers*
 

islandguydon

Well-known member
Steel Soldiers Supporter
3,724
782
113
Location
Michigan
That bumper is a Deuce bumper upside down bolted to the upper one. You don't have to remove your existing one, it stays there.

If you don't mind I can post a few pictures of 6-10 different 109's and what they did.

I bought the oddball express with only the interior floor done on purpose. I wanted to do the interior myself. I am going with a Log bunk bed across the back and knotty pine rough cut sanded interior. 24v gel cell forklift battery cut into the floor under the bunk and braced across the frame. The 109 is a top heavy truck and so I want the battery weight low from center of gravity, 1,965 lbs. I just looked at the shipper to verify.

The battery is the heart of the system, services the truck, 6000 watt inverter for 120/240v power needs, The inverter/charger will keep the battery charged if its hooked to shore power. If not my neighbor is an aluminum welder so he is making the same ladder and cab roof rack as the picture posted. He will build the solar panel frame to secure 5-24vdc panels. Also when your driving your charging the battery as well. With a gel cell there are no fumes and 100% maintenance free. Just need a desulfater or solorgiser to keep it in tip top shape.Thats my plan for the summer of 2012
 
Last edited:

islandguydon

Well-known member
Steel Soldiers Supporter
3,724
782
113
Location
Michigan
Islandguydon,I have my first real major job coming up - removing the wheels and brake assembly and replacing my leaking front axle boot. Big job, but I want to do it right, and replace it with the single piece, non-zippered boot. Wish me luck! I will write about it one way or another. Hopefully you will see a success story posted soon.*crosses fingers*
Take pictures, we like pictures..:popcorn:
 

yarry23

Member
61
2
8
Location
Santa Cruz, CA
The ICD's New Boots

Stopped At Stage One


Time, where does it go? Anyways, been a while since I've posted anything, but I am happy to say I am back in the writing saddle once more. Some big progress on the Imperial Car Destroyer, and I can't wait to share it with you. I, your humble Captain of this mighty vessel, have undertaken, and accomplished the biggest mechanical task I have ever attempted - both figuratively and quite literally. So, what is this monumental task of mechanic'ing that rests before us you ask? Well, let me tell you... The Axle Boots.


Bad greasy badness!

The axle boots are the rubber accordion style gaskets that go on the inside of the front axles, between the front axle housing and the rear of the brake and hub assembly. The military, in all of their infinite wisdom, standardized on a zippered booty system. There are some advantages to this system, namely that they can be replaced in the field with minimal fuss without having to take apart the entire front end of their vehicles. The down side is that they are less durable, and typically start leaking from the zipper itself in a matter of one or two years. Sure enough, mine were leaking. Leaking Green Gobbery Goo Snot, also known as axle grease.

Now, I had some hard decisions to make. The first piece of bad news was that I really couldn't drive the ICD in its current state, as I was worried about damaging things if I lost too much grease out of the axle. I wasn't in danger of that yet, but if I kept driving her, it would only be a matter of time. Next was whether or not to replace the ripped booties with another set of zippered ones, or to replace them with a single piece non-zippered boot. I spoke with some friends, and started doing some research on the web. I was leaning towards doing the zippered ones, as it would be much, much faster, but my friend Joe Alig (the Imperial Car Destroyer's Chief Electrical Engineer) talked me into doing the job correctly. With a non-zippered boot I wouldn't need to replace it as often, and it was going to be less prone to get dust and other nasty stuff into my axle. I made the order and started to psyche myself up for the job. It was going to be HUGE.


The supplies...

In order to prep for this job, I read and reread this fantastic post and walk-through of this very same task I found on Steel Soldiers. The write-up by Banshee365 was fantastic. I have no idea who that guy is, but I want to give a huge shout out to him saying thanks! You can find his excellent post here. I started going through the list of supplies I would need, as well as specialty tools. I ordered the following supplies and tools:

20 Ton Bottle Jack
Pair of 6 ton jack stands
3" 8 sided socket
8 tubs of axle grease
One box of nitrite gloves
2 gallons of 80w90 gear oil
Pack of shop towels
(2) Axle boots
(2) Inner hub seal
(2) Outer hub seal
(2) Cans of PB Blaster
(3) Cans of brake cleaner
One box of trash bags
I planned on using hand tools I already owned, and air tools as needed (have to keep leveraging the investment in that nice air compressor - working out great!). As fate would have it, I would end up purchasing many more tools before the project was over, but I get ahead of myself. Supplies in hand, I was ready to get this project started! One last thing I should mention is that I also downloaded the TM's for all of the relevant repairs I would be making. Steel Soldiers has a link to them off of their site here.


Back when my rod was straight...
So, first things first - Step One, remove the lug nuts in preparation to take the wheels off! No problem, right? I had already found the tools to do so in my utility box (see previous post on Treasure Hunting) so it was simply time to bust them out. I did so, got the 1.5" socket on the lugs (that's a HUGE socket by the way. Go check your local tool store and see if they even carry something that big. I bet you they won't) and got to work. I put on the three foot solid steel extension bar and heaved with all my might. Nothing. I had sprayed PB Blaster on the lugs and let them soak in overnight (more like a few days), but I blaster some more in there just in case. I then went and got Cricket, and she and I stood on the steel bar and bounced up and down for a while, trying to break the lugs free. It was fun (bouncing with the wife always is!) but in the end all we ended up with is a bent rod (which is not fun, especially with the wife!).


So, no dice. Time to call up my buddy Joe and ask him to bring down his 3/4" torque bar. The thing is a beast. It goes up to 600 foot pounds of torque, and could be used to kill a zombie in a pinch! He pulled up in his old Mercedes 240D and unlimbered the giant black case from the back of the car. It reminded me of a sniper deploying and setting up his hardware. In my head theme music was playing as he strode forward purposefully. And yes, this kind of thing does indeed go through my head all of the time.

We put on the 1.5" socket on the end of the beast and started pulling. The torque readings kept on increasing, three hundred, four hundred, five hundred, six hundred foot pounds of pressure! And yet, the lugs didn't even budge. Joe wisely decided not to run the risk of destroying his beautiful torque wrench, so we sadly set the beast aside. What were we to do?

Never one to give up, we hopped in the car and started driving to auto shops. I was simply going to buy a bad ass impact wrench and be done with it. Ends up, no place in Santa Cruz sells 3/4" drive impact wrenches. I know. I visited every single one of them. Okay, lots of time spent in a car, no closer to getting the lugs off my truck. New idea - if we couldn't buy one, we would rent one! So, I called A Tool Shed and asked if they had one. Ends up, they did, but it was an electric one. Desperate, I rushed right over. When we got there, I was really impressed by the wrench. It weighed about twenty pounds or more, and looked like a plasma rifle manufactured in the 1950s. Bad ass!


Plasma rifle in the 50 watt range - this sucker has GOT to work!

Back at the truck, we crossed our fingers, sprayed some more PB Blaster on the lugs for good measure, and then started hammering. The old metal electric impact wrench kicked like a mule and made a racket. I could hear its hammer blows echoing down the street as I leaned into it. I am pretty certain an old couple walking down the street stopped at the corner, reconsidered their evening, and just went back inside by the sight that befell them. I may have laughed maniacally for a bit. Just a bit. Honest.

Oh, the lugs you ask? Oh, um... yeah. They didn't budge. Not even a bit. Yes, they defeated the steel bar, the sniper torque wrench, AND the plasma rifle impact wrench. And it was now dark. Thoroughly depressed, I did the only sensible thing. Drowned my sorrows in beer and cried on Joe's shoulder. It was very manly, I swear. Regrouping, I decided to head over the hill to San Jose and visit Harbor Freight, which I should have done in the first place.

I got a good night's sleep, hopped in the car, drove up to Joe's place, and headed over to The Pit - also known as San Jose. Soon we stood in the parking lot of Mechanic Heaven - also known as Harbor Freight. For someone just getting back into wrenching on vehicles again, Harbor Freight is a dream. Relatively decent quality tools, for dirt cheap. Sure, they are made in China by babies forced to eat burning tires and used motor oil, but hey - cheap tools!


Land of Cheap Tools! Hallelujah Brother!


The new hotness!
I had to seriously restrain myself while I was there. Who knew there were so many tools I just had to have! I purchased a 3/4" air impact wrench and a 3/4" drive impact socket set. I also bought a larger air hose for my compressor (and some various bits) in order to properly supply enough air to the wrench. I drove my purchases home (after dropping off Joe) and gloated over them for a while, rubbing my hands in expectation. NOW I had some serious firepower. Er, air power. What ever. This HAD to work!

Crossing my fingers, and invoking the Great Automotive Gods Click and Clack, and hooked the sucker up and fired up the air compressor. With a squeeze of the trigger the impact wrench kicked in my hands and the lug nut spun free! Free at last! FREEDOM! I sat there, staring at the lug nut, now off the wheel, and grinned stupidly. Only them did it dawn on me that I had just spent my entire weekend I had reserved for doing the axle boot job on Step One - remove lug nuts. My smile slid off my face, dribbled down the driveway, and went down the drain.

I put the lug back on, and recommitted myself to attacking this job ASAP. Which, coincidentally, will bring up to our next post. Keep reading to see how it all turns out! I promise to post the next one in a much more timely manner! Honest!
 

Attachments

yarry23

Member
61
2
8
Location
Santa Cruz, CA
Elbow Deep In Grease!

(original post can be found here: The Imperial Car Destroyer: Elbow Deep In Grease!)

AKA - Axle Boot Repair Part Two

Where we tear this sucker apart!


"Gee, sure hope this thing doesn't
land on me...

Success!
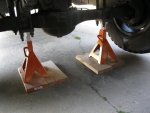
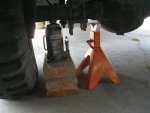
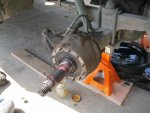
So, picking up on our story from last post, I had FINALLY found a solution for getting off my lug nuts, and it was time to get to business in earnest. Next available weekend I tore back into the truck, confident I had all of the right tools at my disposal (this time for sure). First matter of business was to jack up the truck and get it onto the 6 ton jack stands I had purchased. Now, I have jacked up small Mini Coopers and Honda Civics and the like, but I had never contemplated jacking up a truck in excess of 15,000 pounds! Luckily, I had prepared for this ahead of time, and had purchased a cheapo 20 ton bottle jack from Harbor Freight. The axle that I was going to lift up is so high off the ground however that you have to use some kind of support to go under the jack in order to have it work. I bought a cheap 2 by 8 from Home Depot and cut the thing into workable pieces. You then jam these pieces under the bottle jack, and get pumping!


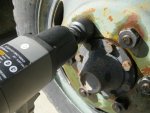
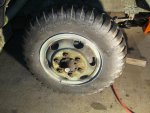
Next I fired up the old air compressor, let it build up to 120 PSI, and hooked up my new kick ass impact wrench. I attached the 1.5" impact socket, and started popping off the lug nuts. After the trials and tribulations of the last attempt, I was amazed at how easy it was once I had the right tool. I think I had all six lug nuts off in under six minutes per side, tops! Word of advice, when that last lug nut comes off, the wheel is now hanging freely on the studs. Be careful with it. Also, these tires are heavy. Take care when lifting them off to not scrape the threads on the way out. Another gotcha is the fact that the driver side lug nuts are reverse threaded, so don't go hammering on them with your new impact wrench the wrong way or anything! (I was actually extremely careful with this part, as I was sure I was going to get it wrong. Luckily, disaster was averted...)


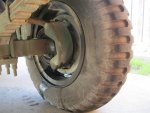
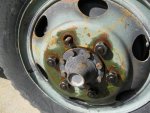
Check out the nice Rust Haven I have discovered!


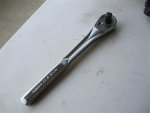
"1/2" drive socket wrench, check!"
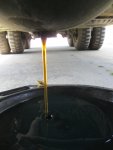
The wheels were off, and I carefully rolled them to the side of the house and leaned them up against the fence there. There was a fair amount of rust trapped between the inside of the wheel hub and the outside of the brake housing, but it was on the surface, and none of it looked too severe. Sure was some pretty colors though! Next I had to drain the oil out of the axle housing itself. For this I borrowed a giant oil drain pan from Joe, and placed it under the drain plug on the front axle housing. Crawling under the housing, I saw that the drain plug has a square half inch socket on it. I guess you are simply supposed to shove a 1/5" drive socket wrench up there and work it free. Of course, I didn't have said socket wrench, so I popped out to the local hardware store, bought one, and returned. Said socket in hand, I carefully undid the drain plug. I don't know about you guys, but I always get my "lefty loosey, right tighty"confused when I am on my back for some reason. I always remind myself by pretending to open a beer bottle, something so instinctual I can always remember it, no matter which direction I am facing.

I got the thing out without too much difficulty, and I was pleased to see that the oil coming out of the front axle didn't appear to be in too bad shape at all. It had a nice amber quality to it, and didn't have any chunky particulate matter show up. All this was good news! I had had some trepidation about what I might uncover once I stared tearing this thing apart - who knows how well maintained a forty seven year old army truck would be, right? So far, so good!

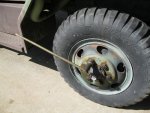
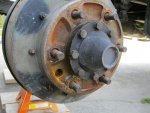
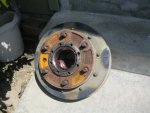
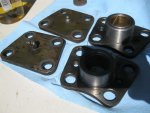
Next I needed to take off the axle hub cap itself, the cap on the end of wheel that holds in the axle proper. This is held in place with eight smaller sized nuts, as is visible in the picture above. The inner side of this cap is splined, and without it the wheels will not drive. I discovered I had no sockets of the appropriate size, and sighed as I headed back out to the hardware store. I had this new 3/4" bad ass impact wrench, so I went out looking for some smaller 3/4" sockets. It ends up that no retail store in Santa Cruz carries 3/4" sockets. I know, I looked. After trying four different places, I was directed to try Sears. I drove to Capitola, and walked into the place, well aware of my good daylight hours slipping by. When I discovered they didn't carry them either, I was understandably disappointed. I did the only sensible thing - I bought a 1/2" drive impact wrench as well and a smaller set of sockets to go with it. Problem solved!

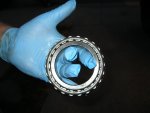
With the smaller half inch impact wrench I was able to pull out the axle hub bolts with no problem. It's nice working with air tools, because the bolts are broken free without much damage to them at all. And lets face it, it puts a smile on my face every time a new bolt or lug comes free and I get that sexy "air tool whine" at the end. Maybe its just me... *grin* Pulling off the axle hub cap and setting it aside, you reveal the end of the axle and its retaining nut and washer. There was a wonderful mixture of red and green (how festive!) grease once I got it apart, green on the axle itself, and red on the wheel bearings. Note the splines on the end of the axle shaft that is now revealed.


Axle shaft, 8 sided lock nut, and outer wheel bearing...

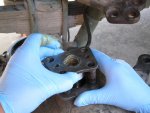
Next I had to straighten out the bent clips on the castellated retaining washer. I did this with a hammer and my largest flat edge screw driver. Hey, this vehicle aint subtle, neither are its tools! Once most of them were straight, it was time for me to break out my specialty tool, something I am pretty certain will only be used for doing wheel repair on giant army trucks, school buses, and fire engines. An eight sided, three inch socket made of solid steel. I had to special order mine from Winchester Auto, because they had never heard of one that large. It made me smile. I attached it to my 3/4" impact wrench, and slipped it over the lock nut and gave it the tiniest blip of torque. It came right off, and nothing was damaged. Success!

Next I had to pry out the outer wheel bearings. This is done by using the same aforementioned largest flat head screw driver and wedging it in there and prying the sucker out. It requires a strange combination of delicacy and brute force, much like a barbarian would wield a zweihandler. Or at least it did in my mind. This was a little tricky at first, as I wasn't exactly certain what was bearing and what was seal, and where they would all come apart at first, but I soon got the trick of it as I wiped away from of the grease and got a better look. I also have to say, being able to refer to the Technical Manuals and see the blow out diagrams of them was a HUGE help!

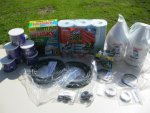
A quick note on keeping yourself sane when doing a large project like this. Do things methodically, and follow a pattern. It doesn't have to be the 'perfect pattern according to blah blah blah', you just need to be consistent, and do things the same way, every time. Mostly I am talking about where you place the bolts you take off, the nuts you collect, the hubs you disassemble, and so on. For me, I setup one of my plastic fold out gaming tables and re-purposed it be my parts bench. Whenever I would finish with one step of the disassembly, I would then add the recent parts to the bench in a pile of like with like, taking care to keep the right side separate from the left, and so on. I happened to start from right to left, and planned to go from left to right in reverse order when it was time to put the sucker back together. In this manner I would be able to give myself every advantage possible when it came time to actually making this sucker work once more. Let's be clear - this is help for the assembly stage. Anyone can tear something to pieces. But putting it back together, and actually having it work better than before, there in lies the province of mechanics! Anyways, find a system that works for you, and stick to it throughout the entirety of a project.


Lugs, hubs and bolts, and outer wheel bearings...
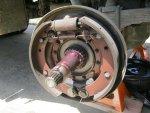
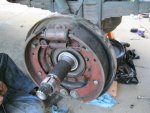
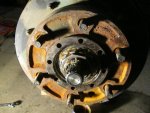
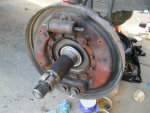
Brakes, revealed!
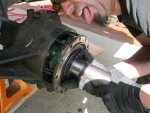
So, I had the outer wheel bearings out, the axle hub off, and all the various bolts removed. It was time to pull off the drum! At this point there was nothing holding it in place besides friction, so all I had to do was carefully lift it and pull it past the six threaded studs. Easier said then done though, as the drum weighs a significant amount, and it likely one's fingers are covered in grease at this point! Still, I managed to feat without any unfortunate mishaps, and seen the interior of my front brakes were bare to the world! I set the drum aside and put it down gratefully and checked out the interior of my brake assembly. I was stunned at how clean it was, and in what good repair. Plenty of life left on the front brake pads, and there was no significant amount of rust anywhere I could see. I was prepared for many things, but it had never actually crossed my mind that perhaps everything would be in pretty decent shape once I started digging into the beast. Obviously I was missing something!

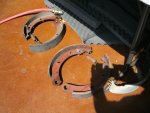
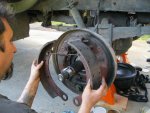
Next was the tricky business of actually disconnecting the brakes themselves. In case you didn't know, the deuce has an "air assisted" drum brake system. This means it is essence a traditional fluid based system using these epic pads and drums to stop the vehicle, and relies on the additional power provided by the air tanks to give you that extra umph required to stop a vehicle this large. Removing the brake shoes required taking out the two pairs of guide bolts roughly in the middle of the shoes, as well as the primary retaining bolts with their horse shoe retaining clips. These are located on the bottom of the assembly. You should also remember to actually disconnect the brake lines from the back of the hub before proceeding, otherwise its even more of a mess than it needs to be.


By far the trickiest part is getting two main bottom bolts out, as those horse shoe clips like to slide around if they are not held in place. I used a wacky 'dual screwdriver and hammer' technique I came up with on the spot, which basically involved holding two flat bladed screw drivers in place, each with a blade on the opposite side of the end of the horse shoe clip, and whacking them ever so delicately with a large hammer. Sounds nutty, but it worked, so hey. Once those are off, you can move the brake pads back so they disengage from the pistons at the top of the assembly, and then you can simply lift them clear and away. Next you have to remove the twelve bolts that hold on the brake assembly, set them aside, and then remove the assembly itself. This is pretty straight forward, but as you can see I managed to remove one of the studs themselves int he process! (see picture below) Luckily they are double threaded, so it would go in again no problem, but I was a little worried at first.


Is it just me, or is that a tad bit phallic?

I now had just the steering knuckle, inner wheel bearings, and axle boot left to go! I was getting close, I could feel it. Joe had shown up at this point, so it was time to bust out a cold one and marvel at the progress so far. We gave thanks to the great god of Auto Mechanics and Fermented Yeast Products, and then got back to it.


Oil, heat, hit. Repeat as necessary.
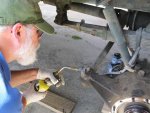
Next came one of the toughest parts of the whole job, if not THE toughest part. Removing the tie rod. This is tricky to do on a conventional truck or car (or Lesser Vehicle, as we on the Imperial Car Destroyers crew compliment like to say), and was downright intimidating on a vehicle of this magnitude. Luckily, we had beer, and a veritable wealth of backwoods ingenuity, so we plowed ahead, undaunted. First thing to remember is to remove the cotter pin from the top of the castellated nut before proceeding. That done, we moved on towards actually trying to remove the sucker. Joe had brought a wide assortment of tie rod removers, but none of the contraptions seemed to work. In the end, it was a combination of soaking the thing in PB Blaster, hitting it with my giant sledge hammer I bought for just such a purpose, then heating it up with an acetylene torch, then repeating the process. If at first it doesn't come loose, use more PB Blaster, then hit it harder. If it still doesn't come loose, heat the sucker up til just below when the PB Blaster starts to boil off, then hit it again, this time with feeling. If that doesn't work, return to step one and repeat. I can tell you this, all of us cheered when the thing busted free and clanged onto the driveway, that's for sure!


Yummy!
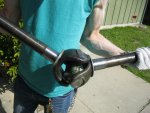
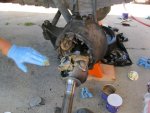
Next was one of the most rewarding parts, removing the axle and the inner wheel bearings! There are twelve bolts that hold the We had worked hard to get here, and it was exciting to pull that sucker out. Gripping the end of the shaft manfully, you simply have to give it a good yank and it will come (off) in your hands. I am, of course, speaking of the axle itself. It revealed a ton of green axle grease behind it that looked for all the world like so much ogre snot. It was disgusting I just had to love it! Contrary to popular belief, ogre snot is actually quite yummy. tastes like apple pie actually. I could tell as much by simply sticking out my tongue and tasting it (do not try this at home).


Joe's son Nate holding the passenger side axle

The axle itself was way cool, and made of good old solid American steel, back from when we still mined our own metals, and paid our own iron and auto workers to make it! Mostly at this stage I was using the boxes of plastic gloves, over sized trash bags and blue shop towels I had purchased for this project to clean up the epic amounts of axle grease packed into this sucker. There was no way to this gently, cleanly, or gentlemanly. Pretty much you were going to get disgusting, and get disgusting quickly. As a kid, I would have fainted or come up with some lame excuse for why I suddenly needed to be doing something else right now. As an adult, I reveled in it and may have started cackling madly at some stage. Who can tell, eh? Amazing what a little bit of perspective and thirty odd years can do to you...


Passenger side, easy peasey!

Drivers side, not so much...

I think we filled something like two trash bags of towels, grease and gloves before we got them both out, but we were singing and joking the whole time. Next we had to get off the steering knuckle itself. This proved to be fairly straight forward on the passenger side, but was a little tricky on the drivers side. Passenger side was a simply matter of removing four nuts (two really, as we had removed two before to get off the axle boot guard), remove the top plate, and simply lifting the knuckle off over the studs. On the drivers side it has the steering arm attached, and the bolts are actually under pressure due to being fitted into concave cavities. Very tricky to remove. This proved to be almost as difficult to remove as the dreaded tie rod, and we found ourselves unprepared for it.

With the tie rod, at least we knew we were in for a hard task. With this driver side steering knuckle, none of the technical manuals or the walk through on Steel Soldier's mentioned this small technical detail, and the top plate of that steering knuckle was not coming off, no matter how hard we tried. Sure, we got the bolts holding it to the steering arm off just fine, but then we had to remove the top plate from the steering knuckle in order to lift it free, and that just wasn't happening. At first we tried prying it free with large flat head screw drivers, but that wasn't having any effect what so ever. We tried some PB Blaster, so heat, some swearing, and some more swearing. In the end I had the vindication of using one of my favorite tools my wife thinks is ridiculous (and to be clear - it is), my four foot long wrecking bar. This thing is great! Its an Uruk Hai weapon if I have ever seen one! When you hold it in your hands, you feel like you could pretty much destroy just about anything you came into contact with. Taking this weapon of Mass Decontrsuction into my hands, and my large sledge of tie rod removal fame, we pounded the crap out of that stupid little metal plate until eventually it had to come free, and it did, oh yes, it did! Was not expecting this to be such an epic tale, but it seems every auto repair of merit has at least one of these - the little detail that turns out to be the The Big Deal.


Yeah, those tools of auto repair. Honest!


Modern art, or M109A3 axle?

Oh yeah, that's pretty!
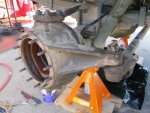
With both steering knuckles off, the axles out, and the brake assembly removed, we now had the thing down to its skivvies. What was kind of cool is that you could look through the entire front of the axle and see clear through to the other side! This was all kinds of cool, and of course I had to take a picture.

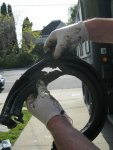
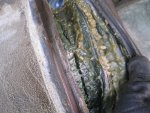
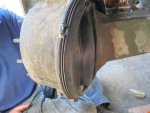
Next was the part where we actually took off the axle boots. You know, the part we had done all of this other work to get to? Yeah, I had almost forgotten about them too at this point. There is a large retaining ring held together with a simple bolt that needs to be removed first, and then it is a simple matter of prying the boots free. When we did so we were confronted with the some pretty gnarly bad grease. In a way, it was vindication that I needed to do this repair in the first place, as the more disgusting discoloration and opaque quality of the grease was an indication that it was starting to break down from the additional material and crap that was getting in through the rip in the axle boot.

I felt around until we found the zipper in the boot, and then began to unzip it. This was harder than you might think, because at this point pretty much everything was covered in a fine layer of axle grease, from the boot, to my gloves, to the zipper and my beer bottle. Still, we managed to get the sucker apart, and yanked it out of there. Before bagging the thing, we examined it for a bit to see how bad it was. Ends up, it was in sorry ass shape. There was a huge rent through the boot, large enough to pass three or four fingers through at least! Holding it up to the light made it really clear - that thing was FUBAR! The other side had a tear as well, not quite as bad, but still in sorry shape. We felt ultimately justified in our need for the repair, and congratualted ourselves mightily. It now being quite late, we packed it in for the day, carefully covering the exposed axle with trash bags and stuffed with shop towels to keep them vaguely protected, and called it a day. It would end up being weeks before I got the axle back together, but that is a story for another day (and my next post). Please stay tuned, details are forthcoming!


"That doesn't look like a problem, does it?"
 

Attachments

M1031CMT

New member
356
12
0
Location
Ontario
Islandguydon,
Any idea where I can find a roof rack as well? Its been in my plans forever, but I have no clue where to go find em.
I didn't notice this question until now. They are not commercially available. They only came on the Canadian M35's (MLVW's).

But you can build your own. Here is a manual showing you how to do it.
 

Attachments

Lextreme

New member
244
0
0
Location
SGV Ca.
I just read the entire The Imperial Car Destroyer web site. I followed this thread as well. I like your attitude. I like the foam in the cab and the exhaust system I am sure your 109 is way quieter. I am going a different rout with the exhaust, but I will do the foam, this is a good insulating property as well and Michigan does get cold.

Hey, Since your ride is the CAR DESTROYER I would install a over and under bumper on the front. This way you can easily move disabled cars/trucks/debris out of the way. When I was down in GA last year I took a few pictures. The 109 pictured here has the bumper I am talking about.

Gimp's holding on to 2 deuce bumpers for me until I can get there for pick up. Mogger and I have the same trucks and 1 is for him. I really had a hard time locating 2 straight specimens. The one pictured has 8 grade H bolts bolted to the upper bumper and is re braced for bottom pushing. Just a thought for ya, It's what I'm doin.

You can get allot of good ideas off this truck.
Awesome projects for both of you..... Island, do u think we can get more pictures of your 109?
 

yarry23

Member
61
2
8
Location
Santa Cruz, CA
Awesomeness and some appreciation!

I didn't notice this question until now. They are not commercially available. They only came on the Canadian M35's (MLVW's).

But you can build your own. Here is a manual showing you how to do it.
M1031CMT - thanks a ton! A pity they can't be acquired without fabricating them yourself, but this way they will simply be cooler, and more custom! *grin* Oh yeah, and a bit more work, hehe...

Once again, thanks man. The community on this forum is pretty much the best thing ever. I don't know what I would do without you guys.


~~yarry
 

M1031CMT

New member
356
12
0
Location
Ontario
Well technically you can buy them. I know of one place that has a couple from trucks that they scrapped, but it would cost a ton to ship due to being over-sized. I also have a spare assembly in the yard, but again, shipping would be an issue. You can build one for maybe $100 in metal.

But yes, the professionally made ones are nicer. They also have a removable basket (though I am not sure when you would ever have to actually remove it).

Forgot to take installation pictures when I put it on the truck, but it is pretty straight forward and looks good afterwards: MilitaryTrucks.ca - RV Project
 

Clay James

Member
524
4
18
Location
Reno/NV
I still use the military lug wrench and breaker bar :) Just put it on the lug nut and jump on it and they break free. I always bend the bar, but I just turn it the other way for the next one and bend it back.

You can take the knuckles off without removing them from the tie rod. I've done this three times and never removed the tie rod. Just take the top and bottom plates and kingpin bushings off both sides and you should have enough play to work the knuckle and tap on it and it should slide over the kingpins, then have someone lift that side and you go to the other side and rotate it off.

Make sure to check the end play when you put it back together. Also check your kingpin and spindle bushings. On my A2 I replaced all the bushings on the front axle and it still leaks like crazy. At least I've narrowed it down to end play(new spacers should take care of it). Also going to get the new style seal I found.

Those look like the rubber, Chinese boots I used the first time. They'll dry rot almost immediately unfortunately. I replaced them with silicone ones in December and they seems to be holding up okay so far.
 
Last edited:

yarry23

Member
61
2
8
Location
Santa Cruz, CA
Clay, great advice there. Hadn't thought about just simply not removing the tie rods. What a concept! Perhaps I'll try that next time, as I am sure there is inevitably going to be a 'next time'.

As for the boots, I ordered mine from Erik's Military Surplus and I am pretty certain they are the better silicone variety. At least, that's what I ordered on the web. ;)

I already got the sucker back together, but that will be in my next post, which I hope to get out to you guys soonest!

Loving the feedback, thanks guys! I get a little bit smarter every time I come here. *grin*
 

nf6x

Feral Engineer
1,630
49
48
Location
Riverside, CA, USA
About the drain plugs: One of the little bits of kit that was originally supposed to be in the truck's tool bag, and was likely lost long before that tool bag parted ways with the tool-bagless truck that you would eventually buy, is a little steel bar. It'd be square in cross section, a half inch wide, and around 2-3 inches long. It was meant to be stuck into the drain plug and then cranked on with one of the crescent wrenches that are also missing from the missing tool bag. Now, I've never actually used one, because I never got one until I recently bought my M923 5-ton that went through a rebuild program and then found its way to me before somebody got around to stealing the tools. Still, I've counted myself lucky so far that I've managed to get my drain plugs out with a 1/2" socket wrench or breaker bar, since the plugs are often pretty banged up, and a socket wrench thingy usually has much rounder corners than the little steel bar. I suspect that the proper little steel bar will work better on a badly mistreated drain plug.

Regarding everything else: As I read long, I kept thinking to myself "yup, that's how ya do it". I was filled with suspense about whether you were turning the lug nuts the right direction. You actually got off even easier than you might think... on my first MV (an M109A3 shop van), there were a couple of lug nuts that I spent hours getting off even with a 3/4" air impact wrench! I also had a whole hub on the left side that had right-hand studs installed, and it's a good thing that I checked the markings on the ends of the lugs before I hammered away at them.
 

yarry23

Member
61
2
8
Location
Santa Cruz, CA
Putting It All Back Together

(For the full Blog post, please visit The Imperial Car Destroyer. Sorry, no inline images yet. It's really late, and I'm tired, so just doing what I can to get it posted.)

AKA - Axle Boot Repair Part Three


So, you have torn your giant, old army truck to pieces, have you? And now you want to put it back together? Oh, and have it work again? Better you say? Well now, let's not be so hasty... So, yeah. I had torn my big green beast to pieces, and now had the daunting task of getting her reassembled ahead of me. In truth, I was looking forward to this bit, and couldn't wait to get started.

Except I did wait, not that I had much say in the matter. My youngest daughter (I have two, this one being Ensign Indigo, of Girl Scout delivery fame) got a horrible infection in her knee, and had to be hospitalized for a week. Shortly afterwards, a friend of mine was murdered here in sleepy little Santa Cruz. So, yeah, the Imperial Car Destroyer had to take the proverbial back seat for a little while. You will love this though - after having missed days of work, and staying several sleep deprived nights in a chair next t my daughter's hospital bed at the Lucile Packard Children's Hospital, what is the first thing I do on the Sunday afternoon we are released?

That's right. Rush home and begin working on the truck. *evil grin*


"Right, now where was I again..."

Hard to believe, I know, but there it is. My buddy Joe came through again, and the two of us convened at my house an hour or so after I got back into town for the first time in days. I set the girls up with some show and lemonade, got myself and Joe a beer, and got to work. Now, time for some mention of the work I had done in the down time between when I finished tearing the front end apart, and when I was about to put it together. In my copious spare time (in between staying in hospitals, working full time, being a dad of two girls, and trying to keep a relationship more or less working) I had managed to clean off the majority of the axle grease from the steering knuckles, mounting plates, axles and so on. For this I setup a separate folding table in my back yard, stashed a couple cans of carb cleaner, numerous rubber gloves, and my remaining supply of steel wool. Every day I would get home from work I would go out there and scrub forty seven years of grease and grime off of some motor parts after dinner. To tell you the truth, it was kind of fun, but then again, I am obviously a warped individual.

Yeah, this is AFTER cleaning...

I had big dreams of removing every little spot of rust from the interior wheel assemblies and making them factory fresh before reassembling them, but that ship sailed once Real Life entered the picture and whopped me upside the head. In the end, I was happy to have a focused evening with Joe's help to tackle simply getting the sucker back together and in one piece. I focused on making sure the interior bits were spotless, and settled for scraping most of the gunk off the exterior sides. No bead blasting. No Factory Freshness, but such is life. I suppose you could use the saying, "Good enough for government work", but as I have never worked for the Government, I wouldn't actually be able to verify that fact.


Buy the silicone ones!
So, first things first, we put on the **** boots! I had read around on Steel Soldiers and seen a lot of posts warning about "those darn cheap Chinese rubber boots", so I made sure to follow a few links and go to Erik's Military Surplus and buy the "good rubber silicone" ones from them. I am sure they cost a little more, but at $36.50 it was small change compared to the time and energy spent on getting to the place where I would get to install them. So, if you ever find yourself doing this, buy the silicone boots. That being said, I tore them out of the packaging, and brought them over to the end of axle housing. I had cleaned off most of the gnarly gunk that had accumulated over the years, so it actually looked pretty clean. Initial installation is basically stretching the boot over the steel cylinder that holds on the steering knuckle and then wiggling them into place.


New boots!
There is a little groove that they will want to rest in, so that's where you should aim for. In addition it should be mentioned that the boots have accordion like folds in them, and there are more on one set of sides than the other. Use your intuition as to how they should go on - more folds towards where it will want to turn and bend (i.e. - think about how the wheel turns, then do the right thing). At this point it is appropriate to secure the inner wire clamp that holds the boot in place. This is the ring that secures the boot into that little groove I mentioned.

Next, you grab that freshly cleaned steering knuckle and lift it into place. You will need to lift it over the mounting cylinders located on the top and bottom in order to get it into place. Pay attention to which side is which - the driver side will have the concave bolt cavities, so it's hard to get too confused. You then put the mounting plates back on, flat side up, sliding the smaller cylinder into the larger one to hold the steering knuckle in place.


"Good booty, niiice booty..."
Once the top and bottom plates are seated, you can bolt them into place. Next you can attach the outer edge of the boot to the newly installed steering knuckle. Once again, there is a little groove on the outer edge of the steering knuckle it will want to slip into. You then take the larger outer wire clamp and tighten it over the boot. You might need an extra pair of hands to hold the boot in place while you do this part. Once it is securely in place, pull the steering knuckle back and forth and check out the action on the axle boot. It should easily move, the accordion folds opening easily and not being under any undue stress. If it seems too tight, or doesn't want to rotate fully, you have probably got the boots on wrong.


Steering arm and tie rod in place Sir!
At this point you can connect the steering arm once more to its connection point on the driver's side steering knuckle. These are those concave bolts under pressure I mentioned that were so hard to take off. Make sure to tighten these to the appropriate torque settings listed in the TM. We used Joe's epic sized 3/4" drive torque wrench. Now it's time to get that good old tie rod back into place. Once again, nice to have some help at this point, as it is both heavy and unwieldy, much like the Imperial Car Destroyer itself. Lift it into place, and then screw on the castle nut to hold it in place. Once both sides are secured, torque both down to the appropriate setting, and slip a fresh cotter pin in place to seal the deal. Make sure to bend the ends of the cotter pin out to ensure it doesn't simply rattle out the first time you decide to take a test drive. Turning the steering wheel at this point should turn the steering knuckle via the recently attached steering arm. So far, so good.


"Trying not to think of ogre snot..."
The next step is fun. You grab that big axle and get to shove it back into its housing. Something of note is that both axles are actually of different length. The passenger side axle is significantly shorter than it's opposing brother on the driver side. This is handy, as it is impossible to get them mixed up! It was a matter of carefully sliding the axle through the steering knuckle and making sure not to bang anything up along the way. Once it had the majority of its shaft in, you want to start packing it with axle grease. You definitely want to be wearing gloves for this! It's actually kind of fun, in a vaguely disgusting kind of way. The military has giant drums of axle grease, but I didn't have those, so I opened lots of little tins instead. It got the job done. You don't need to fill every existing open space to the gills with grease, but you should make sure it is good and full. After this is completed, you push the axle in the remainder of the way until it won't go in any further. At this point you need to jostle it a bit and make sure it properly gets into position, and that it's splines are fully engaged. You will feel it slide into place when you get it positioned correctly, and it should now be engaged.


You should slide in the inner wheel bearing at this time. If you don't do this, and simply bolt on the brake assembly in an enthusiastic hurry, you will find yourself taking it back apart in order to do so. Don't ask us how we know.

Now it was time to get the brake assembly back into place. This is the part I thought I would clean and make all pretty. Instead it is going back on in pretty much the exact same shape it came off. Luckily, that shape was much, much better than I had been expecting, so it's really only cosmetic appearances that I am failing to appease. And lets face it people, its the fricking inside of a brake assembly. No one is going to see this (well, except for people reading this blog, but whatever...). The assembly slides on over the twelve mounting bolts that stick out of the steering knuckle we had just finished getting into place, with the axle sliding through the hole in the middle. Torque to appropriate levels. I had accidentally unscrewed one of the mounting bolts when taking the assembly apart, but luckily no threads were stripped, so it was a simple matter of screwing it back into place and counting my blessings.


Note its light at this point...

Now it isn't...
Time to get the brake shoes back on. I found this a little tricky, but was able to get the hang of it after a few attempts. The technique I found worked for me was to have the two shoes connected via the tension spring, lift it into position, and slide the top of the shoe into the little slotted push rod coming out of the brake cylinder. Then you jostle the bottom of the shoe onto the large circle at the bottom and push it into place. At any point, something may come free and you will have to try again.. Once you get it in place, you can screw in the two guide bolts into the middle of the shoes, which should hold it in place pretty well. Then it is a matter of getting those pesky horse shoe clips back on the pivot points at the bottom of the shoes, and making sure you haven't missed anything. I did the first time, but luckily Joe noticed it. You really want to make sure that the brake shoes are fully in place, and that the bit of the shoe just under the spring is snug against the small metal nubbin there. The inner 'point' of the shoe should be resting in the crook of the little comma shaped bit of the metal there that I have forgotten the technical term for. But ****, it's late, and this is the third night I have been writing this, so "little curly Q thingy" is the best you are getting right now. ;)


Cleaned outer wheel bearing
Once that was done, we took the opportunity to repack the wheel bearings. There are various miracle tools you can buy that are supposed to make this process easy, but I was being assisted by a Grand Master, and he showed me how to do it by hand. Basically you blast out the old grease with carb cleaner, making sure not to get any of it in your eyes (either grease or carb cleaner, but mostly the carb cleaner) until it is nice and shiny. Try not to let any of the bearings roll around at this point, as they will be unlubricated, and we all know what that is like. We held them up to the shop light and inspected them for any defects as well. Just like everything else I had seen on the Imperial Car Destroyer, they were in much better shape than something at old had any right to be. I was thrilled.

Next you hold the bearing in your hand, and with the other hand take a large glop of grease (technical term there) and massage it into the inside of the bearing, pushing it down using your palm. You then rotate the bearing in your hand slightly, taking care not to allow the inner and outer rollers to move, and then repeat the process of glopping on more grease, and pushing it down into place. It's really not very hard, and doesn't take too long. Before long, we had two re-greased bearings ready to go!


"Almost there, stay on target..."
Time to get the drum back in place. Remember, this sucker is heavy. I had no problem forgoing machoness and having help lifting it into place. The end of the axle should be sticking out of the center at this point. Slide the outer wheel bearing into place and make sure it is snugly in place. Time to get the eight sided lock nut and its retaining washer and screw those into place. You will need to use the specialty 3" eight sided socket to torque the lock nut in place. We used Joe's huge 3/4" drive torque wrench.

We were so close to being done, I could taste it. No, wait. That was just axle grease. Anyways, next up on the hit list is to get the axle hub cap back in place. As you will remember, the inside of the cap is threaded, and without it the wheels won't actually engage. Take care that they are splined properly, then push them into place. Eight bolts secure it into place, once again torqued to the proper amount. I resisted the urge to reassemble using my cool new air tools, as I didn't want to over torque any of the bolts or lugs. My thought was that if I put them on with hand tools, I could take them off with hand tools. I have a feeling what ever grunt mechanic was originally taking care of this vehicle had just slapped them together with big ass air tools, and never thought again about it. I want to be able to actually get the wheel off if I get a flat in the middle of the desert and need to change the sucker.

The time had come to roll out the tires from the side yard and lift them onto the six main studs. Take care not to drag the wheel along the threads, as you don't want to strip them. Then you grab the six 1.5" lug nuts and torque them down into place. Once we got both wheels on, we spun them a few times to make sure everything felt right, and that nothing was binding. Everything checked out great, and we found ourselves smiling and swearing a lot at this point. The good kind of swearing, like, "By Jove, I think we've done it" and that sort of thing. Interesting thing of note. When you spin one wheel clockwise, the opposite wheel will spin counter clockwise. If I hadn't read about this in Steel Soldiers, I would have been seriously freaking out at this point. :p

There you have it folks, as simple as one, two, twenty-three. We felt rightly proud at getting the sucker back together, and I was personally very pleased at how few actually worms we encountered when we opened this particular can. All in all, it went about as well as could be helped. Next, the test drive!


The Imperial Car Destroyer, back on her feet again for the first time in weeks...
 

Attachments

Last edited:

yarry23

Member
61
2
8
Location
Santa Cruz, CA
Clean Up and Hull Patching

Feel free to visit the original post on the Imperial Car Destroyer blog!
-------------------------------------------------------------------------------------------


Star_Destroyer_by_Kwindu.jpg
The Imperial Car Destroyer's Great Great Grandmother

Now that I had finished my first major mechanical repair, it was time to to think about the more ephemeral aspects of the Imperial Car Destroyer. Specifically, a new paint job. Now I know there are going to be plenty of you out there that think there is nothing wrong with the beautiful NATO spec camo paint job she is currently sporting, and you are correct. I actually get a fair amount of complements in its 'El Natural' form. Except that it just isn't the Imperial Car Destroyer. For the ICD, I needed battleship grey, just like the mighty starships of the Empire my vehicle hails from.

Also, there was the aspect of the rust. For a vehicle this old, that I am certain was not garaged inside all of its life, there is actually a lot less of the flakey orange demon as could be expected, but there is still plenty if you look closely. They are most notable along the seems of the van body (or koffer, as I like to say) and any place where different pieces of metal meet and are joined together. Around any of the 6.5 million rivets holding the thing together is a classic example of where to find some rust. I really want to tackle this problem, and one way to do it is to track down every place I can find, sand it, put some Locktite Extend or POR-15 on it, and then cover it in rust resistant automotive primer.

Which is of course exactly what I did. This will lead to a patchwork, motley look to your vehicle, but hey, you have dealt with some of the rust, right? So all of this is a good excuse to get it painted. Although in my case, I was always going to paint the truck, so it motivated the hunt for the rust instead of the other way around.

IMG_3075.jpg
Pressure Washer
in the 3000 PSI Range

The other thing that needed to happen was the ICD needed a serious bath. More like a blasting. It had dust literally impregnated into the multiple layers of paint covering its steel hide over the years. No standard garden hose treatment would do to get off the dust that had been on there since the day it was painted. For this job, I needed a pressure washer. So, I conned Joe out of his pressure washer for a few weeks by plying him with beer and the opportunity to work on Big Green Trucks, and soon had a nice Karcher pressure washer to play with. I went and grabbed a few Jerry Cans of gas, filled her up, and yanked her to life. With a cough and a sputter, she started, and soon was merrily humming away. Ends up, pressure washing is fun!

I began blasting the years of accumulated grime off the truck, as well as many flecks of paint as the top layers began peeling where they had already been cracked and dry. This was good, as I wanted all of the loose stuff to come off now, instead of after it got painted. I didn't have the resources or time to take the entire vehicle down to the frame and prime it, so I intended to just knock off the most damaged bits of old paint, give her a light sanding, and call it good. Oh, and deal with the rust, of course. The pressure washer worked great at this. Years of dust was knocked loose, soon to be running down the driveway and headed to the ocean. Not a bad voyage for dust from Nevada if you ask me.

IMG_3082.jpg
"Just like a flame thrower, only different..."

The whole process took around an hour, as I made sure to go pretty slow over every surface, but to tell you the truth, I had a blast. I especially liked the part where I was standing on the roof, with a commanding view of the entire neighborhood, blasting away at the top of the koffer and rocking out, when a Honda Civic drove by, slowed down, and I saw the driver's lips move in slow motion, "What. The. ****." It was a moment of sheer glory, I can tell you. I do have to admit, I keep having funny thoughts run through my head, like going to one of those cheerleaders-on-side-of-the-road-benefit-car-washes and telling em to go for it. Or taking the truck to the Jiffy Lube and asking about their $15 oil change special. *evil grin*

IMG_3089.jpg
Yucky roof hole!

While spending time on the van body roof, I noticed I had some pretty bad corrosion damage up there. I had noticed over the drizzly rainy portion of the winter that some water leakage had gotten inside the van body, so I wasn't too surprised. It didn't look too bad, but it was still there. Basically the van body is comprised of multiple large sheets of steel, overlapped and riveted together in the finest military fashion. Well, right where those sections overlap is where they have rusted through in some places. Several places in fact.

I also found two previous metal patches on the roof, big square sheets of metal that had rusted entirely since being installed. This got me to thinking - I should do something about my holes as well. After reading some other posts and M109A3 build threads, I decided I wanted to cover the roof in truck bed liner, that rubberized, heavy duty, good grip black stuff you, uh, often see in truck beds. This would be nice and everything resistant, give you good footing when you were on the roof, and seal the sucker pretty **** well. With this in mind, I simply coated the hole in Loctite Extend, let it dry, and primered it with some rust resistant primer. I had in mind that I would simply coat it in Herculiner (the truck bed liner I mentioned) and be done with it.

But the more I thought about it, the more that solution seemed kind of half assed to me. I voiced my thoughts on the matter to Joe, and he suggested I do a hull patch. I asked him, "How so, sifu?" He explained the process to me, and it sounded really straight forward. I then went on to YouTube and watched a couple videos of backyard mechanics doing cheap autobody repair with cheap sheet metal and rivet guns. ****, I can do this!

So the next morning I went to Home Despot before heading in to work, and bought myself two tubes of all weather adhesive sealant caulk, a large piece of sheet metal, some metal shears, the nicest rivet gun I could find (well, one below the most expensive really, hehe), and an assortment of pop rivets. That evening when I got home from work I piled the supplies on my work table and decided to have a crack at it. How hard could it be? Ends up, it's pretty darn simple.

IMG_3102.jpg
Everything you need to do a simple hull patch

It being summer and all, it stays light out pretty late. So I climbed up on top of the koffer and got to work. I measured how long a piece of sheet metal I would need, and I decided to keep it wide enough to cover either side of the seem of metal where the two original sheets come together and have rusted out. Taking these measurements down to my work bench, I then drew on the sheet metal in Sharpie the lines I was to follow. I then grabbed the nice angled cutting sheers I had bought. A word of advice here from having used the cheaper, lightweight ones. Buy a nice big, drop forged angled pair. Sure they cost ten bucks more, but they work! These babies will cut through just about anything, and the sheet metal (what they were designed for after all) was no exception.

IMG_3110.jpg

Taking my new metal patch, I then dragged the rest of my gear up on top of the koffer and sized it up. Looks like I had about the right size. So far so good. Next step was to coat the hole and the area surrounding it in adhesive sealant. This is where I ran into my first bit of trouble. It seems that my old, cheap caulk gun (the same one I used to do the floors in van body) had randomly crapped out on me. When I pulled the trigger, it did not advance the plunger and cause wonderful sealant goop to come out. No, instead it did nothing. Nothing. No problemo I thought, I am a handy guy, I'll figure out whats wrong with it. Well, let's just say that it didn't go so well, and I ended up throwing it across the yard in disgust after having hammered the **** out of it when I lost it in a fit of impotent rage. Hey, it deserved it, I swear! So, quick trip to the hardware store down the road, replacement caulk gun shoved into the motorcycle jacket and return trip, and I was back in business. THIS one knew not to mess with me (I showed it the mangled ruin of the last gun that defied me) and I soon had the area covered in goopy sealant goodness.

Next step is to lay the cut piece of sheet metal over the top of your freshly gooped hole and press it into place. The adhesive caulk should do a pretty good job of keeping it there. Now to drill your first couple of holes to put rivets in. I grabbed a likely rivet from my new set and sized it up against the cheap Harbor Freight 115 Drill Bit set I had bought a few months ago. I found a drill bit about the right size, grabbed my cordless drill, and climbed back up on the roof. It ends up the old Makita couldn't quite hack it. Sheet metal no problem, but the steel of the roof just laughed at the little cordless. Time for me to grab another Harbor Freight special, a big beefy incredibly cheap corded drill with plenty of power. It also had the annoying tendency to not always drill when I pulled he trigger when in its forward setting, and would need to be jostled a bit to work. *sigh* Well, I did mention it was quite cheap, right?

IMG_3119.jpg
First hull patch in place. Now time for more rivets!

New drill worked great, once I convinced it it wanted to go into forward drilling mode and work. I picked one corner and put a nice rivet sized hole through the sheet metal patch and the roof. You want to pull the drill out pretty fast, otherwise you end up pulling out a lot of the insulation in between the outer and inner walls of the koffer body. I then grabbed the rivet gun, inserted the rivet, and in two pulls of the handle had my first rivet in place. Grinning like a madman I then did the other corners and slapped two in the middle to hold it in place and admired my handiwork. Standing back, one thing was clear. It was going to need a lot more rivets.

IMG_3122.jpg

I chose what simply felt like a good spacing, and started drilling more holes. I highly recommend using some kind of punch to set where you want to drill ahead of time, as it keeps things consistent, and it makes drilling a lot easier. That being said, I did run into my second real problem here. Ends up, old American steel is superior to cheap Chinese drill bits. Just after putting a hole through the steel top, I broke my first drill bit. Yes, I said first. There would be more. This was going through the section of roof that had two of the overlapping sheets of metal - along the skinny edge of the hull patch. I broke one more on that first patch before I got the hang of it. In all I would go through something like four drill bits that evening. Now my 115 piece set is only a 111 piece set, and missing all of the useful little sizes. Aw well.

IMG_3123.jpg
First patch done, and looking great!

At this point I had gotten the hang of things, and moved through patching the next three holes in rapid succession. By the time I was finished it was getting dark, and I had broken two more drill bits (putting me to the number four, like I mentioned). I finished up by sweeping up all of the discarded rivet tails, cleaning up the tools, and grabbing some rust resistant black primer. I know you aren't supposed to paint at night, out of doors, but the alternative of leaving bare sheet metal to the tender mercies of the coastal mist didn't seem too appealing either, so I simply went for it. A lot of owning this truck was knowing when to simply go for it after all. Went on just fine, and even if it didn't, I was going to be coating all of this stuff in Herculite anyways, so **** it. I stood back and took a look. Looked pretty good! Semi pro anyway, or if not that, at least as good as the two original military patches already up there.

IMG_3127.jpg

My daughters joined me on the roof at this point, and I showed them my handiwork. They all played along and pretended to be very impressed 'Dads Truck Stuff'. We celebrated by an impromptu dance party on the roof.

Another Civic drove by. Mouth agape. "What. The...."
 

lawdog1623

New member
274
1
0
Location
Texas
Congrats i just got my 109 home yesterday. I cant wait to do my rv conversion. Its gonna hafta wait until im fatehet along with the restoration of my cargo deuce.
 
Top
AdBlock Detected

We get it, advertisements are annoying!

Sure, ad-blocking software does a great job at blocking ads, but it also blocks useful features of our website like our supporting vendors. Their ads help keep Steel Soldiers going. Please consider disabling your ad blockers for the site. Thanks!

I've Disabled AdBlock
No Thanks