• Steel Soldiers now has a few new forums, read more about it at: New Munitions Forums!

  • Microsoft MSN, Live, Hotmail, Outlook email users may not be receiving emails. We are working to resolve this issue. Please add support@steelsoldiers.com to your trusted contacts.

New Cummins HMMWV project in the works!

steelsoldiers

Administrator
Staff member
Administrator
5,251
3,962
113
Location
Charleston, WV
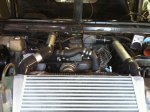
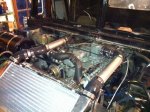
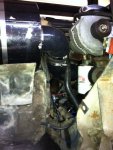
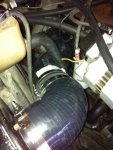
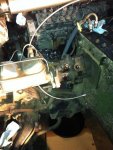
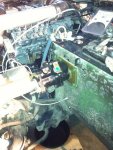
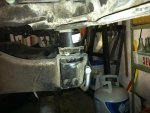
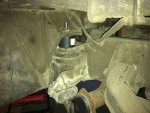
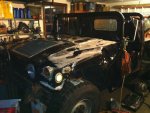
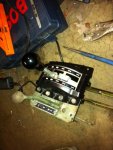
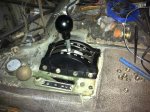
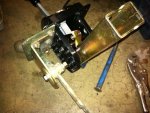
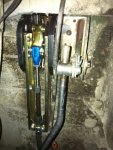
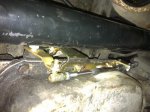
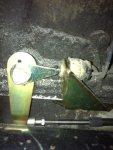
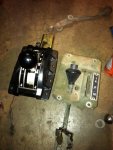
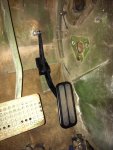
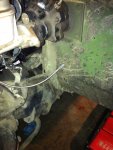
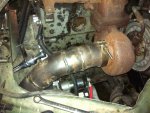
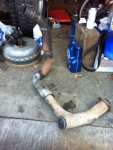
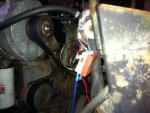
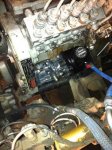
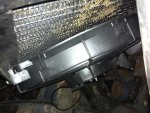
Moving the engine/trans back 3" and leaving the body lifted 2" seriously screwed up the transmission shift linkage. I tried adding rod to the old linkage, making a new linkage and re-bending the old/new linkage, but nothing seemed to get all of the gears to shift right. Finally, I gave up and ordered a beefcake Winters (Art Carr) cable shifter. I think it has just the right look for a resto-mod HMMWV. I then went about grafting the new trans shifter and the old t-case shifter together. An hour of chopping up parts with the band-saw, drilling and fitting left me with a fully functional trans and t-case shifter setup. I had to use a cut-off wheel and a die grinder to open the hole up in the tub for the new unit to fit in. Once I got everything test fit, I drilled the new holes in the body for the mounting bolts, bolted the shifter in, ran the cable, installed the cable bracket, installed the neutral safety switch, lengthened the t-case shift linkage and tested everything out. It worked like a champ!
 

Attachments

steelsoldiers

Administrator
Staff member
Administrator
5,251
3,962
113
Location
Charleston, WV
Originally, I fabbed a bracket so I could use the stock humvee throttle cable and pedal with the Cummins, but that dang pedal was so floppy that it would travel an inch to the side before it even started pulling on the cable. I bought some new bushings to rebuild the pedal pivot, but still didn't like the design, so I scrapped it in favor for a Lokar aluminum pedal and stainless cable set up. It turned out pretty sweet. I still need to mount a kick-down switch by the pedal and put some wire loom over the cable where it is exposed to rocks/dirt in the wheel well.
 

Attachments

steelsoldiers

Administrator
Staff member
Administrator
5,251
3,962
113
Location
Charleston, WV
Recently, I have been working on the exhaust system. I took a Cummins downpipe from a '93 Dodge and proceeded to cut and section it until it fit just like I wanted it. The dang dipstick tube was right in the way of the downpipe, so I bought a flexible Lokar unit that mounts to one of the transmission bolts. It is a locking and sealing dipstick so I won't have to worry about water intrusion. Once the downpipe was done, I cut apart the old humvee y-pipe, sealed off the driver's side with a plate and welded the passenger side to the new downpipe. It looks pretty good and should flow OK at stock power levels. I plan on fabbing a whole system from scratch at some point using 4" tubing and a flow through muffler. The stock muffler and fording pipe will do for now.
 

Attachments

steelsoldiers

Administrator
Staff member
Administrator
5,251
3,962
113
Location
Charleston, WV
I decided to use a 24v electric cooling fan for now. I was going to try and make the Cummins mechanical fan work, but the Ford bus accessory drive brackets position the fan too high. I could switch to the Dodge serpentine setup if it is necessary. In the meantime, I think the relatively low cooling needs of a stock Cummins will do fine with an electric fan. I am going to add a second fan as a pusher over the trans and power steering cooler. My brother and Dad helped me install the thermostat. I welded up a mount for the fan that uses the stock threaded holes in the radiator, which was convenient.

I decided to go with a Dodge Cummins PS Pump setup. I don't need the vacuum, so I'll just run a line from the pump up to a higher point and install a breather filter to protect it.
 

Attachments

steelsoldiers

Administrator
Staff member
Administrator
5,251
3,962
113
Location
Charleston, WV
That's pretty much all of the pics I have to share right now. I will get some more up after more progress been made. I am hoping to put a big stack of silicone couplers to use this weekend by making my intake and intercooler piping.

Here's a short video of it running:

Cummins HMMWV Project #2 - YouTube
 

TedG

Well-known member
1,133
38
48
Location
MI USA
Nice work as always Chris! Bring it up to MI and we'll test its capabilities at Camp Grayling!
 

steelsoldiers

Administrator
Staff member
Administrator
5,251
3,962
113
Location
Charleston, WV
Here's another video. It was from a little earlier in the project before the cooling stack, etc went back in. I shot this one in the wrong direction so it's skinny, but you'll still get a good look at it.

[media]http://www.youtube.com/watch?v=_dIzUEpYMag[/media]
 

steelsoldiers

Administrator
Staff member
Administrator
5,251
3,962
113
Location
Charleston, WV
I got the intercooler and intake plumbing finished today. It was a little tricky running the bit from the turbo to the IC because of the placement of the alternator, but I think it turned out great. I was planning on using all new silicone fittings for the intake, but I was actually able to re-use the rubber intake hose from the 6.2L plus one silicone 90* fitting and a piece of 4" aluminized exhaust pipe to connect the two. I just need to fab the mounting tabs for the IC and I'll be done with this part.
 

Attachments

steelsoldiers

Administrator
Staff member
Administrator
5,251
3,962
113
Location
Charleston, WV
I made some big strides on the HMMWV project this weekend. I was hoping to test drive it, but I ran out of time and daylight yesterday.

I got the hydro-boost swapped out, bolted up the rear drive-shaft, swapped out the fuel tank inlet hose, installed my body lift pucks, bolted the body down, installed my hood hinge spacer and got the hood installed with some help from my Dad. We finally had some winter weather hear with snow and temps in the teens, but my kero heater was cranking and kept the garage pretty comfy until we opened the door to install the hood. The hood is resting on one of my intercooler hoses so I need to lower it a little so the hood will close all the way.

I am hoping to get the seats installed, windshields installed, and tidy up a bunch of little stuff in preparation for the test drive this weekend. More updates soon!
 

Attachments

nattieleather

Well-known member
1,884
134
63
Location
Cleveland, OH
How did you make those body lift pucks? I need to make a smaller set for my project truck. Do you have any pictures on how you made them? Thanks, Joe
 

jwaller

Active member
3,724
19
38
Location
Columbia, SC
If you only need an inch or so you can run the new poly bushings and thicker washers that come on the 1151 and newer trucks.
 

steelsoldiers

Administrator
Staff member
Administrator
5,251
3,962
113
Location
Charleston, WV
Joe:

I bought a set of 2" pucks from Zone Offroad. They are 3" in diameter. I had to drill the holes out to 5/8" since they were set up for 9/16" hardware. I bought six 5/8 x 7" bolts. I had to trim 1/2" off of the front left bolt because it was going to hit the frame. I used the factory 3/8" washer with the pucks to give me 2-3/8" total. I bought some 2" square tube and used some leftover 3/8" plate to space the hood hinges up.
 

steelsoldiers

Administrator
Staff member
Administrator
5,251
3,962
113
Location
Charleston, WV
Sounds like you are getting close. Pretty sure it needs a haspin run....
That sounds like a lot of fun. I have certainly missed being there over the last few years. No promises this year since we added a new little boy to the Stansbury clan back in September.

Thanks Chris I will check them out and see if they will work for my application.
Good luck. I think they make 1" and 3" pucks as well so they should have something you can use. They were only $3 a puck too!
 

steelsoldiers

Administrator
Staff member
Administrator
5,251
3,962
113
Location
Charleston, WV
Got some more work done this weekend. I made some adjustments to my intercooler plumbing so the hood will close all the way, bolted the hood solid, checked/filled all fluids, cleaned out all of the trash, leftover hardware, tools etc... and then finally got to take it for a test drive as the snow started to fly. Check out the latest video:

[media]http://www.youtube.com/watch?v=ICZ1Z6gJsuI[/media]

Thanks to my wife for shooting that excellent video [thumbzup] I have a bunch more little stuff to take care of before I get to take it on a longer road trip. Also need to install the windshields, soft top, seats, and seat belts. It sure felt good to take it for a drive today!!
 
Top
AdBlock Detected

We get it, advertisements are annoying!

Sure, ad-blocking software does a great job at blocking ads, but it also blocks useful features of our website like our supporting vendors. Their ads help keep Steel Soldiers going. Please consider disabling your ad blockers for the site. Thanks!

I've Disabled AdBlock
No Thanks