Pictures of the cargo box restoration
I knew I had pictures of the cargo box work I did over the winter.. Finally found them on my old phone.
I think one more weekend is all I need and the cargo box will be finished completely.
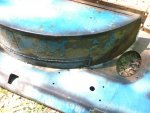
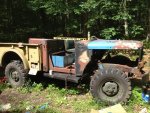
First, a few before pictures from the night I dragged it home and the subsequent weekend of tearing it apart.


I'm not really sure what was holding the tailgate on... I was able to remove it without tools.


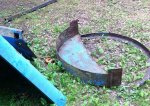
There was no way I was going to sink 300 dollars into a rear crossmember. I broke all the spot welds, cut it into 3 parts and and re-made it using a sheet metal brake I improvised from 2x4s. For a template I just unfolded the rotten metal onto the new and spray painted around the perimeter.
The rear of the cargo box sides were pretty much fabricated new for the last 8 inches of the truck. The square tubes are actually 1/8" thick square tube cut to fit. It's what I had on hand, and now it's even heavier duty than it was.
The past 2 weeks I have been chasing around pin holes in the sheet metal with 5 minute epoxy. Next step is to have at the cargo box with seam sealer, a flap wheel to dress my fabulous welds, and probably a little bondo.
Brush on pickup bed-liner will make it all look like I knew what I was doing all along.
In the last picture the tailgate won't close properly. I've since fixed that with a judicious application of violence.