• Steel Soldiers now has a few new forums, read more about it at: New Munitions Forums!

  • Microsoft MSN, Live, Hotmail, Outlook email users may not be receiving emails. We are working to resolve this issue. Please add support@steelsoldiers.com to your trusted contacts.


No help needed with M109 Restore..

papabear

GA Mafia Imperial 1SG
13,508
2,383
113
Location
Columbus, Georgia
I was not sure if I should continue this thread due to lack of interest. However I decided to continue for my faithful followers.

Lack of interest Sir?? Bite your tounge!!!:cookoo:

I wake up every day thinking... I hope GE is working on that M109 so he can make an RV and come to the GA Rally!!!:driver:

I know you have to work alone so things go slow. I know times are tight so it's hard to fund things (trust me...I do)...

BUT!!!

A good troop (which you are) will find a way to::grd:

So...:driver:
 

davidkroberts

Active member
1,453
22
38
Location
west tennessee
very nice job, i like the airride seats im planning on throwing them in my M818 when it gets in. When youran the airline from the connection under the dash how did you route it and did you use a air dryer/ inline air filter or just use the stock system
 

goldneagle

Well-known member
4,432
865
113
Location
Slidell, LA
In the M818 the connection point is on the driver side. It is a block with a shut off lever and an unused connection on the front. I just ran it along the floor on the door side. i used a 1/2" rubber hose to cover over the 1/4" copper tube. i used 1/2" metal pipe straps to holt the hose against the bulkhead. No filtering at all! Just ran the line direct.
 

goldneagle

Well-known member
4,432
865
113
Location
Slidell, LA


Lack of interest Sir?? Bite your tounge!!!:cookoo:

I wake up every day thinking... I hope GE is working on that M109 so he can make an RV and come to the GA Rally!!!:driver:

I know you have to work alone so things go slow. I know times are tight so it's hard to fund things (trust me...I do)...

BUT!!!

A good troop (which you are) will find a way to::grd:

So...:driver:
It's the reader feedback that gives me encouragement to continue to document my work and take pictures of the progress. i thank those that took the time to write compliments and encourage me to contribute more work. :driver:
 

srodocker

Well-known member
6,549
68
48
Location
Lacey, Washington
I defiantly like the seat upgrade. im installing bolt on seats onto springer seat bases. I also have been following this thread as i love the 109 conversions. first time posting tho
 

goldneagle

Well-known member
4,432
865
113
Location
Slidell, LA
I defiantly like the seat upgrade. im installing bolt on seats onto springer seat bases. I also have been following this thread as i love the 109 conversions. first time posting tho
I am just curious why you don't just install genuine air ride seats instead? They are very comfortable and not real expensive if you get used ones.

I had one in the M820A2 and wow what a difference compared to the springer.
 

srodocker

Well-known member
6,549
68
48
Location
Lacey, Washington
keeping it simple for now. im sure i'll upgrade again in the future. redid both my current seats a springer and box seat with new marine grade fabric and now im getting some bolt on ones. we'll see how i like it.
 

zout

Well-known member
7,744
154
63
Location
Columbus Georgia
GE - don't hold your breath to see pics of seats in SR's truck - he has had camper diagrams for over a year and 1/2 now that he is still contemplating overrofl

You might as well start planning now to bring that 109 to the GA RALLY 2011
use up all your excuses now - and by the time it rolls around you can make it.
 

Lonekazoo

Member
31
1
8
Location
Ogden, UT
Another grateful follower here, with a shop van in similar condition. Thanks for taking the time to share your ideas, and pictures of your work. I don't have your skills, but since you're making it look easy I'm going to attempt my own floor repair.
 

goldneagle

Well-known member
4,432
865
113
Location
Slidell, LA
Another grateful follower here, with a shop van in similar condition. Thanks for taking the time to share your ideas, and pictures of your work. I don't have your skills, but since you're making it look easy I'm going to attempt my own floor repair.
The floor repair is not that hard if you are not 300 pounds fat like me. The hard part was bending over do to stomach pressing against diaphragm and not being able to breathe. If the floor boards are rotten enough they should be easy to pry off. The rusted sheet metal will take pry bars and a air chisel to make it come off easy. make sure you wear gloves so you don't get cut up from the metal. If you need patches for the cross members I have a couple as samples I can send you.

If you need further advise ask and I will be glad to give you my 2cents worth.
 

timntrucks

Well-known member
Steel Soldiers Supporter
4,040
114
63
Location
Ponchatoula LA
those seats are realllly nice.. your doing a A plus job.. each day i come on im looking for this post.. many thanks for the pics.. they are real nice to see. you will be super proud of that truck. cant wait to see it finished:drool:
 

zout

Well-known member
7,744
154
63
Location
Columbus Georgia
OK GE - its a long time to hold ones breath to see what your up to on your 109.

That ole guru fabricator is up to something !!aua

Kind of slacking off - and you are nearly the only one left with decent weather to work outside in.

:grd:
 

goldneagle

Well-known member
4,432
865
113
Location
Slidell, LA
Sorry for keeping you waiting guys! This is my busy season on Ebay and I had to devote my time to making income so I can pay my bills. I also had to devote some time to the M820A2 in order to have it ready for Sirblissful to pick up. Had some storage boxes and spare fuel tank to remove as well as replacing a battery in the M820A2.

Now that the truck has safely arrived at it's new home in NM I can get back to Ebay and my M109 projects. Just remember that JOB (Ebay) comes first then play (truck).

When we last left the truck she had new seats installed. Since then I have been contemplating what to do next. I have been researching insulation for the cab. Ended up the research was already done by ZOUT. Following his advise I ordered the aluminum insulation blanket he installed in his cab. i should have the rolls next week. Then I am going to insulate the floor and the walls of the cab. I may even attempt to insulate the firewall on the engine side.

This week I managed to install one of the under-mount tool boxes that I removed from the M820A2. I removed the Pioneer rack and spare tire mount earlier in the week. I fabricated some angle supports and mounted the tool box. Now I am able to store the large 1" impact driver, air hoses, 20 ton jack, and socket sets in the tool box.

Now I am ready to replace the soft top on the cab. I plan to add 2 more bows to the top support. They were spares that I found on the cab floor of the 5 ton when I got her home. They have been sitting around since. They will be installed closer to the doors on each side of the cab. The current soft top has a bad dip in the front corners that hold a lot of water! (Too much unsupported space between the existing bow and the top of door!)

I also have new twist locks and button snap for holding the soft top over the door frames. I got them from Erik's Military and Industrial Surplus - Military Vehicle Parts, Industrial and Military Surplus Electronics . I also bought some new wiper arms and blades from him. He carries good quality items at a good price.

When I install the new soft top later today I am going to make sure the door frame is better aligned. Currently the openings lean back a bit so the door seal when closed is lousy! Windshield frame is correctly aligned butt he top frame over the door will not sit properly. i plan to screw the two together with a self tapping screw. I tried to lock it down last night but the spring clip would not hold it down. When I held it down I could see the door signed up nicely with the frame! I sould have some pictures of my work posted tonight.
 

goldneagle

Well-known member
4,432
865
113
Location
Slidell, LA
Ok I got the soft top installed today as planned. Everything went as expected. The only thing I didn't think of was that the top of the window frame had some surface rust. i scrubbed, vacuumed, primed and painted the surface before installing the soft top.

I am attaching pictures showing the new soft top after installation.
 

Attachments

goldneagle

Well-known member
4,432
865
113
Location
Slidell, LA
Why did you put on a tan one ?
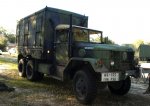
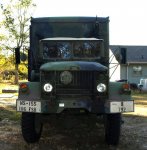
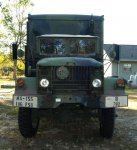
Have you seen the picture of the Deuce in the back cover of STANDARD CATALOG OF US MILITARY VEHICLES by David Doyle? i want to paint my M109 the same color. In the picture the Canvas tops look like TAN due to the lighting. I like the look. i think it will look great with the dark sold green.

Also the TAN was cheaper!
 

Attachments

Last edited:
Top
AdBlock Detected

We get it, advertisements are annoying!

Sure, ad-blocking software does a great job at blocking ads, but it also blocks useful features of our website like our supporting vendors. Their ads help keep Steel Soldiers going. Please consider disabling your ad blockers for the site. Thanks!

I've Disabled AdBlock
No Thanks