-
Steel Soldiers now has a few new forums, read more about it at: New Munitions Forums!
PEASHOOTER's M109A3 CAMPER Build Thread
- Thread starter peashooter
- Start date

More options
Who Replied?peashooter
Well-known member
- 1,039
- 210
- 63
- Location
- Hanover, minnesota
Besides some of the things recently done in the last couple posts and some posts to come, I also have been working on a project just for my kids.
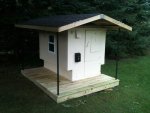
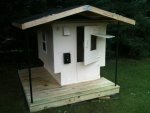
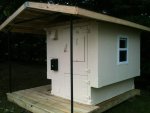
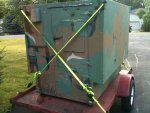
My wife has been wanting a playhouse for the kids for sometime. While I was at Scott's house (Tie6044) one day checking out some deuce parts, he asked jokingly if I wanted a shelter. I'm pretty sure I started laughing but a few seconds later a light clicked and I saw it now as a playhouse that was already finished and probably about the price of what it would cost to buy lumber to just make a floor if I were going to build my own. This thing is great. Its all aluminum with foam sandwhiched in between. Its pretty fun getting a 50 year old metal item that has zero rust (and never will).
We ended up buying the shelter and then my wife kept thinking of more neat things to do to it so this became a project as well. I tore out the electrical, pressurewashed it good, patched the holes, and then painted it inside and out. I bought the cheapest vinyl windows I could find from Menards also.
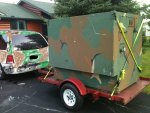
My wife thought it would be nice if it could look more like a house so we ended up making a roof and deck for it. I built the deck as more of a frame so eventually we could put this thing on stillts someday so its more of a tree house type of thing when the kids are bigger.
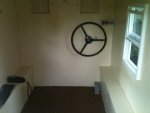
I put an old deuce steering wheel in there, a foot pedal thing (old pneumatic valve), some buttons from the scrap bin at work, and an old keyboard & phone. Ive even thought of getting an old transmission top cover off a dead tranny from Scott so I could rig up a play shifter next to the steering wheel. So far the playhouse is a pretty big hit with the kids and neighbors.
Its not done as it needs some shingles and mainly finishing off the roof (which is Ironicly just for show since the shelter has its own roof), but the kids are having lots of fun with it already.
My wife has been wanting a playhouse for the kids for sometime. While I was at Scott's house (Tie6044) one day checking out some deuce parts, he asked jokingly if I wanted a shelter. I'm pretty sure I started laughing but a few seconds later a light clicked and I saw it now as a playhouse that was already finished and probably about the price of what it would cost to buy lumber to just make a floor if I were going to build my own. This thing is great. Its all aluminum with foam sandwhiched in between. Its pretty fun getting a 50 year old metal item that has zero rust (and never will).
We ended up buying the shelter and then my wife kept thinking of more neat things to do to it so this became a project as well. I tore out the electrical, pressurewashed it good, patched the holes, and then painted it inside and out. I bought the cheapest vinyl windows I could find from Menards also.
My wife thought it would be nice if it could look more like a house so we ended up making a roof and deck for it. I built the deck as more of a frame so eventually we could put this thing on stillts someday so its more of a tree house type of thing when the kids are bigger.
I put an old deuce steering wheel in there, a foot pedal thing (old pneumatic valve), some buttons from the scrap bin at work, and an old keyboard & phone. Ive even thought of getting an old transmission top cover off a dead tranny from Scott so I could rig up a play shifter next to the steering wheel. So far the playhouse is a pretty big hit with the kids and neighbors.
Its not done as it needs some shingles and mainly finishing off the roof (which is Ironicly just for show since the shelter has its own roof), but the kids are having lots of fun with it already.
Attachments
-
 46.7 KB Views: 105
 -
 41.1 KB Views: 100
 -
 22.4 KB Views: 108
 -
 36.9 KB Views: 101
 -
 62.4 KB Views: 84
 -
 59.9 KB Views: 102
 -
 39.8 KB Views: 83
 -
 49.4 KB Views: 99
 -
 54.4 KB Views: 88
 -
 57.9 KB Views: 135
KaiserM109
New member
- 1,108
- 4
- 0
- Location
- SE Aurora, CO
Great info in this thread! Maybe if I can get my wife to read it, she'll be happier with my ideas.
I have a '66 M109 with a non-turbo engine and it is sick, sick, sick at this altitude (5280) and I won’t even think about taking it to 10,000 ft. Instead I am planning to move the box to the chassis of my M923 as soon as I get it home. I don’t know how all the dimensions are going to work out. One thought is to bob the M923 which would make it a lot more agile around town and will still get me anywhere I want to go.
I have a '66 M109 with a non-turbo engine and it is sick, sick, sick at this altitude (5280) and I won’t even think about taking it to 10,000 ft. Instead I am planning to move the box to the chassis of my M923 as soon as I get it home. I don’t know how all the dimensions are going to work out. One thought is to bob the M923 which would make it a lot more agile around town and will still get me anywhere I want to go.
FatBuddhaBoo
Member
- 330
- 8
- 18
- Location
- Jacksonville, Fl
Very nice setup in both of your recent updates! ![[thumbzup]](https://www.steelsoldiers.com/images/smilies/icon_smile_thumzup.gif "Thumbs Up [thumbzup]")
sewerzuk
Member
- 524
- 12
- 18
- Location
- Seaside, OR
I like the air manifold; very similar to my setup. I initially built a 4 tire setup with a quick connect for 2 additional hoses, but found that a 2 tire setup saves just as much time. Now I just use the 2 tire setup.
I made my regulator removable, and just put a pressure gauge on the manifold. The air supply to the manifold is controlled with a 1/4" ball valve. So, when I want to check pressure, I just close the ball valve and read the gauge. This works well on my Samurai, sidekick, or truck...but the Deuce takes FOREVER to air up so I usually install the regulator, set it to the desired pressure, and walk away.
Now that I'm running a set of MRAP wheels, I will likely build a new one similar to yours with the big bore air chucks...
peashooter
Well-known member
- 1,039
- 210
- 63
- Location
- Hanover, minnesota
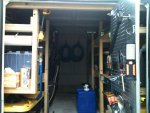
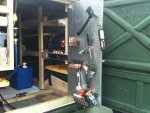
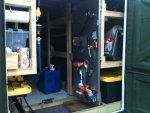
Here are some pics of the trailer racking as well. We use the trailer quite a bit for keeping our camping stuff in so we arent always going into and out of the Truck for paper towels, a spatula, flashlight or whatever. We also cook off of the tailgate when we use a campstove since its a good spot to help block the wind when cooking. One of the handier things I added was a pull out pegboard wall that keeps all the common stuff we grab often. Since its pegboard, its easy to add on or move hooks around whenever we think of some other commonly used item we want to hang on there.
There are also 3 jerry can holders (made of wood) on each side right in front of the wheel wells where that space was somewhat wasted. So again this trailer has turned into a bit of a shed for me as well, where I can keep the things that I dont really want in/or have room for in the garage.
There are also 3 jerry can holders (made of wood) on each side right in front of the wheel wells where that space was somewhat wasted. So again this trailer has turned into a bit of a shed for me as well, where I can keep the things that I dont really want in/or have room for in the garage.
Attachments
-
 51.4 KB Views: 180
 -
 53.9 KB Views: 183
 -
 44.5 KB Views: 182
 -
 46.5 KB Views: 172
Last edited:
59apache
Chipmaker
- 1,299
- 30
- 48
- Location
- Bavaria / Germany
nice & clever. I want one ")
peashooter
Well-known member
- 1,039
- 210
- 63
- Location
- Hanover, minnesota
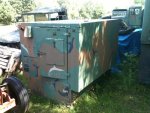
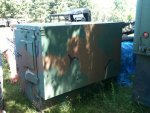
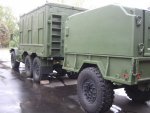
I'm not sure. I dont know if I've ever actually seen a S250, and I dont know anything about them (steel or aluminum?). The CBC is nice and made specifically for the 105 trailer, but it is fiberglass which has its pros and cons. They are also rare which kind of stinks since that makes them both more expensive and harder find. If I had a choice, I think I would prefer an aluminum Box setup constructed similar to that little playhouse thing I built in the post 102 (not sure of the model of that shelter, its only 5' wide, and 6' long). The CBC is quite a bit bigger obviously as it takes up the whole M105 trailer with whatever dimensions they are again (6' wide, 9' long?). I honestly dont even know enough about the shelters to know what versions out there fit well in the M105 bed.Nevermind...a CBC just as I suspected. Looks nice. What do you think about them compared to the S250's?
Click on the links in my signature box to see the S250 in the M105A2 trailer (and my truck..which is different on the inside now). Ignore the link about the newer 109 box because that just ain't happening now...unfortunately. At least the 109 box on my truck only had one small rust spot which I fixed.
I just changed some of the signature links around the first is the inside & outside of my M109A3 before I changed the inside...which is not done because of lack of funds at the moment. And the second & third link are different perspectives of the S250 & M105A2 as it currently sits but before it was actually transported to my house in Maryland from Ohio.
- 561
- 789
- 93
- Location
- Canton, PA
Great design and creativity!!!
peashooter
Well-known member
- 1,039
- 210
- 63
- Location
- Hanover, minnesota
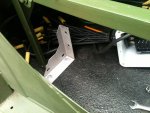
Thats a pretty cool looking shelter. Are they steel or aluminum? I was curious about a couple items on your shelter, what is the bracket assembly on the right (passenger) side of the shelter door for? Also what is that hump thing on the front top Passenger side of the shelter box? Thanks for the education.Click on the links in my signature box to see the S250 in the M105A2 trailer (and my truck..which is different on the inside now). Ignore the link about the newer 109 box because that just ain't happening now...unfortunately. At least the 109 box on my truck only had one small rust spot which I fixed.
Also I certainly know about changing the inside of these 109 boxes as you mentioned. Its probably not a bad idea to set them up somewhat temporarily one way and then use it for a while to figure out what you really end up wanting to do with it before putting too much time into making it one way and then wishing you would have done something different.I just changed some of the signature links around the first is the inside & outside of my M109A3 before I changed the inside.
One of the biggest things we learned from our first attempt interior was that having the side facing couch/futon bed was not really fun to look at the wall right in front of you and it felt like it took up way more space. We changed it to what it is now with the couch/bed on the backwall and the view now looking outside the back doors is much better and room feels much better also. (can be seen in posts 11-17)
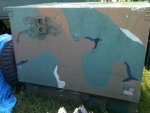
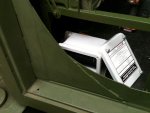
Sorry for the delayed response...I just noticed it. I don't really come on here too often anymore. Anyway...the are made of high-tensile steel. As far as the bracket is concerned I'm not 100% sure but I think at one point it had a communication satellite dish of some sort...or maybe a radar system. I can honestly say I'm not sure what it is exactly but I think it covers other brackets..of which there are many. Here is a better image of what's up there.Thats a pretty cool looking shelter. Are they steel or aluminum? I was curious about a couple items on your shelter, what is the bracket assembly on the right (passenger) side of the shelter door for? Also what is that hump thing on the front top Passenger side of the shelter box? Thanks for the education.
View attachment 453513
As far as the interior is concerned...I have a feeling it is going to be done in a sort of hillbilly way as it was before due to lack of funds. I initially wanted to have a mixture of military issue equipment blended together with a classy & modern decor but with the bottom falling out of my personal economy and the more pressing need to finish some other projects (this weekend a buddy of mine is going to help me get the Air-O-Matic installed) I am thinking about selling off many of the unnecessary items (like my brand spankin' new AN/VVS-2 Night Vision Periscope I had intended to have a custom mount created for to be able to take it in and out of my hardtop) so I can ensure I have on-board solar electric power for lighting, a 20 inch and/or 37 inch LED TV, my laptop, & Kllipsch computer speakers, & A/C (which has been a catastrophic failure) as well as a small plumbing system and a wood stove for heat and hot water. Originally, up against the wall toward the truck cab I had wanted to put cabinets & a kitchen counter with a stove and small fridge under the counter top and the sink in the center under the window, a wet-bath on the rear drivers side, this awesome wood stove called the Sardine (which is only 12"x12" and has a brass rail for when cooking in a moving vessel...but it's $1000), and either a side-folding bed/couch or one of those bed/gun-safes (which are rather heavy). I just had this image of a house wife standing at the counter, utilizing the kitchen, and looking out the window into the back yard at (use your imagination to insert image here). I intend to become a traveler (like the Scottish/Irish "Gypsies"...not Romani Gypsies), which is happening at a much slower rate than I had anticipated, and I wanted it to be as efficient, EMP proof, and female friendly as possible which would have been done by Christmas but now I'm just hoping to make it livable before the nation erupts into chaos. Thankfully I have more time to deal with the A/C issue since the weather is finally agreeable. It's always much easier to heat the 109 than it is to cool it .Also I certainly know about changing the inside of these 109 boxes as you mentioned. Its probably not a bad idea to set them up somewhat temporarily one way and then use it for a while to figure out what you really end up wanting to do with it before putting too much time into making it one way and then wishing you would have done something different.
One of the biggest things we learned from our first attempt interior was that having the side facing couch/futon bed was not really fun to look at the wall right in front of you and it felt like it took up way more space. We changed it to what it is now with the couch/bed on the back wall and the view now looking outside the back doors is much better and room feels much better also. (can be seen in posts 11-17)
peashooter
Well-known member
- 1,039
- 210
- 63
- Location
- Hanover, minnesota
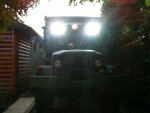
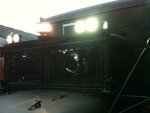
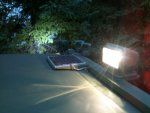
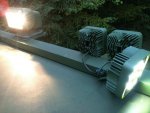
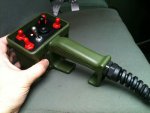
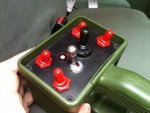
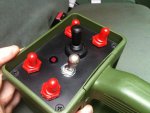
Well I finally got around to finishing the lightbar and solargizer setup.
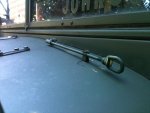
As mentioned earlier on in post 30 when the light bar was not yet wired, I ran into an unforseen problem with the hood hitting the searchlight and the hood support rod not fitting anymore. As shown in the pictures I just put a screw in rubber foot on the front of the search light mount for the hood to hit. I also made a new hood support rod out of a small tie-rod end, threaded shaft, and loop, so it has some adjustment and gives both a little longer reach and bends front to back as well as side to side. It still mounts to the original spots.
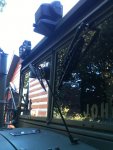
The Search light is a 12v Golight I got cheap off of ebay. They have 24v ones but I wasnt able to get one for a price I was willing to pay, so 12v it is. I've got the other 6 lights wired to 24vdc.
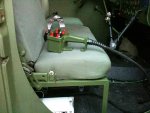
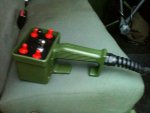
The green handheld Control Pendant on the seat is what controls all the lightbar lights. The search light has a switch to turn it on along with a red light to know its on and a joystick to move it. The other 4 switches (with the red boots) are for the LED lights. Right switch is for right side, left for left side, and top 2 are for the front 4 lights... 1 controls the 2 spot lights, and the other controls the 2 flood lights.
The solargizer box is mounted under the passenger side seat with some brackets I found and modified. I did have to extend the +24v supply wire.
(sorry for the poor camera phone pictures)
As mentioned earlier on in post 30 when the light bar was not yet wired, I ran into an unforseen problem with the hood hitting the searchlight and the hood support rod not fitting anymore. As shown in the pictures I just put a screw in rubber foot on the front of the search light mount for the hood to hit. I also made a new hood support rod out of a small tie-rod end, threaded shaft, and loop, so it has some adjustment and gives both a little longer reach and bends front to back as well as side to side. It still mounts to the original spots.
The Search light is a 12v Golight I got cheap off of ebay. They have 24v ones but I wasnt able to get one for a price I was willing to pay, so 12v it is. I've got the other 6 lights wired to 24vdc.
The green handheld Control Pendant on the seat is what controls all the lightbar lights. The search light has a switch to turn it on along with a red light to know its on and a joystick to move it. The other 4 switches (with the red boots) are for the LED lights. Right switch is for right side, left for left side, and top 2 are for the front 4 lights... 1 controls the 2 spot lights, and the other controls the 2 flood lights.
The solargizer box is mounted under the passenger side seat with some brackets I found and modified. I did have to extend the +24v supply wire.
(sorry for the poor camera phone pictures)
Attachments
-
 53.3 KB Views: 132
 -
 37.7 KB Views: 138
 -
 36.2 KB Views: 137
 -
 52.5 KB Views: 138
 -
 50.9 KB Views: 135
 -
 44.6 KB Views: 136
 -
 31.2 KB Views: 129
 -
 26.3 KB Views: 132
 -
 34.7 KB Views: 122
 -
 42.8 KB Views: 125
quickfarms
Well-known member
- 3,495
- 25
- 48
- Location
- Orange Junction, CA
Where did you get that green handheld box
peashooter
Well-known member
- 1,039
- 210
- 63
- Location
- Hanover, minnesota
You can get them from 2 of my favorite places to shop: McMaster.com or eBay. They almost always come in yellow (plastic) so I just sandblasted it, brake cleaner, then painted with the Rapco 383 green spray cans (along with most other green add ons I made).Where did you get that green handheld box
They are called pendant switches, pendant enclosures, handheld enclosure, etc. They can be found cheap on eBay or if buying new from a vendor they are about $50. You can get wireless ones too.
Attachments
-
 51.3 KB Views: 46
 -
 45.5 KB Views: 45
 -
 44 KB Views: 42
Last edited:
- 114,396members
- 167,273threads
- 2,354,815posts
- 4,143online users