• Steel Soldiers now has a few new forums, read more about it at: New Munitions Forums!

  • Microsoft MSN, Live, Hotmail, Outlook email users may not be receiving emails. We are working to resolve this issue. Please add support@steelsoldiers.com to your trusted contacts.


PEASHOOTER's M109A3 CAMPER Build Thread

peashooter

Well-known member
1,039
204
63
Location
Hanover, minnesota
Any pictures of the map seat restraint harnesses installed?
Not yet. I'll probably just be installing 1 on the passenger side of the bench for now. The truck tends to put my kids to sleep when we are driving and with just a lap belt, their isnt anything keeping them from falling forward and banging their heads on something.

I have started work on the fold down deck/platform between the trailer and truck so that I dont need to unhook the trailer when we camp anymore. It will fold down over the trailer tongue area and be about level with the 109 box's floor, with a ladder coming off the side of the deck.
 
Last edited:

LowTech

Member
Steel Soldiers Supporter
886
12
18
Location
Arizona
A point on that, we don't always get to park straight on and sometimes the ladder runs us too close to the corner of the truck. We've made it a habit to pull in and turn right before she stops. I think some of that could be changed w/ a slight reshaping of the deck closest to the trailer.
Just some thoughts.
 

peashooter

Well-known member
1,039
204
63
Location
Hanover, minnesota
A point on that, we don't always get to park straight on and sometimes the ladder runs us too close to the corner of the truck. We've made it a habit to pull in and turn right before she stops. I think some of that could be changed w/ a slight reshaping of the deck closest to the trailer.
Just some thoughts.
Yes, I took your earlier advice on what you learned with yours. (as mentioned earlier in this thread, I planned on copying what LowTech & Tuff did HERE).
I decided to make mine rectangular like in the pictures below again because I have little kids so I didnt want any big gaps for them to fall through. I'll have some adjustment in it, but for the most part I will just have to keep the trailer straight with the truck when I want to use this deck. I've got all the aluminum and started it the other day (no real pics yet) but here are some computer drawn ones. I think I'll end up getting one of the scissors steps and make some quick release so it can mount to either side of the deck or the trailer tongue.
 

Attachments

peashooter

Well-known member
1,039
204
63
Location
Hanover, minnesota
Well I started doing some work again over the last 2 weeks once I thought the snow was done... and then we got a foot of snow the other day. Trying to get the brakes and deck done by memorial day, not sure if the deck will be finished by then or not.
-Got a new compressor installed thats been sitting in the shed for a couple years.
-fixed a leaky coolant hose behind the compressor while it was off.
-gutted all the service brakes except for the pedal and Master cylinder bracket.
-Installed my new style master cylinder with built in differential switch which will eliminate 2 lines and 4 fittings.
-built a remote reservoir mount out of some left over steering column clamps from the gauge pods. Reservoir has a low level float and switch inside that will turn on the dash "brake" light if the level gets too low.
-started overhauling the front axle ends. New axle bushings, kingpin bushings, seals, silicone boots, new brake shoes....what a MESSY time consuming job. I've done a fluid change before, and repacked the bearings and checked brakes but that was it. I went to O'Reilly Auto parts and took advantage of their "loaner tool" program... got a slide hammer and attachments, and a seal driver. Well worth the end cost of $zero.
-Adjusted the toe in a tad closer to zero while I was in there.
-started installing larger wheel cylinders on the front from m35a3 trucks (1.5" diameter rather than the stock 1-3/8" A2) This truck needs all the stopping help it can get.
-got 1 new airpack installed (not pictured), 1 to go.
-got the rear stainless steel braided brake hoses installed (not pictured)
-started the fold down deck/porch project on the trailer.
 

Attachments

Last edited:

whiskey357

Banned
168
0
0
Location
chicago,ill
Great shoots and work on it to date...just one question....Are you going to use it or show it...Just wondering.....with all of the work on the 2 items.....Great job by the way.....Any money left over to put fuel in the tank and go?????? best of luck
 

rustystud

Well-known member
9,071
2,388
113
Location
Woodinville, Washington
For the heater hose & Coolant filter hose, I bought the "GATES GREEN STRIPE" hose from Oriley auto parts. I'm pretty sure it was 5/8"ID if I remember right. They sell it by the foot, it wasnt super cheap but I wanted some good hose so I wouldnt have to do it again. I honestly cant remember how much hose I got for the coolant filter, but looking back through the pictures I think that 5' would be plenty. If you have a heater that needs new hose, its the same size and probably needs 8-10' for that.

The heater has the pet-cock valves for inlet and outlet that are mounted to the engine and water pump. I did add ball valves to the coolant setup(inlet and outlet both) for 3 reasons.
-1. would make less mess when I wanted to change the coolant filter (shut the valves)
-2. Since I also have a heater plumbed in parallel with this, I shut the heater pet-cocks in the summer so more fluid goes through the filter, and if I were to drive this in the winter I could close (full or partially) the filter valve so more hot fluid goes to the heater core.
-3. just in case... better to do it now than later when I'd have to catch & reuse the coolant that would spill or buy more of it which gets pricey (I cant remember how many gallons of coolant the deuce holds but its a lot.)

Hello peashooter, rustystud here. Where did you get thus 90% shutoff elbows ? Do you have a part number ? Also,Thanks for that great steering column gauge housing ! That is one sweet unit !!! You do fantastic work !
 

peashooter

Well-known member
1,039
204
63
Location
Hanover, minnesota
Great shoots and work on it to date...just one question....Are you going to use it or show it...Just wondering.....with all of the work on the 2 items.....Great job by the way.....Any money left over to put fuel in the tank and go?????? best of luck
Ha, yeah it looks expensive and probably would be if I went about things the normal way. I basically pay for truck parts by selling truck parts:) Even yet, I'm still too cheap to just buy something at normal price usually though. All the brake parts I got by trading things or picked them up cheap via ebay over the winter. The deck stuff will be made with as much scrap parts as I can find but I did by 2x 24' long pieces of aluminum decking at full price of $60 each.


Hello peashooter, rustystud here. Where did you get thus 90% shutoff elbows ? Do you have a part number ? Also,Thanks for that great steering column gauge housing ! That is one sweet unit !!! You do fantastic work !
I really cant remember where I got mine. I think this part number from Mcmaster is something close though but there must be cheaper ones out there because I didnt pay $24 each. http://www.mcmaster.com/#4847K15
 

brianp454

Member
572
11
18
Location
Portland, OR
Nice thread, been watching it for some time. Do any of you have a part number and source for the oversized wheel cylinders? Going from 1.375 to 1.5 is about a 20% increase in surface area, so I would expect roughly a 20% boost in braking power. I llike it! My front axle is completely apart now, so I'd like to look into this ASAP and install them if I can work out the details.
 

whiskey357

Banned
168
0
0
Location
chicago,ill
What can I say you are doing great work......Looks like the stuff they do on flip this house...except you must have a back up crew with acceies to lots of fun tools and stuff likemoney......and time....do you see your family often or only on weekends...as this work takes alot of time ...I rebuild sat comm sites for the DOD....lots of money and lots of help...still takes crazy money and time to put it all together the right way...lots of wrong ways.....HEHEH Anyway nice looking truck and trailer.........lots of time and money on this one looking good..have fun camping stop working on it for awhile and enjoy it....
 

rustystud

Well-known member
9,071
2,388
113
Location
Woodinville, Washington
Nice thread, been watching it for some time. Do any of you have a part number and source for the oversized wheel cylinders? Going from 1.375 to 1.5 is about a 20% increase in surface area, so I would expect roughly a 20% boost in braking power. I llike it! My front axle is completely apart now, so I'd like to look into this ASAP and install them if I can work out the details.
Brian, I just ordered some for my truck. The number I used was "Dorman W37317" . Now I'm not sure that these are exact fit, but the NSN number 2530-01-441-4866 came up with "37317M" (not available). I checked out the specifications and they match with the "W37317" from Dorman. The price is $32.32 ea. Here's hoping !
 

brianp454

Member
572
11
18
Location
Portland, OR
WOW Thanks! I'm digging around for them on the web now. It looks like this is actually an old design that was used by White, Dodge, IH, etc. back in the day. Crap they have then on the Summit web site, but not in stock.

Brian, I just ordered some for my truck. The number I used was "Dorman W37317" . Now I'm not sure that these are exact fit, but the NSN number 2530-01-441-4866 came up with "37317M" (not available). I checked out the specifications and they match with the "W37317" from Dorman. The price is $32.32 ea. Here's hoping !
 

peashooter

Well-known member
1,039
204
63
Location
Hanover, minnesota
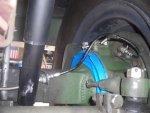
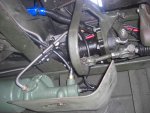
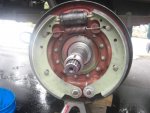
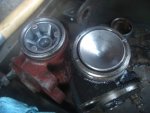
Finally got the brake project done. I did not enjoy it. Ended up overhauling the front axle as mentioned earlier (this was the worst part). Got all the new wheel cylinders and new brake shoes in everywhere including the larger 1.5" diameter front ones. I had to modify the link pins to get the shoes to fit as shown here.

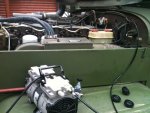
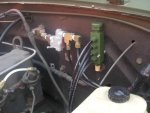
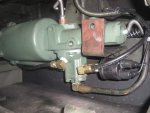
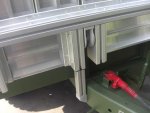
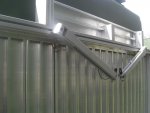
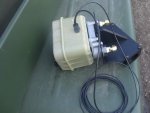
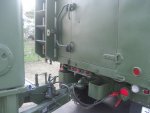
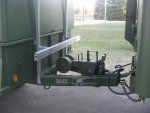
Also found that one of the rear axle seals must have leaked again from when they were replaced a year or 2 ago during the hub flip. I removed the breather vents from the top of the axles to clean them out and heard a pssst noise on a couple so I decided to install vent lines instead. I put some 1/8npt fittings into all the breather vents on the 3 axles, transfer case, and transmission and using 1/4 nylon tubing ran them up to a breather manifold on the firewall near the remote reservoir for the brake fluid. Hopefully this eliminates any future seal leaks due to plugged vents (transfer case has a leak still too after driving a while... this also made a "psst" noise when I removed the breather).

While I was gutting the brake lines, I also decided to gut some of the copper air lines and replace them with the nylon air brake tubing. Swapped over the hydaulic brake switches to the air switches while I was replacing the air packs. Ebay came through again for the best prices on the air switches and some other random air system check valves I replaced while they were out. I will say this is a good hobby to get nice NOS replacement parts for cheap (at least cheap for us buying these the second time around, overpriced for us taxpayers the first time around).

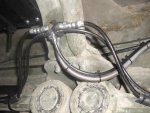
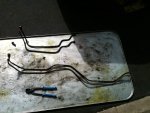
Made new brake lines out of CUNIFER and put Stainless steel spring armor on them all. You can check out my BRAKE PARTS REFERENCE GUIDE HERE which shows line lengths, sizes, and part numbers for most other brake info in the first 3 posts.
Added the stainless steel braided brake hoses too.

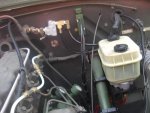
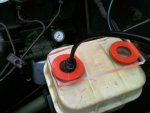
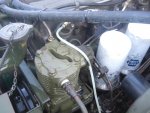
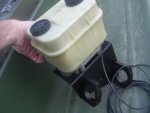
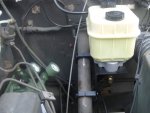
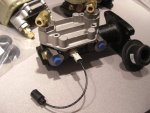
Installed the new master cylinder which went in easy. I planned on using some cunifer hard line for the remote reservoir lines but had such a hard time with it that I switched over to air brake tubing which was way easier. Made a pressure bleeder cap for the reservoir which worked well but I think I still had some air stuck in the top of the M/C or the remote reservoir line that was snaked around some things. I decided to borrow a vacuum pump from work and made a adapter out of some scrap plexi and some foam gasketing. I stuck it on the top of the reservoir, turned it on and watched lots of bubbles come up. It probably pulled some air in from the wheel cups too so I re-bleed it again and all is good. Here is some info on building a pressure bleeder for the dual circuit trucks.

Adjusting the brakes was really difficult at first, I ended up buying a 1-1/8" deep offset box wrench for the lower "major" adjusters which made the job way easier, it was worth the $30 verses trying to use an adjustable wrench or large combination wrench. Also got a deep offset 7/16" wrench for the bleeder screws. The brakes work well, I think the new shoes will need to wear in a bit and then I'll re-adjust them.

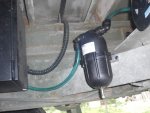
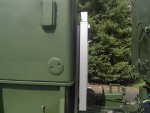
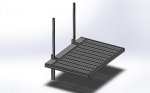
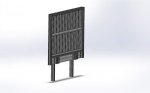
Also mounted the accumulator I mentioned in post 22 that I wanted to add in order to reduce the sink water pulsation due to the water pump, this was also a nice affordable problem solver.

In total, I used over a Gallon of brake cleaner through a sprayer and a half bottle of anti-seize on the brake/axle project.
 

Attachments

Last edited:

rustystud

Well-known member
9,071
2,388
113
Location
Woodinville, Washington
Aaron that looks so pretty ! I mean "That's so manly looking in a very manly Way ! " . Just kidding Aaron ! It looks great ! One question though, where did you get that breather manifold ? That is way cool ! I just have my lines hanging down by the air filter.
 

peashooter

Well-known member
1,039
204
63
Location
Hanover, minnesota
good job, as usual!
Thanks Juergen, I've definitely started cutting corners lately though just to get things done.... at least not making things quite a "tidy" or "pretty". Lots of zip ties, rather than cable clamps. Reusing old fasteners rather than replacing them, electrical tape rather than heat shrink, stuff like that to get the job done quick.

Aaron that looks so pretty ! I mean "That's so manly looking in a very manly Way ! " . Just kidding Aaron ! It looks great ! One question though, where did you get that breather manifold ? That is way cool ! I just have my lines hanging down by the air filter.
Thanks Greg, I found the manifold off of an old machine I scavenged parts off of at work before we scrapped it. But you can get all the parts off McMaster I'm sure. I thought this would make it easy to eventually hook up a low pressure regulator to someday as part of a fording setup... just put a few PSI into the manifold to pressurize the axles, trans, xfer case to help keep water out. I've got parts to make 1 more if you want except it has 6 ports instead of 4 (only takes 1/4" od line though). I'll send you a pm.
 
Last edited:

peashooter

Well-known member
1,039
204
63
Location
Hanover, minnesota
After the brake job getting out of control, I didnt plan on getting the "Deck" done before memorial day but my family was out of town for 2 days and the weather was nice so I decided to knock out as much as I could. Here is the fold up/down deck.

We really wanted to make the deck after getting the idea from Lowtech. Its a pain to unhook/attach the trailer. So the deck lets us leave the trailer attached and as long as we park somewhat straight, we can fold the deck down and have a ladder on each side. The green aluminum replacement ladder I made previously (post 24) can mount to 1 side, and a scissors style ladder I splurged on can mount to the other side with quick connect pins.

I had hoped to sandblast, anodize, and paint the deck & scissors ladder before installing it but I'm just tired of working on the truck so it will stay raw aluminum colored for a while. The project took a few unexpeced directions since I forgot about the ladder on the back of the truck, but wanted the deck to be able to fold down without needing to remove the ladder or having a big gap between the truck. So I narrowed the front piece of decking which should also help the trailer not need to be too straight when I want to use the deck. Of course now it hits the ladder side rail bracket which means I still need to remove the ladder to fold the deck downaua so I'll deal with that some other time. Plus I hadnt figured out a way to keep the deck locked in the upright position, or support the front of the deck when down. Basically I just sort of figured that out as I went today and had to machine a few brackets and hit the hardware store. I'll end up redoing the front support arms in a while so they hinge from the trailer and not the deck, I'll also modify the upright position lock later on so its a little sturdier and wont mar up the decking...... but for now it will (should) work.
 

Attachments

Top
AdBlock Detected

We get it, advertisements are annoying!

Sure, ad-blocking software does a great job at blocking ads, but it also blocks useful features of our website like our supporting vendors. Their ads help keep Steel Soldiers going. Please consider disabling your ad blockers for the site. Thanks!

I've Disabled AdBlock
No Thanks