AN/ARC186
New member
- 997
- 16
- 0
- Location
- Graham,Washington
Great write up on a very well executed project!
I see power steering in my future.
I see power steering in my future.
Steel Soldiers now has a few new forums, read more about it at: New Munitions Forums!


Thanks Tom for catching my blunders, edits made to correct the original posts.seth in your first post you meant to say 'box' not 'pump'! most will understand, but some may wonder.
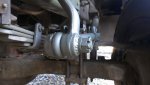
on the vickers pump, not all fittings are pipe thread. the suction is 3/4 and the 'vent' or 'bypass' is 1/4 both pipe thread.
the pressure port is #8 SAE and uses an o ring to seal. (straight thread)
the 1/4 fitting was thought to be needed if you were going to hold the pump at max pressure and no flow for more than 15 seconds. (who would do that anyway?) so it CAN be plugged to simplify plumbing and avoid air in suction issues.
tom
")
NAPA part number 269-1194. You will need to cut out a portion to enable it to tighten a little more than stock.Slit the ends of the drag link and get an off-the shelf tie rod clamp from NAPA.
I did get the collapsible shaft, so I am comfortable with the parts I used. I believe at this point my problem is down to just caster. I trust the folks that have had good results with this setup, but it is more work than I had anticipated - although thats the case with most projects I do on the truckseth, i can't find it right now, but i had a link to a moog web site that listed every TRE in the known world. so the choice was fairly easy. the play in the wheel is the big reason i did not like the old ross box. since it uses a linear valve and not a modern rotary valve there not only is more play, you need to have a column that slides easily on itself. to measure the caster you really need an old magnetic caster gauge. i had a snap-on one that fit the truck quite well with the front drive hubs off.
tom

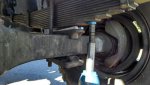
Your springs have had 6500 lbs sitting on them for 40+ years. just need new springs!I climbed under the truck this morning and got started on it. Does anyone else's front springs re-curve like this? Its been like that since I picked him up from GL and doesnt seem healthy to me, but I've never noticed any problems?
View attachment 459942
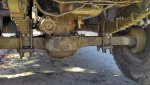
Now, do us all a favor: turn those shims around, front to rear... then try again. Why? because the way you installed them - according to the second pic - you ended with negative caster (!!), instead of 4-5º positive.........
Regardless though the outcome is pretty close to what I hoped for/expected...
Now, do us all a favor: turn those shims around, front to rear... then try again. Why? because the way you installed them - according to the second pic - you ended with negative caster (!!), instead of 4-5º positive.
G.
Glad it was helpful. I've pulled so much good info from the smart folks on this site it seemed only fair to try and share some of my experiences.har har har - Nevertheless, I for one REALLY appreciate the time and effort you took to document this - many many posts say "I was able to complete the project using XX parts" - But this takes it to a much more understandable and thereby useful level.
Although I read the whole thread, could you summarize (even if opinion only) what you think you had in it for time and money as compared to what other (PS) options might be out there. This is an upgrade I would Def want to make in the future but I want to consider all the options first.
- Thanks again!
Left it stock for now. If I come across an extra PA I may try shortening it, but I didn't want to cut & weld on the only one I have. The idea of welding on the pressure side of the steering system wasn't very appealing to me.Did you shorten you pitman arm or leave it stock ?