• Steel Soldiers now has a few new forums, read more about it at: New Munitions Forums!

  • Microsoft MSN, Live, Hotmail, Outlook email users may not be receiving emails. We are working to resolve this issue. Please add support@steelsoldiers.com to your trusted contacts.

Sparks->smoke->fire?

dstang97

Well-known member
1,859
30
48
Location
Clover, SC
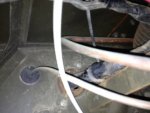
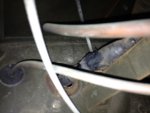
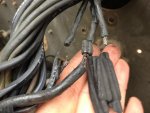
Had some problems with the deuce today. Went to get a vin check and when I came home I was testing all of the lights. Then I hit the high beam switch sparks started flying by the switch then the wires above the steering wheel started to catch fire. I did some good damage. I was able to put it out with my hand, but kept relighting. I was finally able to disconnect the batteries. So i guess when it stops raining I will have to do some more research. It looks like the wires chaffed against a metal clamp the supports the wire to the column. Has this happened to anyone here.

Also any connections to NOS in cab wiring harnesses????
 

tco3129

New member
219
4
0
Location
Flat Top W.V.
Eriks military surplus has the NOS wireing harness. I bought front and rear halves. Have yet to install the front half. Probably a time consuming job. Just have not had the time so I keep patching. Sounds like yours is beyound that.
 

doghead

4 Star General /Moderator
Staff member
Super Moderator
Steel Soldiers Supporter
26,247
1,168
113
Location
NY
And you thought CUCVs were wiring nightmares! fat lady sings
 

dstang97

Well-known member
1,859
30
48
Location
Clover, SC
And you thought CUCVs were wiring nightmares! fat lady sings
lol. Until I read the manuals and talked to the "experts" like you, warthog, and Recovery.

Good thing I go to both family reunions.

I think I'm gonna undo the harness and see whats going on in there, Repair as needed to buy me some time and then look for a new harness
 

dstang97

Well-known member
1,859
30
48
Location
Clover, SC
Here is the culprit. The metal clamp above the steering column. It looks like it chafed for a while and finally grounded out. So i was able to get the tape off and dig in. This wire was pulled out from a big glob of rubber. I am guessing they did this as protection for the "Y" splice. No idea why the other wire was fused in there also. Anyone know what that wire is? I think I'm gonna just cut out the bad section and solder in a new section.
 

Attachments

doghead

4 Star General /Moderator
Staff member
Super Moderator
Steel Soldiers Supporter
26,247
1,168
113
Location
NY
At least it looks like an easy fix!

Not sure what that wire is. Maybe you can follow it and find a wire number at the end.
 

dstang97

Well-known member
1,859
30
48
Location
Clover, SC
Yea i was pretty happy that was all it was. There was a pretty big fire. Most of what went up in flames was the rubber. It was such a pain just getting to that part of the harness I am not going to trace it out. It would not be worth it. What would be the best way to fix the "Y" set up? heat shrink butt-connector?
 

aaron92685

New member
73
0
0
Location
Elko Nv
I am not a big fan of normal but connectors. I try to solder and heat shrink everything I can. They also have a solder type but connector out there that are easy to use. Just insert the wire and use a small heat gun to melt the solder inside. Then the casing melts around the solder to from a good water tight seal.

Edit: I miss read what you said. I thought there was a "or" between heat shrink and but connector.
 
Last edited:

doghead

4 Star General /Moderator
Staff member
Super Moderator
Steel Soldiers Supporter
26,247
1,168
113
Location
NY
I like to solder and use shrink tube. Since access is difficult, a butt splice is a reasonable option.

I suppose a wire nut would made a good splice as well (just look odd).

You could crimp a bullet connector onto each wire and use a bullet connector wye.
 

doghead

4 Star General /Moderator
Staff member
Super Moderator
Steel Soldiers Supporter
26,247
1,168
113
Location
NY
Follow the wire! It may have burned out somewhere else.

If you follow it in the cab, it may be #10 or 11. If it is, I think it comes from the starter.
 

dstang97

Well-known member
1,859
30
48
Location
Clover, SC
Did some searching and found a thread like mine.


I must have man handled the harness a little to much. It pulled on the master switch to not make a good connection.

Now I just need to figure out why I have no lights. Tomorrow is another day and hopefully not raining

Thanks DH
 

dstang97

Well-known member
1,859
30
48
Location
Clover, SC
Dug into this a little more with my friend today. The wire what caught on fire is not the Hi/lo beam switch. I need to follow it to see where it goes to try and figure out what else it could have done. We also discovered I need a new Acc. switch. It only gives power to 2 terminals. I think i have a lot more problems than just that switch though.
 

dstang97

Well-known member
1,859
30
48
Location
Clover, SC
Need your help guys. I know you guys know how to figure this stuff out. I'm not being lazy and trying to read these diagrams.

The wire that burnt is number 11 not sure why sparks were coming from hi/low beam when this happened.

so one of the # 11's have 24v

here is what happens when I test for resistance at the master switch
not sure if I'm saying this right but here it goes.

OFF position all resistance

On position
a-b no resistance
c-d no resistance

If this is correct how do the lights get powered?
Should there be 24v to #1 all the time?

BTW tested my headlight switch and it works correctly.
Got a new accessory switch and it preforms just like the old one.
 

Attachments

Last edited:

DieselBob

Active member
2,891
13
38
Location
Arnold Maryland
so one of the # 11's have 24v
Both of the #11 should have power all the time as long as the batteries are connected.

here is what happens when I test for resistance at the master switch
not sure if I'm saying this right but here it goes.

OFF position all resistance

On position
a-b no resistance
c-d no resistance
That sounds right to me

If this is correct how do the lights get powered?
Should there be 24v to #1 all the time?
The only time you should have B+ on #1 is when the master switch is on. According to the schematic the light switch receives B+ through #15/pin F on the light switch which goes back to a splice where #10,#11 and #15 join.
 

dstang97

Well-known member
1,859
30
48
Location
Clover, SC
Both of the #11 should have power all the time as long as the batteries are connected.


That sounds right to me


The only time you should have B+ on #1 is when the master switch is on. According to the schematic the light switch receives B+ through #15/pin F on the light switch which goes back to a splice where #10,#11 and #15 join.
I think i'm getting confused with the (2) 11's Hopefully my buddy will be able to figure it out.
 
Last edited:

aaron92685

New member
73
0
0
Location
Elko Nv
I think i'm getting confused with the (2) 11's Hopefully my buddy will be able to figure it out.
With the master s/w closed one of the "11's" sends power down to the Alt through pins C and D. The other "11" sends power to the low air pressure warning buzzer and Fuel pump motor through pins A and B.

so if im not getting power at the horn circuit breaker and the headlights where should i look to find out why?

Looks like the horn circuit breaker and the number 15 wire going to the light switch all get power from the number 10 wire wich starts at the starter relay. I would see if you have voltage at the starter relay pin 1 wire 10. If you dont have power there, I would move on down the line. From there the 10 wire gets power from wire 14 to the starter sol. Check for power there. That is what I would do...
 
Top