-
Steel Soldiers now has a few new forums, read more about it at: New Munitions Forums!

Starting my 5 ton crew cab project
- Thread starter Jeep Nasty
- Start date

More options
Who Replied?prfl777
New member
- 1
- 0
- 1
- Location
- United States
Hi new to the site,i think its incredible what your doing with your 5 ton,it inspires me to get going on mine.Quick question were did you get the cab from,im looking for a m923a1 cab thanks for your time and good luck.
srodocker
Well-known member
- 6,549
- 70
- 48
- Location
- Lacey, Washington
How did I not post in this thread before. Im still trying to get my brakes fixed on my 928 but im also relocating the batts to tool box. Im going to be instaling a third batt to run 12v, and will be using TM americas 5ton 12v kit when he comes out with one. What size of step bit did you need to drill new holes? Im wondering if I have one big enough right now.
Rusty Nut
New member
- 87
- 2
- 0
- Location
- Chicagoish, Ill
Awesome ! I'm rooting for some warmer weather for you.
Plasma cutter: They are great, but leave a hardened ragged edge that is a bit tough to grind. You may wish to use 4" die angle grinder cutoff wheel or even a metal cutting blade in a skillsaw that has a metal shield, not plastic, for cleaner edge. Get extra tips for your plasma cutter and make sure you have a clean ground point, like welding.Wear proper eye protection with any of the above methods.
I HATE rust. Makes every job 10x harder.
61sleepercab
New member
- 622
- 3
- 0
- Location
- Walton, West Virginia
Good posts and good work so far. You need to keep lots of pictures in steps so you can make a "BUILD BOOK" with your story of your build when you are at shows with your truck.
I built a SAR some assembly required truck body built on a KB5 International truck frame and running gear with supplies from ....... garage door truck, tubing from a dog kennel, angle iron from a bed frame, 2 inch oil field pipe, surplus sheet metal, you get the idea.
Best advice from body work experience on old stuff GET A GAS SHIELDED MIG WELDER AND AN AUTOMATIC WELDERS HELMET and learn or practice your welding skills.
I have the small sized Lincoln wire welder with .025 size wire and I can weld sheet metal fairly good. One tip...... when spot welding when you stop welding the wire tip will glow enough to let you move the wire tip to the next seam spot.
The Eastwood company has some neat tools and coatings for back yard body builders. Good luck Mark
Jeep Nasty
Active member
- 379
- 245
- 43
- Location
- NH
I got the cab on ebay through An auto recycler in NJ, I believe his name was Jon. I believe a member on this board is usuall parting out some trucks in PA though.
the step drill bit went up to 1 3/8 and I went all the way with it which was the perfect size for the existing bushings.
thanks for the plasma cutting tips, depending on how clean I can get the cuts I did borrow a 4" grinder and some cutoff wheels for some cleaner lines, especially when I split the hardtop. I definitely use eye protection for everything. I've had a couple of close call when I was younger that I luckily learned from. I enjoy shooting to much to mess up my eyes.
i was lucky enough to borrow a gas shielded Mig and the auto dark helmet. All my past favors of helping people move and build sheds, decks ect, are finally paying off with some great loaner tools that I definitely could not buy.
Thanks again for the encouragement and keep the tips and advice coming.
Jeep Nasty
Active member
- 379
- 245
- 43
- Location
- NH
I covered everything with a welding blanket so nothing get melted during the fabrication of joining the cabs like airlines and wiring. I set up my jig of 2x8's that the rear cab will sit on before I bottle jack it into place to tack weld the front section and mount the rear horseshoe mount. The other pictures show where I got a chance to fire up the Plasma cutter and work on the second cab. I hoping to get the cab ready for mounting tomorrow and get it up onto the jig on the truck frame. Plasma is awesome but is going to take some practice. I foresee some angle grinding in my future.


Last edited:
How are you going to orientate the rear cab?
Will you make it so all doors on one sides open
the same or will try the rear cab around and make
suicide type of doors AND keep the open able windows
at the rear with rear wipers too! Gawd that would be so cool!
I have looked at this job a friend is doing and he is doing it
so all doors open the same way. If I were to do it I think
I would go for the suicide door install way for many reasons.
You do know the cab is shaped like an iron of sorts right?
THAT is another reason why I would go w/ the suicide rear door
type of install.
cx65083
Member
- 187
- 4
- 18
- Location
- wisconsin rapids, wi
Looking great and moving FAST! Maybe my next truck I'll do a crewcab. I'm keeping my 1st truck stock. But I love watching these builds. Keep it up!
Hawssie
New member
- 157
- 0
- 0
- Location
- Clayton, California
Well I guess one of last good things about California, Is I haven't seen rust like that in a while. And I know yours isn't really that bad. But id take the rust instead of the politics.
Jeep Nasty
Active member
- 379
- 245
- 43
- Location
- NH
I had a couple hours this morning and headed to work in a few minutes. Weather did not cooperate this morning with some freezing rain, but turned nice about 11am and its warm now.
I response to some other posts, no suicide doors for me , straight ahead on all four.
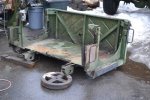
Per advice on here i did the initial slitting of the cab side with a skill saw with a metal cutoff blade then I tipped it up to get all the way through floor support. I was able to get excavator fired up now that its a bit warmer and I used some heavy duty ratchet straps to lift it up. Cab was light enough to use a small tractor at this point. I set it on the wood jig I had and after unhooking it I put the horseshoe mount over the frame rails to start lining it up.


I response to some other posts, no suicide doors for me , straight ahead on all four.
Per advice on here i did the initial slitting of the cab side with a skill saw with a metal cutoff blade then I tipped it up to get all the way through floor support. I was able to get excavator fired up now that its a bit warmer and I used some heavy duty ratchet straps to lift it up. Cab was light enough to use a small tractor at this point. I set it on the wood jig I had and after unhooking it I put the horseshoe mount over the frame rails to start lining it up.
Attachments
-
 68.2 KB Views: 239
Jeep Nasty
Active member
- 379
- 245
- 43
- Location
- NH
here are more pics. I bolted the Horseshoe mount to the cab so I would know that the rear was centered on the frame rails. The horseshoe is not mounted to the farm yet but is tight enough that stays in place. I made a couple more cuts with the plasma cutter and that gave me the flexibility to widen the front of the donor cab to the width of the front cab. I will get the the two cab tack welded together with my first panels on both sides. Once I have done that, I will drill holes into the frame and bolt the Horseshoe mount in its final location. Well, Im off to work but it was a productive couple hours. I can't wait to get some friends over to help. Working solo wastes a lot of time running back and forth side to side to get things done.


Jeep Nasty
Active member
- 379
- 245
- 43
- Location
- NH
I started welding tonight. I got the two cabs level and lined up. I measured my first 2 side pieces that would start the cabs becoming one and cut them with the skill saw cutoff wheel. I set them in place and used a MIG welder for the first time in my life. Its doesn't look pretty but it seem to work alright, when I removed the clamps and jacks. Next order of business when I have some time, is to recheck the position of the Horseshoe mount on the rear, make sure it level and then I have to drill eight 1/2 holes through the frame rails (4 ea. side) then bolt them it in. Once thats done Ill start bracing the floor where the cabs will join and start patching/ making the new floor.


Dead Reckoning
New member
- 22
- 0
- 1
- Location
- Forest Grove, Oregon
Looking good so far.!!
Hawssie
New member
- 157
- 0
- 0
- Location
- Clayton, California
I really congratulate you for doing this even without ever MIG welding. There is nothing like learning yourself. A lot of people would be too afraid to even try.
Rusty Nut
New member
- 87
- 2
- 0
- Location
- Chicagoish, Ill
Rock On ! You will be more than a little proud when you load-up the fam and drive that monster around town. You will never loose your vehicle in a Mall parking lot again !
Welding: Welding has a few variables that need to be tuned- the amps on the knob, how fast the wire is fed, how fast you move the tip, and how far the tip is away. The best way is to use some of those cut-off scraps and keep fooling with them until it looks perfect. Your using the exact same thickness scraps to dial-in your settings. When your learning, you will get sputtering and it'll clog-up your tip. Make sure you keep the tip clean- they sell a cool needle nose plier tool just for the purpose, but any needle nose plier will work in a pinch.
Your welds look a little hot or your feed is a bit low. Take your time fitting the panels and eliminate any gaps best you can. When you prep the 2 edges that are to be butted, grind a little bit of an angle so it forms a v-canyon ( ____/\____ ) and you can fill the void with your bead. Your tack/stitching approach is good as it reduces warping from too much heat. Fool with how far you hold the tip from the surface- you can angle the gun and drag the fat outer shield part of the tip along the metal to keep the tip to surface distance constant.
I never had any formal welding training, but learned just like you. Practicing on scraps saves time cleaning-up w/ grinder wheel. If you have big gaps, it's best to tack a strip of steel behind it to overlap, then fill otherwise it tends to keep burning through.
joesco
Member
- 442
- 1
- 18
- Location
- Hampstead, NH
What great progress, you have put my Bob time line to shame already!
Jeep Nasty
Active member
- 379
- 245
- 43
- Location
- NH
Thanks for the welding tips. I have a ways to go on that learning curve. I'll try some of the things you suggested to dial it in. I don't think welding in the dark by lamp stand was helping me. I was at a bad angle due to where I could see from. So I think I'll try to weld in the daylight for my floor supports and the rest of the body exterior, so I won't be grinding welds for weeks.
Jeep Nasty
Active member
- 379
- 245
- 43
- Location
- NH
Hard top and wall removal.
I finished drilling horseshoe mount holes and bolted it on.
I unbolted the hardtop into two pieces and set the top on my hood. The rear section was moved and bolted onto the rear of the cab.
I cut out the old back wall of the first cab to open things up.( I love plasma cutters).
I have to to some clean up cutting and grinding all over and then I'll start making the new floor supports.
- 114,318members
- 167,211threads
- 2,353,958posts
- 3,475online users