• Steel Soldiers now has a few new forums, read more about it at: New Munitions Forums!

  • Microsoft MSN, Live, Hotmail, Outlook email users may not be receiving emails. We are working to resolve this issue. Please add support@steelsoldiers.com to your trusted contacts.


Tatra 912-2 upgrades!

EZFEED

New member
880
0
0
Location
Lafayette, LA
Yep, I know.....the NOS originals that I could get are under $2 a piece (like $1.80 something). Brand new knuckle boots are like $15-$22. Problem is that noone wants to ship over there...not to the U.S. at least and not for a parts order of under $100. Ad that source you speak of dissapeared unfortunatley. Same issue...its more work to package and ship plus deal with the money transfer than sell the parts. :(

Tatra and Praga military parts are dirt cheap, I could literally detail my cabin four times for $100. Problem is finding a company who will ship. :-x
 

steelsoldiers

Administrator
Staff member
Administrator
5,244
3,921
113
Location
Charleston, WV
Glad to see you are hanging tough on this project. It would definitely be a challenge to deal with an uncommon vehicle which was made overseas and never had a US presence. I commend your efforts. Keep up the good work!
 

EZFEED

New member
880
0
0
Location
Lafayette, LA
Chris, thanks but this is nothing like what you’ve done with your 925........YOU have my commendation on all of the work you've put into your baby :)...it’s simply astounding to see what you have done with it. Kinda like watching Frankenstein resurrect the dead.

Nothing to see here in this thread, just paint and flim flam.
 

steelsoldiers

Administrator
Staff member
Administrator
5,244
3,921
113
Location
Charleston, WV
Thanks. :-D We need to get the trucks together when we're both finished. Yours will definitely have more firepower! :twisted: I would like to find a Lightweight Weapons Platform for mine when I am finished with everything else. A .50 would look good on top.

I see you are up in the wee hours of the morning too. Working nights or starting your day early?
 

EZFEED

New member
880
0
0
Location
Lafayette, LA
Heck yeah a .50 on a ring would look great atop! Problem is that goos semi .50's are going for near $5K now :( Might want to start looking for a parts set or piece one together to build a semi. Otherwise you'll be stuck with a dummy and those are no fun. Tell ya what would look cool, a couple 1919A4's mounted side by side with crankfire....might be fun too ;)

Yep....I work 6pm-6am 7-7 wed-wed here at Halliburton. Tomorrows my last night then its off to "real" work on my days off. I ave so much work to do around my house it aint funny, coming to work is sort of relieving LOL
 

cranetruck

Moderator
Super Moderator
Steel Soldiers Supporter
10,350
74
48
Location
Meadows of Dan, Virginia

Attachments

Last edited:

duncan

Member
550
1
18
Location
None
Right, I made some pictures for you. I dont think t813 boots will do you much good ;) When I looked at my brake cylinders I literally slapped myself on the head. All I have for boots is a little cap that scrapes dirt off the cylinder rod.
 

Attachments

EZFEED

New member
880
0
0
Location
Lafayette, LA
Bjorn, check out that McMaster Carr link.....they have a whole bunch of boots on there. :)
And yeah pretty much but thats cool! Its kinda like keeping an online journal of your work I suppose:p
Speaking of that, do you have all of the canvas for your XM757?
And how hot does that cover get with the engine up to temp at idle? Have you thought about insulating it?

Hmmm Duncan.....you must have something new/old there. I've never seen one like that, same actuator though.
 

duncan

Member
550
1
18
Location
None
Seems like a small group of us are following each others "different" (in more sense than one) projects. :)
Seems we all have a little out-of-the-ordinary type of vehicle, and thats saying something on this forum :D

Hmmm Duncan.....you must have something new/old there. I've never seen one like that, same actuator though.
Yeah, based on the actuator I said "wait that must be identical to mine", only to look at the real thing and realize I dont have boots at all. I wanted to make a picture of the actuator with the brake engaged too, but you can understand thats kind of hard to do at this point. If you find some cheap boots I might consider putting some on my brakes as well, cant have enough protection!
 

duncan

Member
550
1
18
Location
None
You're getting quicker on the whole reply thing eh :wink:

I think I need to clean and adjust my injectors too at some point, but it looks like a complicated technical job (unlike the rest of the maintenance on the engine, heh) with loads of things to go wrong. I do have access to some device that apparently allows me to adjust the injectors to the correct pressure, but it scares me :roll:

More pictures!
 

EZFEED

New member
880
0
0
Location
Lafayette, LA
HAHAHA! Yeah I know...work keeps getting in the way of my "online life" LOL! :-D

Actually....Duncan you may really want to rethink not doing it and do it VERY soon!
Not only is it easy to do but you would be suprised at what kind of junk is in them at this minute. The Tatra injectors are AWESOME!!!!!! Super easy to clean, set, etc. Mine have to be set at 170 Kiloponds (2418psi) and I'm sure yours are the same being that the same injector is used. Stripped all 6 of mine down to the guts, cleaned them and resealed them. I dont have the pump to set them with so I had to bring them to a shop to have them pop set but that was only $6 a piece.

http://img.photobucket.com/albums/v425/EZFEED/My vehicles/Picture214.jpg

http://img.photobucket.com/albums/v425/EZFEED/My vehicles/Picture215.jpg

http://img.photobucket.com/albums/v425/EZFEED/My vehicles/Picture216.jpg

http://img.photobucket.com/albums/v425/EZFEED/My vehicles/Picture217.jpg

http://img.photobucket.com/albums/v425/EZFEED/My vehicles/Picture218.jpg

http://img.photobucket.com/albums/v425/EZFEED/My vehicles/Picture219.jpg

http://img.photobucket.com/albums/v425/EZFEED/My vehicles/Picture220.jpg

http://img.photobucket.com/albums/v425/EZFEED/My vehicles/Picture222.jpg
 
Last edited:

steelsoldiers

Administrator
Staff member
Administrator
5,244
3,921
113
Location
Charleston, WV
Looks like you are working at the kitchen table again! :p You are as bad as me!

The injectors seem pretty standard. Did you clamp the body in a vise and then spin the tip off using a wrench on the flats? What did you use to clean the carbon out of the orifices? Are they multi-orifice tips? I can't really tell from the photo.
 

EZFEED

New member
880
0
0
Location
Lafayette, LA
HEHE yep I was, good thing I have no wife to fuss at me for it....she'd really be upset with the 351W heads and crank on the other side of the table and the Flathead V-8 I used for my coffee table ;)

Yep, pretty standard except for the filter somewhat and the tapered nozzle nut at the bottom. There are no gaskets, it just seals to te head like that. I dont have any after pics yet but they were FILTHY! Had to clamp the body in the vice then using a wrech that fit the flats on the tip and a 2 foot cheater pipe on that, I put a little pressure on them while tapping the skirt with a little ball peen hammer and they just eased back off. Used a wire from a wire brus to clean the tips, its a 5 port nozzle. If I would have thought about it I would have used the pack of cleaing wires from my welding kit.
 

duncan

Member
550
1
18
Location
None
You lot again ;) I asked around here to have my injects cleaned and set to pressure. Got quoted about $40... each, so multiply by 12 please. That's the main thing that put me off. Reading this thread makes me wonder if I cant just do it myself. Apparently we have the tools in the garage, but never used them. It's what you get when people dump all their old and unused tools at your place, you end up having almost everything and forgetting about it.

I'll read up on diesel injectors first, dont know anything about them to be honest :roll: Got this picture from the technical manual. Theres a better (different) one in the drivers manual but that's in the garage and on printed paper.
 

Attachments

EZFEED

New member
880
0
0
Location
Lafayette, LA
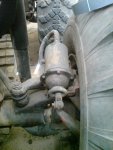
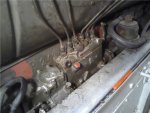
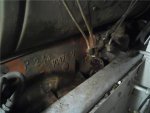
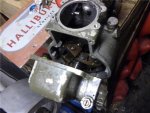
CRAP! Haven't done any work on it as far as restoration stuff goes but the other day I worked it pretty hard pulling trees and stuff and the next morning I walked into the shop and noticed about a 10" puddle under it. My stuff doesn't leak, not a one of my machines. Well upon further inspection I discovered that the governor on the back of the IP was leaking...crap :-| Well it wasnt much and the drip might have been one teaspoon per hour but given the fact that the governor only holds maybe a third a quart any kind of leak is bad news.

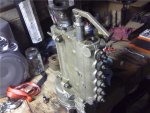
Began yanking it off and when I cracked the banjo fittings for the fuel lines I noticed the diesel looked really milky. Being the lowest part of the system after the fuel filter canister I would guess this is a bad thing and it was a good thing that I got to it now. I think i am going to add a clear disposable filter like the one Chris spliced on his 925A2 lines. Should be able to monitor fuel quality easily with that.

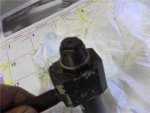
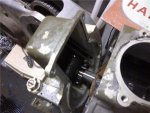
I drained the oil in the governor and drained the IP oil (they have separate capacities) and proceeded to remove the back cover of the governor housing.....stuck :confused: 
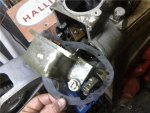
Come to find out the accelerator shaft needs to be removed and in order to do so I would have to chance disturbing the factory settings. I removed the gasket by cutting it and used it for a pattern for the new one that I cut out of modern fiber gasket material. The old paper gasket was crispy and crystalized, had to be really careful removing it but it came off. It was far time for this to be replaced...been on since 1976 I'm sure.

Cut the new one ou and saturated it with blue RTV then fanagled it over the cover and into place. Fit real nice so I snugged it down hand tight then tightened all 8 bolts in sequence.

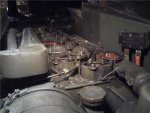
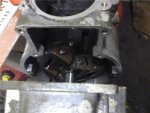
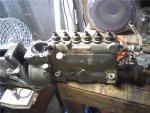
The IP is driven by the air compressors output shaft. The shaft is a little gear crankshaft that drives two pistons, the tail is extended out and has a fixture with a break away coupling in case something in the IP locks up. I took the time to realign the engine to 14 degrees before TDC, this rotates this coupling to a certain spot and then you slide the IP back onto its casting to engage this coupling. There are alignment marks on the matching coupling on the IP and once in place you can tilt the IP either way in order to align the marks on the IP front case and the coupling on the IP then tighten down in place.

Anyway...done deal, thats over...good for another 35 years or more. Both parts use the same oil (engine oil) and I think I may use some f the Royal Purple stuff here? Anyone have any reccomendations or suggestions as to wether thats a good thing or not????
 

Attachments

Last edited:
Top
AdBlock Detected

We get it, advertisements are annoying!

Sure, ad-blocking software does a great job at blocking ads, but it also blocks useful features of our website like our supporting vendors. Their ads help keep Steel Soldiers going. Please consider disabling your ad blockers for the site. Thanks!

I've Disabled AdBlock
No Thanks