• Steel Soldiers now has a few new forums, read more about it at: New Munitions Forums!

  • Microsoft MSN, Live, Hotmail, Outlook email users may not be receiving emails. We are working to resolve this issue. Please add support@steelsoldiers.com to your trusted contacts.


Threw a Torque Rod today

TCD

Member
119
7
18
Location
Mound.House, NV
Howdy,

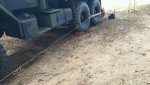
Today while slowly rolling down a hill the back of my M923 kicked hard to the right when I applied the brakes (gently) and there was a non-standard clank/clunk. When I climbed down to take a look I found the the first rear axle right tire almost touching the second rear axle right side tire. The front right side Torque Rod had come loose (the rubber was out of the ring and the Torque Rod was separated from the mount).

So after a little searching on Steel Soldiers I ordered a set of the heavy duty ball joint replacement parts ("Torque Rod End For 5 Ton Trucks M54 / M809 / M939, Heavy Duty Style, 7979185HD") from http://www.eriksmilitarysurplus.com/torodendfor51.html and they are on the way (Thanks Eric!).

Is "TM 9-2320-211-34-2-3" appropriate for the M923 as it is not listed in the preamble (it lists "5-TON, 6X6, M39 SERIES TRUCKS (MULTIFUEL")? If not I have been unable to find the correct TM relating to the process of removing and reinstalling the rebuilt Torque Rod (honest I have tried!). I also need to understand how to best move the front axle back into the correct alignment so I can reattach the rebuilt Torque Rod.

Can someone direct me to the correct TM that will cover this project?

My second question is could I have damaged anything else that I need to inspect during the repair process?

When I pulled off the road the axle actually came back partially into alignment. There does not appear to be any other damage to any other part of the drive line when I crawl under the truck.

The truck is about five days old to me however I am not concerned about this problem as long as I can completely address the repair. Fortunately I have access to everything that may be required to rebuild the Torque Rod. I have also review the following links (and many others tonight):

http://www.steelsoldiers.com/archive/index.php/t-112310.html


http://www.steelsoldiers.com/showthread.php?75224-Pressing-Torque-Rod-Ends-In-Out


Also I thought about this today and I'm wondering if there is any reason NOT to do some version of this mod?
http://www.steelsoldiers.com/showthread.php?33684-Torque-rod-dogbone-mod-and-removal

All thoughts, comments and opinions Greatly Appreciated!

Thanks,
Tom
 

simp5782

Feo, Fuerte y Formal
Supporting Vendor
12,088
9,247
113
Location
Mason, TN
The mod is something you can do if you want. if you replace them all don't worry about it. They were probably replaced about 15years ago and just worn out. Not a common issue unless u are stressing them a lot. They aren't bad. I just did 6 on a M35 in about 2 hours and I had to put the axle back in. Just check your driveshafts and ujoints for play. They are tough on the 5 tons though. Get a grease gun and a few tubes and have at it all over. Especially if you just got the truck.

Putting it back in alignment. Find a friend to help and another friend is a 3 or 4ft crowbar push the tire with the crowbar. It should not be that far. Pictures on here are handy.
 
Last edited:

Scrounger

Active member
496
65
28
Location
Southern, Maryland
You didn’t mention if it is the upper or lower torque rod. The upper can be a bear, the lower is much easier to do.

The only unusual tools that I found necessary is a 2 ¼” combination wrench and a 2 ¼” socket.
The book tells you to jack everything up, pull the tires and wheels, remove the U-bolts then the leaf springs to get at everything.
I use a little less involved method to replace them.


For removing the lower torque rod.
First use a two jaw puller to remove the dog bone from the end that is still attached. That will leave a bare piece of metal to bang on later. Remove the cotter pin from the castle nut, then remove the castle nut. The combination wrench works best on the axle end; the socket works best in the center.
Use a large hammer, I find a 3 pound striking hammer works well, to hit the ball end. It may take a while, but it will come loose. Then repeat on the other one.
For removing the upper torque rod.
Everything is pretty much the same except getting a wrench on the castle nut behind the spring stack is a little challenging.
When reinstalling the torque rod, a couple of pointers. Charge the air tanks, drive back and forth a little to spread the intermediate axle from the rear. Then chock the front wheels and leave the parking brake off.
I use a short piece of chain and a ratcheting load binder to pull the axles back together. Just loop the chain thru the lift pin on the spring stack and the binder on the top of the spring perch on the axle.
Then pull them together as you work the ends into the tapered pockets. Reinstall the castle nuts and cotter pins.
A couple of pointers on pressing the new bushing in. Place the new ones in the freezer for a while before installing them. Second take a half round file and just clean up the opening in the torque rod so the bushing won’t have anything to catch on. And third place a little grease on the new bushing and the inside of the torque rod before pressing it in.
 

gimpyrobb

dumpsterlandingfromorbit!
27,785
747
113
Location
Cincy Ohio
To pull the axle forward to align it, simply run a chain from the front rim to the rim on the axle that needs moved.

Turn wheel toward the axle to be moved, hook up chain, turn steering wheel away, all set!
 

jasonjc

Well-known member
5,325
283
83
Location
Gravette Ar.
Howdy,


Is "TM 9-2320-211-34-2-3" appropriate for the M923 as it is not listed in the preamble (it lists "5-TON, 6X6, M39 SERIES TRUCKS (MULTIFUEL")? If not I have been unable to find the correct TM relating to the process of removing and reinstalling the rebuilt Torque Rod (honest I have tried!). I also need to understand how to best move the front axle back into the correct alignment so I can reattach the rebuilt Torque Rod.

Can someone direct me to the correct TM that will cover this project?
No , that is the wrong TM for your truck. It is for the much older trucks. You need to look for the TM 9-2320-272-**. The M923 is part of the M939 series trucks.


The M39 series truck were replaced by the M809 series truck, that were replaced by the M939 series truck. And now we have the FMTV's trucks.

Hope this helps you some.
 

silverstate55

Useless
Steel Soldiers Supporter
2,068
854
113
Location
UT
Too bad you're in the "nicer" part of Nevada; if you were closer to the armpit of the state (Vegas), I'd be happy to give you a hand.

Your suspension should be OK, they are made to handle a lot of flex & movement.

Some great advice here from posters above! I've found it helps to have a 20-ton bottle jack or two, one or two long prybars (at least 5-feet long), a 2-ton come-along hand winch (or similar hand winch), heavy-duty 6-ton jack stands, some lengths of steel pipe to act as cheaters, and LOTS of wood blocks to use as cribbing (or to prevent your jack stands from sinking into the soil)....I use LOTS of 4x4s and 2x8s, if you have access to old railroad ties those work well too (especially if you cut them to shorter lengths with a sawzall).

Please be sure to post pics of your progress!
 

TCD

Member
119
7
18
Location
Mound.House, NV
Howdy,

Well thanks to everyone for your help, advice and comments!

This weekend I will remove the torque rod and prep it for pressing new fittings.

However, I am Very Seriously thinking about making a retaining setup so the torque rod cannot fall off. I travel alone (with an old Golden Retriever) and this type of disabling failure, regardless of the odds, is something I want to limit as much as possible. And the solution in this case seems very simple!

When you stop and think about it the vulcanized rubber is only intended to secure the torque rod in a very weak fashion. In any other bushed application (tie rods, suspension parts) the bushing cradles the part to cushion it within the required movement and a completely separate and mechanical process holds everything together.

My rubber bushing is still in good shape and could function correctly as a bushing for many years to come IF the torque rod was secured in a separate process. Furthermore replace the rubber bushing with a polyurethane bushing and you would have a true lifetime insert that would probably improve the functioning of the suspension, be more reliable and be an easy to service item in the future without the possibility of catastrophic failure: What if this type of failure happens at 60 mph or half way up an off-road hill? Yup I love run-on sentences but don't stop when when I'm on a roll ;-)

I am going to buy a standard replacement end assembly and see what it takes to drill and tap it and/or play with a few ideas for a "cap" plate that will be able to match the movement of the torque rod. However I also think that if you simply weld a cap plate on to the insert or torque rod who care if the heat loosens the vulcanizing; you have now separated the suspension function from the retaining function.

One of my concerns for this project is the hardness of the insert pin so more experimentation is required...

I'll keep you posted on this project...

Thanks again!

Happy Tails,
tom n tyler
 

DinoShepherd

New member
43
0
0
Location
Sisters/OR
Wanted to kick this to the top.

I also threw a torque rod on my truck earlier this year. Mine popped off as I was braking around a turn at around 40mph. Mine tossed a front axle, lower/front bushing. Right side.

So I pulled that arm off. Big tools. I used a hydraulic jack to turn the wrench, which I thought was smart. I was able to do it without pulling the wheel. I am also going to change the bushings on the left hand side torque arm as those bushings got twisted around pretty well.

That said, it seems depending on vulcanized rubber to hold everything together is not an awesome idea. I like the mechanical retention methods presented here. Seems super smart. Any feedback or new experience with these methods.

Quite frankly I am kind of freaked out about throwing another bushing. A very small, seemingly easy to break part that will leave you standing. I am going to work my way around the truck changing them all out eventually.

I'll tell you all. I love the truck and I love turning wrenches. But the scale of everything on this truck is quite daunting.

Thanks!
 

TCD

Member
119
7
18
Location
Mound.House, NV
Hi Folks,

I have finished my repairs and I am writing up two separate postings; one relating to the repair and a detailed description of the tools required to fix the defective torque rod without disassembling the drive-line/carriage/axles and one post relating to my retrofit of retaining plates to the remaining standard issue ten inserts without any disassembly/removal of the existing torque rods. I hope to have both new posts finished and on-line within a few weeks.

Thanks for all of the comments and help!

Happy Tails,
tom n tyler
 

DinoShepherd

New member
43
0
0
Location
Sisters/OR
Question for the dudes:

Has anybody replaced a torque rod end and had that new unit fail? By fail I mean had a bushing separation.

I am trying to figure out if it is enough to replace them or if I need to replace and reinforce.

It seems all failures have been on old (factory installed) ends. Correct or not?

Thanks!
 

topo

Active member
898
218
43
Location
farmington NM
I replaced torque rod ends on a trailer going on ten years no fails . The torque rod on the tandem axle trailer uses the same ends as the 5 ton the rod is just a little shorter.
 

TCD

Member
119
7
18
Location
Mound.House, NV
Howdy,

The following information was developed during my repair of a separated insert from a torque rod on my 923a2 (I had the lower, front right insert separate from the torque rod). My goal was to complete the repair without a major disassembly of the rear axle carriage or stripping the axles of the complete brake assemblies.

Military TM TM 9-2320-272-24-1 addresses this issue.

Here's what the problem looked like on my truck:

Bad-Torque-Rod-c.jpg

In its simplest form the repair of the torque rod is a very straight forward process:, remove the torque rod from the truck, press out the bad insert(s), press in the new insert(s) and reinstall the torque rod in the truck.

In reality there is a little more to it and hopefully this post will prepare you for the task and help ease the process!

The standard tools that I used to get the torque rod off the truck:

The BIG tools


Tools.jpg


a - One 2 1/4" combination wrench (I found a great deal on a Snap-On via eBay)
b - One 2 1/4" impact socket (also found on eBay)
c - Air impact wrench (I used a 3/4” drive air impact wrench and it worked just fine)
d - Air hose with a glad-hand connector on one end and an appropriate connector for your impact tool
e - Hydraulic jack in the 20 ton range (I have an air over hydraulic 20 ton from Harbor Freight) and optionally one smaller hydraulic jack in the 10 ton range
f - Electric drill motor and 2 - #17 (.173) drills
g - Steel drift - .125"
h - Steel heavy hammer
i - Lead heavy hammer
j - Vise grips
k - Needle nose pliers

Tool that I made:

a - Steel wedge (used to remove the insert with the nut facing out from the center of the truck)

Wedge-Side.jpg

This wedge is approximately 6 inches long and and made from 1.5 inches thick bar stock. The narrow tip is .150", the maximum working thickness is .400" and the working length is at least 3.0 ". You need the flat profile in order to fit the wedge under the rubber edge of the insert. The inner cutout is 2.2" wide and 1.6" deep.

Another method for knocking the insert loose is shown here:
http://www.steelsoldiers.com/showthread.php?33684-Torque-rod-dogbone-mod-and-removal

My process to remove the torque rod:

a – As many have mentioned getting the cotter keys out can be very frustrating. I recommend drilling them and get it over with. My second plan was to cut the lugs off since I had new crown nuts.

b – On the insert nut attached to the carriage (facing in) I used my impact wrench and a 2 ¼ socket to rattle the nut off. I then took a heavy steel sledge hammer and hit the end of the insert to knock it out of the taper.

c– On the insert nut attached to the axle (facing out) from the truck and with the brake backing plate about an inch away from the end of the insert I used the boxed end of my combination wrench and a 10 ton jacket on the other end to break the nut loose and then slowly wrenched the nut off.

d– I used the wedge noted above to separate the insert from the taper.

Wedge-Insert.jpg

Pressing the bad insert(s) out and the new insert(s) in:

1 – I made the slug below and used a 20 ton hydraulic press to get this task done.

Slug.jpg

The slug is nominally 4.115” in diameter and 2.3” long (the inserts are 4.125” in diameter and 2.0” wide).

If you are using Erik's heavy duty inserts then you will have to make a second slug to press in his inserts. The second slug needs to be concave to allow for the dome top and Zerk fitting in the top of the insert.

Reassembly:

a – I used 240 sandpaper to clean up the taper on the truck.

Important tip!

You may find that your axle is not aligned correctly and that the torque rod will not fit into the tappers correctly.

Do Not Try to Use the Tappers to Pull the Axle into Alignment! You will not move the axle and you could damage the taper and/or the new insert!

You can change the apparent length between the two mounting tapers very easily with the 20 ton jack!

If the torque rod is past the front tapper (long) jack the carriage behind the torque rod and as the carriage goes up you will be able to align the torque rod perfectly.

If the torque rod is behind the tapper (short) jack under the axle and as the axle goes up you will be able to align the torque rod perfectly.


I used the air impact wrench to set the torque rod on the carriage and I used the box end of the combination wrench and the lead hammer to set the axle insert nut. Don't forget the cotter keys.

Once the inserts nuts are completely tight then lower the jack. Driving the truck a few feet will settle everything down!

Good Luck!

Tom

PS: I am writing up a separate account of my of my solution to preventing a torque rod from separating from the insert (as in the first picture in this post). As many here on Steel Soldiers have shown a simple "keeper" will get you home if you start having this problem. My goal was to develop a "keeper" that could be installed on the OEM insert without removing the torque rod. I'll finish this additional write-up next week.
Tom
 
Last edited:

MyothersanM1

19K M1 Armor Crewman
Steel Soldiers Supporter
1,954
401
68
Location
Culver City, CA

MyothersanM1

19K M1 Armor Crewman
Steel Soldiers Supporter
1,954
401
68
Location
Culver City, CA
TCD:

If you could also give us updates on the performance of those "high-speed" HD torque rod ends. I have had my eye on those for a while now. I spoke to the part vendor a while back and he said the "water truck guys" use them. I have not seen anyone here install them on their trucks.
 

DinoShepherd

New member
43
0
0
Location
Sisters/OR
l

ah yes, I read that with the greatest of interest... And fear.

I really meant, anybody install new ends THAT WERENT DEFECTIVE and has one fail?

i can imagine how it felt to know you just put on a whole batch of known bad ends. It does seem the vendor stepped up and acknowledged the problem.

I was i as impressed enough with his response to buy my ends from him.

Cheers!
 
Last edited:

TCD

Member
119
7
18
Location
Mound.House, NV
Update - My Solution

Hi Folks,

Here is my original solution for limiting the separation of a dog bone from a standard military insert.

DogBone-Fix-a.jpg

1) The plates are 5" x 1/4" steel disks purchased via eBay.

2) I drilled a 5/8s hole in the center of each plate (oversized for my 1/2 mounting bolt to allow for free movement). I am going to paint the inside of my disks white so it will be easy to monitor for any contact with the dog bone.

3) I tested the affects of welding a 1/2" bolt on to a defective military insert to see if the welding damaged the insert. As you can see I built up a large weld and heated up the center of the insert pretty good and no damage was apparent from the welding.

DogBone-Fix-b.jpg

4) I purchased 1/2" rubber grommets to place on either side of the plate to prevent rattling and to allow the plate to flex without bending the bolt. I use nylok nuts to secure the plate to the insert.

DogBone-Fix-c.jpgDogBone-Fix-d.jpg

I originally went with the welded stud design because I was lazy and did not want to remove all of the dog bones. I have since found an easier solution to removing all of the dog bones (I'm having someone else take them off). So I am now going to drill and tap the inserts for the mounting bolts because I think that is a better solution. However I still think my original solution would work just fine.

My opinion is that even if the vulcanizing separates on an insert that is secured in some fashion, it should still function just fine as a bushing. I believe that we would be able to "get home" so we can repair the dog bone in a shop environment and that is my goal for my truck. I did this project to have a get home solution for those failures that would otherwise stop me dead in my tracks wherever it occurred (Been There Done That!).

I would also like to note that the civilian inserts (which I installed on one dog bone) do not require this mod as securing the dog bone is inherent in their design. I do not have very many miles on the civilian inserts so I can't comment on their durability. The cost of the civilian insert is what kept me personally using them all around my truck. And FYI, the civilian inserts also regular greasing as in any other ball joint.

I am still looking to purchase one dog bone, hopefully out West as the shipping is killing me.

My truck is down right now so this project has not been completed. I will post pictures of the completed mode in the next month or so.

YMMV.

tom n tyler
 
Last edited:

Jbulach

Well-known member
Steel Soldiers Supporter
2,560
1,967
113
Location
Sunman Indiana
Thanks Tom!

Do you happen to have any info and a picture of the civilian joint you found?

I'm also wondering if anyone has a real good idea of exactly how much space is necessary to allow for flex?

Also, if anyone around Cincinnati has an extra dog bone or two let Tom or myself know, I might be able to get it to him.
 
Top
AdBlock Detected

We get it, advertisements are annoying!

Sure, ad-blocking software does a great job at blocking ads, but it also blocks useful features of our website like our supporting vendors. Their ads help keep Steel Soldiers going. Please consider disabling your ad blockers for the site. Thanks!

I've Disabled AdBlock
No Thanks