• Steel Soldiers now has a few new forums, read more about it at: New Munitions Forums!

  • Microsoft MSN, Live, Hotmail, Outlook email users may not be receiving emails. We are working to resolve this issue. Please add support@steelsoldiers.com to your trusted contacts.


Totaled Deuce Gets Rebuilt

Wildchild467

Well-known member
Steel Soldiers Supporter
2,052
56
48
Location
Milford / Michigan
The head stamp on the blank 7.62 nato round is "LC67" wonder how long that was laying in the cab. The cab reinforcement plate looked to be newer installed by the military... so does that mean they had the machine gun on there before the reinforcement plates came around? Interesting.
 

crazywelder72

New member
701
2
0
Location
Winchester Ma
I didn't read past the first page on this thread. But if i had that many memories in that truck, I would say it would be a perfect time to build a quad cab with a short bed and keep all 3 axles. Salvage what you can, get out the torches and turn in the damaged sheet metal for scrap iron.
 

Wildchild467

Well-known member
Steel Soldiers Supporter
2,052
56
48
Location
Milford / Michigan
Well i have a bunch of parts now. i took a trip to kublos and now have an M35A3 cab that i will be putting on my chassis. I have a right front fender and a bunch of other nick-nack parts. Since i have the cab off and everything is easy to get to, i was thinking about putting head gaskets on since they are easy to get to. it always slobbers oil down the side of the block after a while and i guess new head gaskets help this problem. when i pulled the radiator a a year or so ago, i found some milky stuff in the bottom of the radiator hose... i dont know if this was from a head gasket on a previous engine the government had in it or what. the truck always ran good. i do not thinkmy head gaskets are the new style. the engine is also a "TD" block. I have to do my research and find out what gaskets are which. i know the new style ones have the little passage ways from the fire ring to the outside of the block. it should be a fairly easy job to do them, right? not much in the way right now.

another question, can i change the steering box shaft just by unbolting the 4 bolts on the column and unscrewing the shaft from the pitman arm gear? something tells me this would be too easy and it cant be done. my column got bent, so i am just going to stay with manual steering for now. with all the other stuff i want to do while the cab is off, i would be working on it forever! haha

I had the engine running last night with the new radiator on it. i just put water in the radiator
 

Wildchild467

Well-known member
Steel Soldiers Supporter
2,052
56
48
Location
Milford / Michigan
does anybody have advise if i should change my head gaskets while i have all the sheet metal off? the main reason i am doing it is because the turbo side of the block gets dirty from oil after a while and i dont know what condition the gaskets are in. it runs fine and decent power (this is the only deuce i ever drove on the road, so its hard to compare), but as long as i dont screw something else up changing them, it couldnt hurt, right?
 

doghead

4 Star General /Moderator
Staff member
Super Moderator
Steel Soldiers Supporter
26,247
1,168
113
Location
NY
If you do not have the newest style head gaskets, it might be a good time to do a new set.
 

Wildchild467

Well-known member
Steel Soldiers Supporter
2,052
56
48
Location
Milford / Michigan
Im not sure what style is on the truck now. There are not any tabs sticking out between the head and the block. I know the one style has the weep slots and the tabs that stick iut the side. The ones i bought are a darker color and have the integrated fire rings. I was told that they are the new style.

I was busier then heck today working on getting that A3 cab stripped down (wiring doors off... not stripping paint) so i can get things painted up nice. My 6 gallons of rapco 383 green and 1 gallon of 383 brown and 1 gallon of 911 black came the other day. I plan on shooting my M105A2 also with it. Ill feel better once i get the cab on and and bolted down. I think at that point ill see the finish line ahead of me.
 
Last edited:

Wildchild467

Well-known member
Steel Soldiers Supporter
2,052
56
48
Location
Milford / Michigan
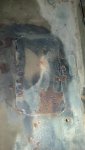
last night i made some good progress stripping down the A3 cab. all the seats are out, flooring, heater etc. i have to weld up the cowl where the hood hinge bolts on the passenger side. it is cracked where the hood hinge bolts go through closest to the windshield. . i don’t know what could have caused that. I think i can hammer and dolly it back to where it has to be and then hammer weld it back together. It not that bad, only about 2 cracks about an inch and a half long. There is also a data plate on the driver’s side I need to remove and weld in the holes. On the passenger side floor, there is an access panel there that I need to take off and fill in. it might have been to access something with the dual circuit brakes. On the other side, the trap door to access the A2 master cylinder location has a plate over it and is tack welded/seam sealed over. I have not tried to grind the welds off and see what is under it yet. I hope all the provisions are there to put my A2 cover on. I also need to punch out the blank in the floor for the winch lever through the floor. After I get all of that stuff done, I am going to pressure wash the cab off and lightly sand the outside to scuff the paint up and shoot it with some fresh 383 green.

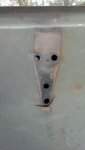
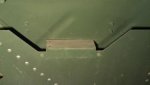
I have a question on the cab reinforcing plate for this A3 cab. It looks like there is a spot to put a date plate or something on the reinforcement plate behind the passenger seat. Any ideas what goes there? I attached a picture.

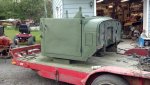
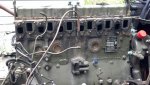
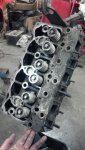
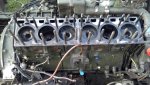
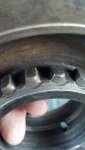
Later that night I worked on the transmission. It looks like some GI beat on the transmission a little throughout its life. 1st gear had some roundness to it and so did the reverse idler. I never really had a problem with it not going into 1st or reverse… so I think it’s acceptable. I was In a truck pull last year with it, and if first gear was going to break it would have done it then. Some of the other synchro nubs on the gears look a little warn, so I am going to see if I can get a couple take out gears for it, if they are any better. Who knows, we’ll see!

I’ll be happy when I get the cab done, painted bare shell mounted back on the chassis. i can’t wait to reach the point when I have everything painted and the reassembly begins!

I also posted a picture of what "like new" synchro teeth look like on second gear.
 

Attachments

Last edited:

Wildchild467

Well-known member
Steel Soldiers Supporter
2,052
56
48
Location
Milford / Michigan
Im working on taking the heads off to change the head gaskets and having one heck of a time getting the special wrench over the cylinder head nuts on the left side.... im looking for some encouragement..... borderline on aborting the job and only doing intake/exhaust gaskets. I already took some of the nuts off the head though. This is frustrating. Ok... i think im done venting. Sigh.
 

Toolmakers Deuce

New member
27
0
1
Location
Bath, MI
Hi Tom, I feel bad about your lose. But you are doing some great things with a bad situation. I love seeing the pictures of your Deuce being stripped down. I am learning as you go thru things. I just bought an M35a2 1968 Keiser Jeep in very good shape a month ago. Keep up the great posts and keep this thread alive. Thanks again, Pat:)
 

Wildchild467

Well-known member
Steel Soldiers Supporter
2,052
56
48
Location
Milford / Michigan
thanks pat. I’m glad you are learning something from me tearing it down... i sure am! i guess one think i learned was you can always keep going farther and farther in to the teardown if you wanted to. for instance, when I pulled the cab off and saw how easy the transmission and transfer case is to get to, i thought then would be a good time for seals, gaskets and transmission synchros. all the while i am thinking what i need to do vs. my budget. i have been thinking about my brake hoses and wondering if i should replace them. well last night i did an inspection and found the one that goes from the frame to the front axle is cracked. so i threw up the red flag and just ordered all 5 brake hoses. no sense on messing around. my master cylinder, air pack and wheel cylinders all look to be in great shape with newer paint on them, so I’m not worried there. when i pull the box off, i will inspect all the metal lines for any wear/chafing. same thing. if i find anything, ill replace it. I want a good feeling with my brakes.

this past weekend, i worked like heck on the truck. wow. i got the whole cab painted, the hood painted and some other odds and ends. i am also working on the head gaskets (as seen above when i needed some venting and did so in a post, haha). i did find some bolts to my intake manifold were not as tight as they should have been. also inside my intake manifold, it was a little oily. I’m guessing maybe a little oily residue in the intake is normal. Maybe oil from my manifold flame heater or turbo was the cause of the oil. I did have my turbo looked at and the guy said everything seemed good with it. I could have had him put seals in it (just to do it, not that it needed seals) for $35, but I opted just to leave it alone. I’m almost wondering if it needed head gaskets or not and that maybe it was just my intake leaking some and that was making a oily mess of the block. it was not a major mess, but definitely gets dirty. So maybe before everybody does head gaskets, check to make sure your intake is tight if your engine block is getting oily. side note: having all the oily mess come off the engine ends up getting my one brake hose oily and that is not good for the rubber, so that is another key reason for doing these gaskets. since i have all the tin off the truck, it should make the head gasket change a lot easier anyway. i am hoping the weather is decent tonight so I can finish getting them changed. right now the manifolds are off the engine, the thermostat housing and the other stuff is moved aside.

I attached some pictures of the cab. As you can see, the cowl is cracked where the hood hinge bolts on. The hood hinge bolts bolt to a plate under the cowl so that there can be some hood adjustments if necessary. Does anybody know why the cowl cracked? I think when I took it off the bolts were tight. I hammered the crack back together and stitch welded it back together while hammering my welds flat. I am not an expert body man, but I know the key thing to do is keep the heat down on my welds. So I let them cool in between welding and it turned out pretty good.

Another picture is of the cover on the floor for the A3 cab. As you can see, it is a welded patch. I cut the 6 welds and pounded the patch off the floor. Everything was there from the A2 to mount the cab plate with the exception of the holes to mount the hinge. This also goes for the PTO lever floor hinge. I knocked out the plate in the floor and only have to re-drill the holes to mount the hinge. Still more work a head of me, but it is starting to come together.

let me know if anybody wants to see specific pictures of the truck while i have it apart. im trying to take them as i go, but greasy hands and a phone do not work well sometimes! haha! :)
 

Attachments

Wildchild467

Well-known member
Steel Soldiers Supporter
2,052
56
48
Location
Milford / Michigan
well last night i pulled both cylinder heads off to do the gaskets. turns out i had the newer style gaskets head gaskets on the truck. i think my real leak making the block oily was leaky manifold gaskets. then the fan blowing around just spreads out the mess. so they probably did not need to be done, but at least i know my head gasket status now and it will be good to go. i do have one question about the gaskets. i have read on here that the new style head gaskets do not require any additional sealants, but has anybody ever put
Permatex® Copper Spray-A-Gasket® Hi-Temp Adhesive Sealant on their head gaskets before they put them on? i have used it on other head gaskets i have done and have not had any problems. i just wanted to see what other people have thought about it. I already have some from a previous engine, so its not like i have to buy any. i would not think this is any different from any other engine... anyboy have opinions about using that spray gasket sealer on the head gasket?

tonight my game plan is to finish cleaning off the heads with brake cleaner and cleaning them up. i did run a tap down the bolt holes for the water manifolds. those threads get crappy because of the dis-similiar metals, so now they are all clean and will get some anti-sieze lube before they get put back on. i still have more cleaning to do on the surface of the block to make sure they are all clean before the heads go back on. im sure the whole job will take me 2-3 hours tonight.

tomorrow nights game plan is to do a little painting on the engine with some 383 green. might as well since i have it all apart. i need to stop worrying about little details putting this truck together and get it done.... but i know i wont. at least it will be a great looking truck when i get it done. my goal is to have it done in 2 more weeks.
 

Attachments

Wildchild467

Well-known member
Steel Soldiers Supporter
2,052
56
48
Location
Milford / Michigan
last night my progress got rained out. a couple sparatic rain drops made me decide i should just leave the deuce covered up. today is supposed to be nice, so i am going to definately get the heads back on. i think i am going to use the spray on the gaskets. ill give it a whirl, see what happens.

i worked a little on the hood last night. i got a takeoff hood and it has a couple small cracks in the front. so i am going to weld those up and grind the welds down (no body filler). the cracks are on the bottom side of the lip in the front. i am also going to make new rubber pads from 1/4" thick mud flaps. i just need to get #10 screws and tighten them down enough so they counter sink themselves in the rubber. shouldn't be too bad to do. the originals were all dry rotted and were about to fall off.
 

Wildchild467

Well-known member
Steel Soldiers Supporter
2,052
56
48
Location
Milford / Michigan
well last night was the point of recovery for me hitting rock bottom on my deuce. by rock bottom i say im done taking things apart and looking for things to fix. the heads are back on and i only got them pre torqued down to 110 ft/lbs so far. the TM shows the stepping sequence to torque the heads down and i only got half way there when it got too dark outside to see. tonight i will get the heads final torqued and then install the manifolds and fire it up.
 

doghead

4 Star General /Moderator
Staff member
Super Moderator
Steel Soldiers Supporter
26,247
1,168
113
Location
NY
Rock bottom huh? Was that just before, or just after I left there...:oops:
 
Top
AdBlock Detected

We get it, advertisements are annoying!

Sure, ad-blocking software does a great job at blocking ads, but it also blocks useful features of our website like our supporting vendors. Their ads help keep Steel Soldiers going. Please consider disabling your ad blockers for the site. Thanks!

I've Disabled AdBlock
No Thanks