• Steel Soldiers now has a few new forums, read more about it at: New Munitions Forums!

  • Microsoft MSN, Live, Hotmail, Outlook email users may not be receiving emails. We are working to resolve this issue. Please add support@steelsoldiers.com to your trusted contacts.


Turboing a 6.2l build (another one)

Dsilverline

Member
51
30
18
Location
Crestline, Ca.
Hey guys,

So, I started this project a bit ago and have been taking pictures and finding out I need to do some intersting things differently based on previous truck mods I did.
Thought it would be cool to make a thread going over the progress, getting ideas from others or showing what I'm doing (not a budget build at all ) Does that seem interesting? This project has basically taken over my life....haha

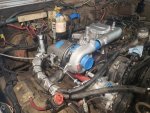
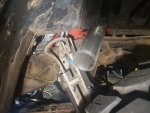
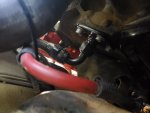
Let's see, so far in the progress I've got everything I need off the truck (needed an oxy acetlyene torch to get the exhaust manifold bolts out), almost all parts sourced and on hand, intake back installed, INJ pump turned up, new fuel return plate installed, fuel supply line installed. Now mocking up the manifold fit and trying to get everything to clear it. Found some nice little heat wrap that just fits around the fuel return lines as the clearance is extremely small on one injector due to where the port is located (port is almost on the bottom when injector is tight , is there a way to dissasemble the injector to get the ports in a diff spot?).

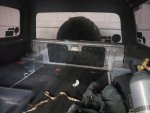
Also found that if you install the Nostalgic Air kit meant for CUCVs w/ two alternators and want to turbo you will run into some issues. Previously relocated the batteries to the rear of the truck and those wires caused issues also.

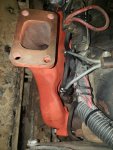
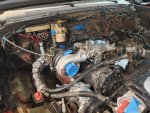
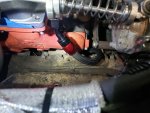
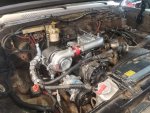
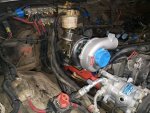
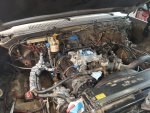
-In the pics you can see that the AC lines block the downpipe location (heater hoses easy to relocate). AC bracket blocks the turbo inlet ( have a plan for that)
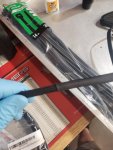
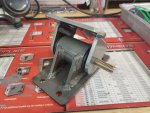
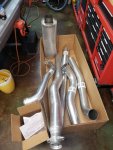
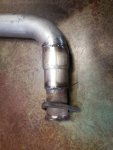
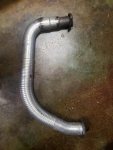
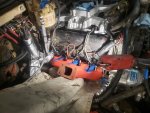
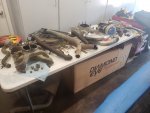
-Nice little pile of old and new parts
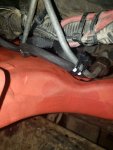
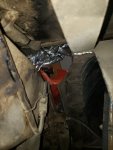
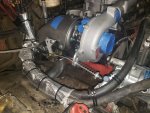
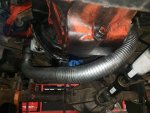
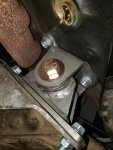
-the current state after rerouting lines and heat wrapping as the clearances are so tight....(now there is room for the downpipe to get through the inside wheel well support on the outside of the frame)
 

Attachments

cruzer747

Active member
218
145
43
Location
California
try swapping an injector with a different one to get the port clocked better. I hear you on projects that take over your life! :D What is the age/wear on the motor? I would love to do this to my 6.2 but it will probably get a 6.5td someday down the road. I will have the turbo setup available soon but as with most things I would be worried to blow it up. However the motor is only at 20k so given your experience/research, would it be worth the risk to put a gm8 setup on from a 6.5?
Anyways, looks like a nice project to follow, good luck!

-edit- having rebuilt some injectors disassembly will not change clocking
 

Dsilverline

Member
51
30
18
Location
Crestline, Ca.
This build has definitely surprised me with the amount of stuff to be done! Ahhh right, swapping injectors...I have some on the drivers side that should work better. I can figure out some complex stuff sometimes but then overlook an obvious solution like that haha. Good to know about the injector rebuild.

ODO when I got it was 60k, no idea if that is accurate or not though. I did a compression test early on and all cylinders showed great numbers. I did think it was important to install a DSG stud girdle so I did that. After that the stock head gaskets are definitely a concern of mine.

I definitely can't say I have any experience on the subject but my opinion on the whole thing is: It seems like plenty of guys have done the project with no issues and end up with motors that live long lives. If one follows the common knowledge of keeping boost under 10, revs reasonable and EGT's under 1k or so then things should be fine. Stud girdle reduces bottom end risk quite a bit.

Guess it comes down to how much you can tolerate the stock motor. In my case I have an SM465 tranny and a modified Inj pump- so without the torque converter of the 400, when it bogs, it bogs *hard* and egt's soar. Often really have to downshift sooner than I would like and drive slow. I'd rather throw this motor in a lake than deal w/ that any longer, so for me it's totally worth the risk.
 

Dsilverline

Member
51
30
18
Location
Crestline, Ca.
Ok, so today I got all the fuel lines and glow plug wires sorted- swapped one injector with another from the driver side which got the problem return line in just the right position. Found some heat sleeve that is exactly the right size to fit over the braided type return lines and will fit over the glow plug connector well enough. This stuff was meant to be, can provide the make and part # if anyone wants it. Got all that cleaned up and looks clean.

Mocked up the manifold again to check clearances and all looks good, tight, but I think it will be fine with two gaskets. Checked and found that the AC and other line rerouting now will give me the path I need for the downpipe so that looks promising. Modifying the AC bracket for turbo inlet will come later.

As I had to jack up the motor to get the manifold and bolts in- when unbolting the motor mounts I found those were shot. Just received this beefy set from DIY4X which will go in soon and will def help hold everything together when I abuse this off road.
 

Attachments

M37M35

Well-known member
Steel Soldiers Supporter
572
648
93
Location
East Central Oklahoma
...braided type return lines...
You might want to reconsider that braided return line... That looks exactly like the 'high quality' braided return line I used on 3 different 6.2/6.5 engines, and they all started leaking after 1-2 years cause the rubber degraded and cracked on the ends under the braid.
I've switched to the translucent yellow Tygon fuel line and haven't had any issues with it yet.
 

cruzer747

Active member
218
145
43
Location
California
You might want to reconsider that braided return line... That looks exactly like the 'high quality' braided return line I used on 3 different 6.2/6.5 engines, and they all started leaking after 1-2 years cause the rubber degraded and cracked on the ends under the braid.
I've switched to the translucent yellow Tygon fuel line and haven't had any issues with it yet.
on my work truck I have been running some of the braided stuff from badger diesel and it has been on there for about 6 years and while I think I may have had one or two that I trimmed back and reused they are doing pretty good. I am in Ca away from the coast so maybe the more cold/wet/salty road conditions in other areas break the rubber line down more quickly?

Anyhow, I have definately hheard lots of good things about tygon.... and it is 5/32 id and no clamps needed either. I will give it a go when mine do start leaking.
 

Dsilverline

Member
51
30
18
Location
Crestline, Ca.
Yeah, this stuff I got is from Badger Diesel. I suppose rubber by nature will eventually crack and I've seen some in the past as well so I may want to get some Tygon lines before final assembly. There is very little room to get to anything behind this turbo manifold so I want the smallest chance possible of having to get back there anytime soon haha
 

M37M35

Well-known member
Steel Soldiers Supporter
572
648
93
Location
East Central Oklahoma
I don't remember where I got mine from. I know I bought it a couple different times, so it wasn't all from the same batch. It was supposed to be fantastic stuff, but I was disappointed with it. The (civilian) factory rubber lines with the springs clamps were on the trucks for ~20 years without leaking, but this stuff only lasted a couple years.
Maybe the stuff I ended up with was 'counterfeit', or it's been improved since then. I just know I won't use it again. YMMV.
 

Dsilverline

Member
51
30
18
Location
Crestline, Ca.
So I took a second look at things and found that with some needle nose pliers I can get to all the return lines without loosening up the manifold if I need to replace down the road and these appear to be legit return lines so I might just run with em. The one thing to note is there are two injectors (maybe 3) that are totally impossible to get out with the turbo manifold installed. So I'd say it's crucial to have rebuilt or new injectors put in before/during the project. Mine have less than 10k miles on em so good there.
 

cruzer747

Active member
218
145
43
Location
California
So I took a second look at things and found that with some needle nose pliers I can get to all the return lines without loosening up the manifold if I need to replace down the road and these appear to be legit return lines so I might just run with em. The one thing to note is there are two injectors (maybe 3) that are totally impossible to get out with the turbo manifold installed. So I'd say it's crucial to have rebuilt or new injectors put in before/during the project. Mine have less than 10k miles on em so good there.
I cant recall exactly how my 6.5t injector removal goes but I think I am able to get at em (I have average/small hands) with the aid of not only I think a modified socket but the fact it has a hex shape at the back of it in addition to being 3/8 drive. It is even 19mm, the same as the line ends. It has been a while but if you are crafty you might be able to swap the injectors w/o manifold removal.

My #6 glowplug on the other hand....
 

Dsilverline

Member
51
30
18
Location
Crestline, Ca.
The longer 6.2l injector is pretty tight against the manifold but I'd certainly try whatever I could if I needed to down the road! Not much progress lately due to other life responsibilities, house projects etc, but making baby steps.

Last night I started cutting out access for the downpipe (still more cutting to do) and opened up the Diamond Eye exhaust box to check it out. Previously I figured it made sense to buy that kit as a good base and modify as need be. Now I'm going outside the frame rails so not sure if that makes as much sense, just a bit more modification anyway. Didn't realize how big 4" exhaust was until I opened the box haha.
 

Attachments

Dsilverline

Member
51
30
18
Location
Crestline, Ca.
And some more baby steps....Odds and ends- got the turbo master installed on the turbo and making the Oil drain line from hose and AN fittings. Still figuring out the downpipe scenario. With all my test fitting I realized that with my booty fab shock mounts in their location I can't currently run the downpipe closer to the frame. To do that I will need to move the shock mount forward and fab a new downpipe with different bends so its not right on the fuel line. So for now (temporary) I have a cut downpipe section that has room in front of the shock. That will work to get it running, after that I can decide what I'll do.....
 

Attachments

cruzer747

Active member
218
145
43
Location
California
thats a lot of work, looks like it is getting closer though, I am going to take my rig out for a trip... with the hot air and high altitude I am preparing myself for some slllllow climbs, cant wait to someday turbo mine :) watching how this goes pretty closely, thank you for the pics. do you think you could have stayed inside the frame rails with a stock 6.5 downpipe?
 

Dsilverline

Member
51
30
18
Location
Crestline, Ca.
Yeah, I can confirm it's a lot haha. If anything, having a NA 6.2 teaches one patience...at least until you get sick of it! I would think a stock 6.5 downpipe would work (can't confirm that) but most people wouldn't want to go that route anyway because its a squished little flattened thing that doesn't flow very well.

The main reason I didn't pursue trying to do anything inside the frame rails is because I had previously done a battery relocation project (4 cables going through that same spot going to battery boxes near the tailgate) as well as aftermarket AC with the refrigerant lines very close. I'm sure you can make something better than stock work inside the frame rails, just wasn't much of an option for me. My truck is very 'special case' w a lot of things.

Yeah, glad to post and hope something helps. I never would have tried this without other peoples build threads from the past!
 

Attachments

Dsilverline

Member
51
30
18
Location
Crestline, Ca.
Seems it's pretty hard to find time to work on this project lately. Makes me wonder if I'll even finish it in time for winter! At least I got a little baby step in.
Bought a turbo oil supply/return kit off of Amazon with braided hose, AN fittings (along with a ton of other stuff, $37) to hook up to the oil drain plate.
 

Attachments

Last edited:

Dsilverline

Member
51
30
18
Location
Crestline, Ca.
Alright, finally got some time to continue on this! Have a temporary crossover setup mocked up. Got a 2.25 to 2.5 reducer online and welded a section of the old exhaust to the new 2.5 crossover. I temporarily have a section of flex exhaust between the two cut crossover sections as I think I'll have a shop do the final sections. I want the crossover to be as high up as possible, clean and have the proper clearance for the driveshaft as my suspension is modified for greater travel. With some of the bends needed I think it will be difficult enough that I don't want to spend forever on it.

Got the first of the DIY4X motor mounts in place. It fit great and looks beefy, throwing the other one on tonight.
 

Attachments

Dsilverline

Member
51
30
18
Location
Crestline, Ca.
That's right, it's definitely a game of patience! No pics w/ a stock crossover, I don't believe they will work unless you swap out the drivers side manifold to a 6.5 version or weld on the old exhaust flange like I did here (at a minimum). The aftermarket versions are plentiful and cheap enough, didn't see much for sale of the original ones at a decent price anyway. I ordered the aftermarket crossover figuring I would need to chop it up.
 

Dsilverline

Member
51
30
18
Location
Crestline, Ca.
Another update finally! Hurt my back a bit and so had to take some time off of the project. Back at it though and made some good progress. After final fitmet I realized there just wasn't enough clearance between the exhaust manifold and the fuel supply and return lines. Did two things, switched the rubber out for Tygon as it is much more flexible and realized I would need 3 gaskets instead of two. After fitting some heat shield sleeve around the Tygon lines I used plenty of stainless steel ties to keep everything up out of the way to not get burned. I used copper exhaust gasket sealant to make a sandwhich out of the gaskets so they would hold together like one solid piece nicely. As I had read elsewhere, I temporarily taped the gasket to the manifold and all the bolts in their holes so things would stay in place while sliding everything in. My back was still jacked so I laid a 2x4 like a little ramp to slide the manifold down into position, then used a prybar to lift it into place which worked ok. Everything that's going on now is final install and getting close to firing up soon. Just a few final things to finish!
 

Attachments

cucvmule

collector of stuff
1,129
552
113
Location
Crystal City Mo
Take your time and keep after the project! Even if you just look at the parts and figure out ways to accomplish even the little things different solutions will come to light.

There are ways to do things if even indirectly. If you find that one bolt that will work today and do nothing else you have made progress even if only in a small incremental way.

Thanks for the information on the progress of your truck.
 
Top
AdBlock Detected

We get it, advertisements are annoying!

Sure, ad-blocking software does a great job at blocking ads, but it also blocks useful features of our website like our supporting vendors. Their ads help keep Steel Soldiers going. Please consider disabling your ad blockers for the site. Thanks!

I've Disabled AdBlock
No Thanks