• Steel Soldiers now has a few new forums, read more about it at: New Munitions Forums!

  • Microsoft MSN, Live, Hotmail, Outlook email users may not be receiving emails. We are working to resolve this issue. Please add support@steelsoldiers.com to your trusted contacts.


Was looking for a shop in or near Milwaukee to work on M1008; then did it all myself!

cucvrus

Well-known member
11,274
9,603
113
Location
Jonestown Pennsylvania
WOW times have changed. Back in the mid 90's I sold every TH400 I could get and people were throwing the 700R on the core pile. The TH400 is one of the toughest transmissions out there. When they added the OD to the mix that was always an issue. Maybe just changing from the 4:56 gears to some 3:73 gears is the least amount of out of pocket money and getting the best bang for the buck. I would do the gear change. Mr. Rusty still plows snow up hill on a mountain and drives 70 - 75 on the highway with no issues. Just a thought and an attempt to save you some cash. These CUCV trucks are never going to be highway cruisers and comfortable. That was never the intent. They are a utilitarian HD vehicle that was built with off the shelf HD stock parts. Good Luck. DSCF3677Rusty.jpg Mr. Rusty was once a very nice 1984 M1028. The years and use have not been kind to it. It has 37K original miles on it and is still going every year.
 

retro_life

Well-known member
243
629
93
Location
Los Angeles, California
WOW times have changed. Back in the mid 90's I sold every TH400 I could get and people were throwing the 700R on the core pile. The TH400 is one of the toughest transmissions out there. When they added the OD to the mix that was always an issue. Maybe just changing from the 4:56 gears to some 3:73 gears is the least amount of out of pocket money and getting the best bang for the buck. I would do the gear change. Mr. Rusty still plows snow up hill on a mountain and drives 70 - 75 on the highway with no issues. Just a thought and an attempt to save you some cash. These CUCV trucks are never going to be highway cruisers and comfortable. That was never the intent. They are a utilitarian HD vehicle that was built with off the shelf HD stock parts. Good Luck. View attachment 836061 Mr. Rusty was once a very nice 1984 M1028. The years and use have not been kind to it. It has 37K original miles on it and is still going every year.
Wow that bed looks great on there!

I was told it would be around $2200 per axle to change gears. The shop with the outrageous pricing is the one who gave me that figure, so I don't know if that's just their price as opposed to the going rate. How much do you think it should cost to swap carriers and go to a 3.73 on each axle?

Also, I stayed up last night reading the TM on removing and installing the IP and it really does seem simple enough. I'm thinking about giving it a go on my own. I'm planning to at least try to pull the intake manifold today so I can get a better look at what's going on. Here are some pictures I took just now before getting ready to dig deeper.

And what is that connector that has been duct taped?

Here's a video of it running: https://streamable.com/9gcx6v
 

Attachments

Last edited:

retro_life

Well-known member
243
629
93
Location
Los Angeles, California
Well.. looks like I'm doing this. I got the intake manifold off and now I'm at the pump. @cucvrus Thanks for pushing me! I can really use some of your advice going forward with this. I don't have the new pump yet, but it would be nice to take this one off so I can drop it off and avoid paying a core fee when picking up the new one. Do I need the old one around so I can reference the timing mark I'm going to have to make? I take a lot of photos on my phone while I work so I can look back closely at things, too.
 

Attachments

cucvrus

Well-known member
11,274
9,603
113
Location
Jonestown Pennsylvania
You look like you are doing great so far. Lets remove the entire fuel pump and fuel injection lines all at once. Take a 7MM and remove the 4 clamp screws 2 on each side above the rocker covers. Next remove the 2 M8 13MM nuts that hold the oil fill neck to the timing cover. Remove the grommet. Using a 24MM deep socket 15/16" will do the same thing turn the engine clockwise from the crank bolt. Remove all 8 glow plugs so you are not dealing with compression and keep an eye on the tissue/rags you have stuffed in the intake holes. You will need to turn the engine so that each bolt on the timing gear is visible thru the oil fill hole. There are 3 bolts. Also M8 with 13MM hex heads. Put a little tape in a socket to keep the bolts secure if you are uneasy about doing it. You can turn the engine over until you get all 3 bolts out. With the 3 bolts out use the 15MM swivel and get the 3 flange mount bolts from the engine upper block. The timing mark is on the upper flange of the injection pump and there is one on the upper block face. Remove the fuel feed line and you should be able to get that injection pump and the fuel lines out in 1 piece. Double check and make sure everything is disconnected. Good Luck. I knew you could do this.
 

Skinny

Well-known member
2,130
486
83
Location
Portsmouth, NH
Yeah add some tall gears to an underpowered engine and numb transmission. Why not drag an anchor while you are at it. Sure the TH400 is beefy in stock form and yes the 700r4 when new sucked. Just like every new transmission, it has its teething years.

Glad the OP is tackling the job, good for you. As fas as taller axle gears, garbage bolt on overdrives, or just accepting that the truck is slow even though there is 30 years of technology available to upgrade them.

Yeah push pull steering and 3 speeds dont belong in the year 2021 grandpa. Even the miltary chose the 4L80 for the HMMWV because the TH400 is ancient.

Sent from my SM-T380 using Tapatalk
 

cucvrus

Well-known member
11,274
9,603
113
Location
Jonestown Pennsylvania
OK. After you have the fuel injection system removed from the engine bay. I would clamp the flange ear in a vise and mark all the injection lines. Top in a circle 1 -8 or clock face numbers. They are 5/8 / 16MM nuts. Very tight tap them loose and they should spin right off. I think you know the rest. I started to take notice that a few of the pumps I get back from rebuilding have the dowel pin missing for the VCV module. Tap that out a retain it. Good Luck moving forward. I wanted to say that I personally have driven these trucks in stock form coast to coast and never changed a thing on them. I still have 1 M1028 that gets used for mostly grunt off road, scrap hauling, pulling stumps and whatever other dirty job comes along. They are what they are. Basic heavy duty utilitarian trucks with HD off the shelf stock GM parts. If you are looking for nice driving, comfort and more power the newer trucks are the answer. But lets get thru this injection pump replacement. I think you will be surprised at the performance improvement. Good Luck. Waiting to hear your progress. Speaking of progress I need to get some CUCV progress going forward.
 

Skinny

Well-known member
2,130
486
83
Location
Portsmouth, NH
Yeah new trucks are cool because dealerships amd extended warranties are so thorough

You do realize that for like $4-5k you could put an LS, transmission with one or two overdrives, and have AC right?

Thats like a a gear vendors overdrive and a driveshaft refit cost.

I understand that sometimes repairing it as original has a place and I'm not faulting anyone for doing that. But I'm going to play devils advocate when suggestions like taller axle gears or a bolt on overdrive are great ideas.

Too much money and little gain, better options out there. I mean I'd feel bad suggesting to someone that spending a few grand to regear the axles. Only for them to realize the truck will now do 80mph but take a couple of minutes to accelerate to it. When a better transmission for the same money could have been installed and gain on both ends. I mean in my little brain that makes more sense.


Sent from my SM-T380 using Tapatalk
 

retro_life

Well-known member
243
629
93
Location
Los Angeles, California
Yeah new trucks are cool because dealerships amd extended warranties are so thorough

You do realize that for like $4-5k you could put an LS, transmission with one or two overdrives, and have AC right?

Thats like a a gear vendors overdrive and a driveshaft refit cost.

I understand that sometimes repairing it as original has a place and I'm not faulting anyone for doing that. But I'm going to play devils advocate when suggestions like taller axle gears or a bolt on overdrive are great ideas.

Too much money and little gain, better options out there. I mean I'd feel bad suggesting to someone that spending a few grand to regear the axles. Only for them to realize the truck will now do 80mph but take a couple of minutes to accelerate to it. When a better transmission for the same money could have been installed and gain on both ends. I mean in my little brain that makes more sense.


Sent from my SM-T380 using Tapatalk
I do have a newer silverado back at home that is my daily driver. I also have another CUCV 1008 back at home that has some engine ticking (I made a post about it) but haven't been able to troubleshoot it yet. I do have a new set of injectors for that truck when I go back to CA--im hoping that will cure the problem.

I know it's a lot of money for the OD on a CUCV, and I could probably find a new gas motor with drivetrain for the same price or cheaper, but I really like these old diesels. I at least want to have one stock CUCV, which will probably be this camo 1008 I'm working on now. If the engine takes a sh** on the other one that would be a better candidate to strip it all down and do some big gas engine conversion like you're talking about. Great thing is these trucks are smog exempt so I could really drop any motor I want into them.

As far as OD options, I'm sorta leaning towards the GVOD. I like the idea of being able to keep the 4.56 gears and the stronger TH400, and just bolting the device onto the drivetrain. From what I understand, I can turn the GVOD off and the truck will behave like stock, and then turn it on to split the gears when I need for HWY speeds. I also like that I can unbolt it and install the original drive shaft to go back to stock easily. I can move it to another truck, or sell it and recoup some of the money.

If I go with the 700r4 I keep reading that they're not very strong without being built up which can get expensive. Also don't I need to rig up something for the TC lockup?

4L80e sounds really good, but then I read that I'll need to redo the cross member mounts, redo the linkages, install some sensors and an expensive computer control box. And then spend the time dialing in the shift tuning. I lost interest in it pretty quick.

But before I do any of the transmission stuff, I'm going to get all this motor stuff done and make sure the truck is running as it should. I'll test drive it around town for a while before dumping more money into parts.
 
Last edited:

retro_life

Well-known member
243
629
93
Location
Los Angeles, California
You look like you are doing great so far. Lets remove the entire fuel pump and fuel injection lines all at once. Take a 7MM and remove the 4 clamp screws 2 on each side above the rocker covers. Next remove the 2 M8 13MM nuts that hold the oil fill neck to the timing cover. Remove the grommet. Using a 24MM deep socket 15/16" will do the same thing turn the engine clockwise from the crank bolt. Remove all 8 glow plugs so you are not dealing with compression and keep an eye on the tissue/rags you have stuffed in the intake holes. You will need to turn the engine so that each bolt on the timing gear is visible thru the oil fill hole. There are 3 bolts. Also M8 with 13MM hex heads. Put a little tape in a socket to keep the bolts secure if you are uneasy about doing it. You can turn the engine over until you get all 3 bolts out. With the 3 bolts out use the 15MM swivel and get the 3 flange mount bolts from the engine upper block. The timing mark is on the upper flange of the injection pump and there is one on the upper block face. Remove the fuel feed line and you should be able to get that injection pump and the fuel lines out in 1 piece. Double check and make sure everything is disconnected. Good Luck. I knew you could do this.
Ok, I've got all the nozzle nuts loosened--luckily they weren't too tight and I was able to just use a 19mm open end wrench.
Removed all the 7mm screws holding the fuel lines to the rocker covers.
I removed the oil filler spout and grommet.

Just a few questions before going forward. I see the timing line on the on the motor, but not on the IP. I see that big line on the body of the IP, but I thought it would be on the flange part. Maybe I'm not looking at it right, but I posted a picture of what I'm looking at.

Also, what about that fuel line that's going over the top of the right side fuel lines. Do I need to do remove that because it seems like it's going to be in the way when trying to remove the IP with the lines attached to it.

Thanks so much!
 

Attachments

Last edited:

cucvrus

Well-known member
11,274
9,603
113
Location
Jonestown Pennsylvania
Since you are using that old Injection pump as a core I wouldn't worry about it. But if you want take a punch or chisel and make a mark. You are going along nicely. Now get them 3 M8 bolts out of the oil fill hole. No worries about the gear and timing. The gear can not move in the teeth. there is not enough room to un mesh them. Turn the engine clockwise with the bottom crank bolt. 15/16" or 24MM what ever. After that the entire spyder assembly will come out with a little wiggling. Good Luck. Report back. Now is also the time to change the coolant manifold cross over gaskets. You must drain the radiator to do that.
 

retro_life

Well-known member
243
629
93
Location
Los Angeles, California
Since you are using that old Injection pump as a core I wouldn't worry about it. But if you want take a punch or chisel and make a mark. You are going along nicely. Now get them 3 M8 bolts out of the oil fill hole. No worries about the gear and timing. The gear can not move in the teeth. there is not enough room to un mesh them. Turn the engine clockwise with the bottom crank bolt. 15/16" or 24MM what ever. After that the entire spyder assembly will come out with a little wiggling. Good Luck. Report back. Now is also the time to change the coolant manifold cross over gaskets. You must drain the radiator to do that.
Alright great. Hopefully the new pump has a mark on it.
I will def replace coolant gaskets. Do you by any chance have the NAPA P# for those? I also want to clean the motor up a little too. I will be careful not to let any dirt or grime inside.

But for now I will work on removing the IP and will report back.

THANKS!
 
Last edited:

retro_life

Well-known member
243
629
93
Location
Los Angeles, California
I never seen one without either. So if this one don't have one I will never be able to say that again and be truthful.
Well.... I did it man. I got that spider out :D 
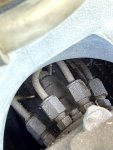
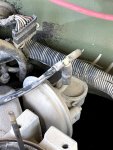
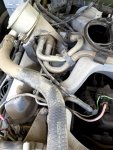
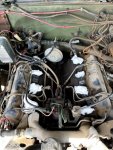
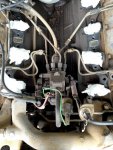
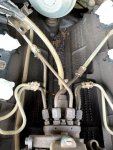
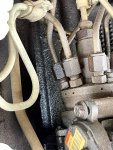
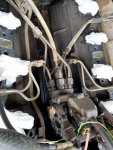
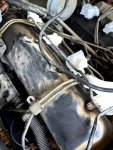
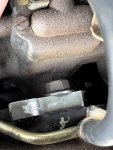
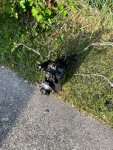
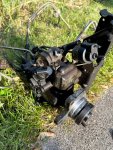
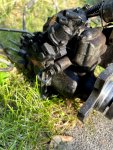
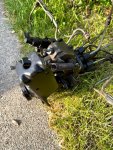
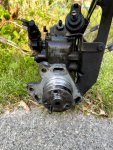
It was a PITA especially since I didn't have anyone to help guide the rear right side fuel lines out through that jungle of wiring right there, but I got her done.

The pump actually does have a mark it was just so dirty that it was hidden. I really gotta clean this thing good, there's decades of caked on oily dirt everywhere.

I was able to use some neodymium magnets from the hardware store in a socket to make sure I didn't drop those three bolts in the oil filler hole.

Now I will label all the fuel lines, and also draw a diagram of how they attach to the pump. I will stick it on a vice and remove all the lines and the throttle cable bracket. Also, where is the dowel pin you were telling me to make sure to remove?

I know I'm still not out of the woods with this job yet, but I really gotta thank you @cucvrus . You've really helped me feel more confident about doing this and I can't thank you enough!
 

Attachments

Last edited:

gringeltaube

Staff Member
Super Moderator
Moderator
Steel Soldiers Supporter
6,882
2,259
113
Location
Montevideo/Uruguay
Also, where is the dowel pin you were telling me to make sure to remove?
The dowel pin is right there (and it should stay there - do not remove...!)
1623030717780.png

But the question is: where is the plunger? (I'm sure Cucvrus was referring to that part...)
From your pics I can see it's missing already, so where did you drop it - and possibly the spring, too...? :???:

1623031131219.png
 

retro_life

Well-known member
243
629
93
Location
Los Angeles, California
The dowel pin is right there (and it should stay there - do not remove...!)
View attachment 836271

But the question is: where is the plunger? (I'm sure Cucvrus was referring to that part...)
From your pics I can see it's missing already, so where did you drop it - and possibly the spring, too...? :???:

View attachment 836272
I pulled it out as is in the pics... I was kinda looking at all the fuel lines while wrestling it towards the firewall to clear the studs and be able to lift it out. I sure hope those things didn't fall inside the motor.... Would that even be possible?
 

gringeltaube

Staff Member
Super Moderator
Moderator
Steel Soldiers Supporter
6,882
2,259
113
Location
Montevideo/Uruguay
I sure hope those things didn't fall inside the motor.... Would that even be possible?
Eventually... but I would have to try that to confirm. If you are lucky enough, that plunger was already MIA, after a previous IP transplant...(?)
It would still work without it, just not as designed.

Here is a description from AM-General Co., of what that plunger & spring actually does:

1623033693836.png
 
Top
AdBlock Detected

We get it, advertisements are annoying!

Sure, ad-blocking software does a great job at blocking ads, but it also blocks useful features of our website like our supporting vendors. Their ads help keep Steel Soldiers going. Please consider disabling your ad blockers for the site. Thanks!

I've Disabled AdBlock
No Thanks