• Steel Soldiers now has a few new forums, read more about it at: New Munitions Forums!

  • Microsoft MSN, Live, Hotmail, Outlook email users may not be receiving emails. We are working to resolve this issue. Please add support@steelsoldiers.com to your trusted contacts.


Was looking for a shop in or near Milwaukee to work on M1008; then did it all myself!

retro_life

Well-known member
243
629
93
Location
Los Angeles, California
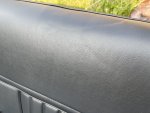
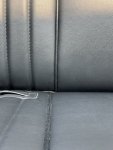
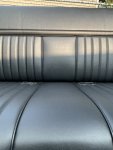
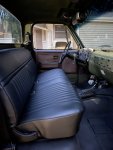
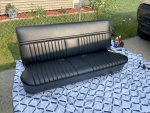
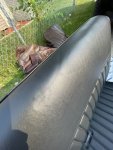
I got the seat done. Learning how to do the hog rings was a bit of a challenge especially with the cheap pliers that came with the kit. The indentation smoothed out but you can still see the marks in the grain. The piping in the center also doesn’t line up perfectly, even though the edges are all perfect. Anyway, not bad for the low price of free 99. I’m happy with it. I’m painting the plastic parts that cover the lower brackets right now and then I will install it in the truck.
18291D75-8A7C-4C8F-AD32-78EA230DB1FE.jpegD3B4C557-A95D-4BAE-AF7F-0D4CE4F0C306.jpegB29D3F90-599E-41F5-A555-85D441FFB661.jpegCB837C32-345F-48EA-9297-C9B98A0C07A8.jpeg4A10E968-1C7E-4A7C-A33D-7DF2225615C7.jpeg
 

ezgn

Well-known member
Steel Soldiers Supporter
650
1,039
93
Location
Lake Elsinore Ca.
A damaged seat cover turned into a positive. Life has it's silver linings. I cover my seat and backrest while parked at home to help keep the sun from premature detonation. Buy your sister in-law a box of candy and a card. Maybe you'll be able to work in a few more projects.
 
Last edited:

retro_life

Well-known member
243
629
93
Location
Los Angeles, California
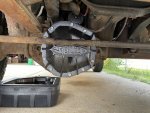
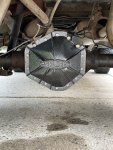
Diff cover went on without a hitch. All bolt holes lined up nicely. I used the Allen head bolts that came with the cover but I got some grade 8 3/8 lock washers from the store and used those instead of the ones that came with the cover. Lube locker gasket for the rear will arrive tomorrow and then I will put that one on, and then fill them both up with fluid.


Buy your sister in-law a box of candy and a card. Maybe you'll be able to work in a few more projects.
I wish it was that easy man. I’ve done plenty of nice things to help out around the house and buy groceries etc… she don’t give a damn lol. But at the same time, I have been here almost 2 months so I get it.B99232B3-C2F3-404A-A8E8-30BC7376907B.jpeg
I need to get my new balancer installed and get the motor back together. My power steering bracket has been sent off to @cucvrus for repair. I’m so grateful he is helping me with that.

Then last big thing I’m waiting for is the GVOD. I gotta throw that on as soon as it comes and then take the drive shaft to get shortened. Hopefully they can get that done in a day or two. Then I’ll have to hit the road as is.

The main things I’d still need to do are all the suspension bushings and the steering ends and an alignment. She doesn’t feel too bad on the road though so I think I’ll be ok till im able to get that all done.
 
Last edited:

M1009_SPAIN

Active member
65
144
33
Location
Spain
What you are doing is incredible, I am learning a lot and this thread and most of the cucvrus have hooked me, which is helping me with my m1009, but in my country there are no cucv pieces and I have to import them all from the United States, with the shipping time causes everything to be delayed a lot, I bought the delphi chfp906 fuel pump 3 weeks ago and it still has not arrived, where I was going, KEEP IT WAY, IT IS LOOKING GREAT

I follow the thread daily
 

cucvrus

Well-known member
11,263
9,552
113
Location
Jonestown Pennsylvania
You can replace all 6 steering link parts for about $250. -$300. use the old tie rod and drag link as a measure to get you 95% aligned and go from there. if you are like me I always have use for the heavy 1" round bar from the long front tie rod. I bought all my tie rods, adjusting sleeves from Autozone warranted for life and they stand behind the warranty. Good Luck. The steering bracket is fixed and hanging in the sun drying. Every repair gets a paint job. I will post some pictures for you. I showed the broken bracket in my post on the CUCVRUS repair projects thread. Take Care. Kill the in-law with kindness and bring out the best in yourself. Later.
 

retro_life

Well-known member
243
629
93
Location
Los Angeles, California
You can replace all 6 steering link parts for about $250. -$300. use the old tie rod and drag link as a measure to get you 95% aligned and go from there. if you are like me I always have use for the heavy 1" round bar from the long front tie rod. I bought all my tie rods, adjusting sleeves from Autozone warranted for life and they stand behind the warranty. Good Luck. The steering bracket is fixed and hanging in the sun drying. Every repair gets a paint job. I will post some pictures for you. I showed the broken bracket in my post on the CUCVRUS repair projects thread. Take Care. Kill the in-law with kindness and bring out the best in yourself. Later.
I’m just hesitant to do that because I’m worried that if I take on that job and end up messing the alignment up worse than it is then I’ll really be screwed. The truck does track fairly straight when letting off the wheel on a smooth road so I don’t think it’s that bad. Everything I got in the works right now I know I can handle.
This is some Maury type of stuff going on over here.. she doesn’t even let the kids talk to me anymore. It’s bad. So I really need to try to get out of here ASAP. I might even have to call Gear Vendors and ask to cancel the order if they don’t ship it soon. I think this all started when I fixed their fridge because she really wanted to buy a new one… sad when you get shafted for being a good guy.
 

retro_life

Well-known member
243
629
93
Location
Los Angeles, California
Trying to keep working through the negativity surrounding me. I went ahead and got the rear diff cover mounted. Had to do some grinding to the brake line bracket on the right to make it fit with the thicker cover. Also had to put the bracket on the left onto the Vice and adjust the bend on it to make it fit. Got both axles filled up with 80-90.
2B822A26-5F5A-4782-A32D-EFB9A7DE5B54.jpeg
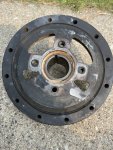
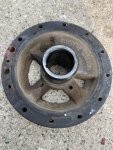
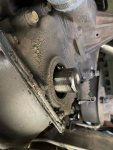
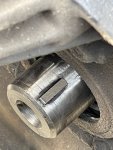
I also got the balancer pulled off. Can anyone give me some tips for pulling out the crank seal and tapping the new one in? I think I read that getting a piece of PVC is the way to go, but I’m not sure. Also, I got a new key but I’m not sure how to remove the old one or if it’s really necessary to replace it.
59FCDF37-B7FD-43EC-8C23-480C4B59D12F.jpegA7BBE5D7-8C44-4389-8D18-AE93DBCC58AC.jpeg4D321D2F-6B55-43F1-8B49-973CAE4652FF.jpeg

2131E16E-7538-48B9-985C-F24493F14ECC.jpeg
thanks
 

Mullaney

Well-known member
Steel Soldiers Supporter
Supporting Vendor
7,251
18,805
113
Location
Charlotte NC
Trying to keep working through the negativity surrounding me. I went ahead and got the rear diff cover mounted. Had to do some grinding to the brake line bracket on the right to make it fit with the thicker cover. Also had to put the bracket on the left onto the Vice and adjust the bend on it to make it fit. Got both axles filled up with 80-90.
View attachment 840126
I also got the balancer pulled off. Can anyone give me some tips for pulling out the crank seal and tapping the new one in? I think I read that getting a piece of PVC is the way to go, but I’m not sure. Also, I got a new key but I’m not sure how to remove the old one or if it’s really necessary to replace it.
View attachment 840124View attachment 840123View attachment 840125

View attachment 840128
thanks
.
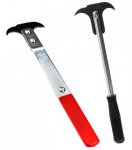
I am sure that there is a nicer way to describe it, but I have a tool that has always been called a "two speed nose picker". Snagged a picture off the web and it is below. Just know - you are removing it. Seal won't (most likely) come out whole...

Oil Seal Hook Removal Tool - Two Speed Nose Picker.jpg

Need to carefully clean the timing cover before you start the seal removal.
Just to keep the crud on the outside of the motor.

That little pocket where the seal fits should be spotless. You want a good seal for sure so spend a minute with your new harmonic balancer and "test fit" the new seal. Wipe a little oil or something slick on the sealing surface of the balancer. Make certain that new seal fits the new balancer!

Driving the new seal in place is done gently. Dip one side into the pocket just a little then tap left-right-left. In a perfect world, a round nylon tube would be nice. Few folks have those though. A couple of pieces of wood (make a pocket on 3 sides of the seal) will work if you don't have success with the left-right gentle taps.

----

Crankshaft woodruff key... Your choice. What you have looks pretty good. If you have a new one, it can be driven down on one end, then extracted with a set of side-cutters. Remember: That open hole to the oil pan is like a black hole in space! Everything close to is will get sucked in... I suggest you pack a rag in that hole before trying to remove the key...

Installing the new one should tap gently into the slot in the crankshaft.

----

Installing the new balancer: There are better tools, but a longer bolt that threads into the crankshaft will pull it gently in place. A few taps with hammer and a block of 2x4 that fits on the center of the balancer (Stay Off the rubber mounted outside ring!). A real balancer installer tool has a thrust bearing so you can snug it all the way until the balancer seats in tight.

In times I didn't have access to that tool, the "longer bolt trick" will work. Use a small 3/8 inch ratchet and only put your hand on the head of the ratchet. NOT on the ratchet handle. Turn until you have 4 or 5 threads by hand, then use your small ratchet. When it gets tight, remove the ratchet, bump the socket / bolt with a block of wood and a hammer. One time - maybe two. Then try the ratchet again. You should be making slow steady progress moving the balancer onto the crankshaft.

Rinse, Lather, Repeat. :)


Be sure that you get the real bolt in there nice and tight. Seated all the way. It's bad if that bolt comes loose. Use a torque wrench.
 
Last edited:

retro_life

Well-known member
243
629
93
Location
Los Angeles, California
.
I am sure that there is a nicer way to describe it, but I have a tool that has always been called a "two speed nose picker". Snagged a picture off the web and it is below. Just know - you are removing it. Seal won't (most likely) come out whole...

View attachment 840143

Need to carefully clean the timing cover before you start the seal removal.
Just to keep the crud on the outside of the motor.

That little pocket where the seal fits should be spotless. You want a good seal for sure so spend a minute with your new harmonic balancer and the new seal. Wipe a little oil or something slick on the sealing surface of the balancer. Make certain that new seal fits the new balancer!

Driving the new seal in place is done gently. Dip one side into the pocket just a little then tap left-right-left. In a perfect world, a round nylon tube would be nice. Few folks have those though. A couple of pieces of wood (make a pocket on 3 sides of the seal) will work if you don't have success with the left-right gentle taps.

----

Crankshaft woodruff key... Your choice. What you have looks pretty good. If you have a new one, it can be driven down on one end, then extracted with a set of side-cutters. Remember: That open hole to the oil pan is like a black hole in space! Everything close to is will get sucked in... I suggest you pack a rag in that hole before trying to remove the key...

Installing the new one should tap gently into the slot in the crankshaft.

----

Installing the new balancer: There are better tools, but a longer bolt that threads into the crankshaft will pull it gently in place. A few taps with hammer and a block of 2x4 that fits on the center of the balancer (Stay Off the rubber mounted outside ring!). A real balancer installer tool has a thrust bearing so you can snug it all the way until the balancer seats in tight.

In times I didn't have access to that tool, the "longer bolt trick" will work. Use a small 3/8 inch ratchet and only put your hand on the head of the ratchet. NOT on the ratchet handle. Turn until you have 4 or 5 threads by hand, then use your small ratchet. When it gets tight, remove the ratchet, bump the socket / bolt with a block of wood and a hammer. One time - maybe two. Then try the ratchet again. You should be making slow steady progress moving the balancer onto the crankshaft.

Rinse, Lather, Repeat. :)


Be sure that you get the real bolt in there nice and tight. Seated all the way. It's bad if that bolt comes loose. Use a torque wrench.
Thanks for all the info! Now I see why an old post on here recommended cleaning the area while the balancer was pulled about an inch out. Well too late for that now. I’ll just have to be careful not to get anything in there.

I have a gear wrench balancer installer coming tomorrow that has the proper sized bolt in the kit, so I think ill be good. I will probably just leave the key be as it doesn’t even look that bad as you said. I also have a 1/2 inch torque wrench that can torque well over 200 FTlbs. So I’ll make sure to torque it to spec with that.

im still waiting for the balancer. The guy I bought it from was out of town and is shipping it tomorrow so hopefully it will be here by the weekend and I can get it installed.
Tomorrow I will work on the clean up of the area.

thanks again
 

Mullaney

Well-known member
Steel Soldiers Supporter
Supporting Vendor
7,251
18,805
113
Location
Charlotte NC
Thanks for all the info! Now I see why an old post on here recommended cleaning the area while the balancer was pulled about an inch out. Well too late for that now. I’ll just have to be careful not to get anything in there.

I have a gear wrench balancer installer coming tomorrow that has the proper sized bolt in the kit, so I think ill be good. I will probably just leave the key be as it doesn’t even look that bad as you said. I also have a 1/2 inch torque wrench that can torque well over 200 FTlbs. So I’ll make sure to torque it to spec with that.

im still waiting for the balancer. The guy I bought it from was out of town and is shipping it tomorrow so hopefully it will be here by the weekend and I can get it installed.
Tomorrow I will work on the clean up of the area.

thanks again
.
Good Deal! Sounds like you have the right tools for sure.

Hicks suggestion to use a big screwdriver or a pick will work to remove the seal for sure as well.

Heck, when I have had nothing else, a claw hammer has done the job too.
 

cucvrus

Well-known member
11,263
9,552
113
Location
Jonestown Pennsylvania
Trying to keep working through the negativity surrounding me. I went ahead and got the rear diff cover mounted. Had to do some grinding to the brake line bracket on the right to make it fit with the thicker cover. Also had to put the bracket on the left onto the Vice and adjust the bend on it to make it fit. Got both axles filled up with 80-90.
View attachment 840126
I also got the balancer pulled off. Can anyone give me some tips for pulling out the crank seal and tapping the new one in? I think I read that getting a piece of PVC is the way to go, but I’m not sure. Also, I got a new key but I’m not sure how to remove the old one or if it’s really necessary to replace it.
View attachment 840124View attachment 840123View attachment 840125

View attachment 840128
thanks
If it were me. And it is NOT. I would leave the key in place. Now that is just me. Do as you wish. The repaired power steering bracket and some other goodies are on the way to you. It is all fixed and ready to be installed. Good Luck.
 

retro_life

Well-known member
243
629
93
Location
Los Angeles, California
If it were me. And it is NOT. I would leave the key in place. Now that is just me. Do as you wish. The repaired power steering bracket and some other goodies are on the way to you. It is all fixed and ready to be installed. Good Luck.
Yeah, I'm not going to mess with the key--it's in there good. And thank you so much for helping me man, it really means a lot to me.
 

cucvrus

Well-known member
11,263
9,552
113
Location
Jonestown Pennsylvania
Hey I posted the repaired power steering bracket over on my CUCVRUS repair projects thread. Not sure if you seen it. Check it out. The package was mailed out yesterday after work. It will take a day to get moving but it is on it's way back. 24 hour turn around was the best I could do on short notice. Good Luck. I hope things calm down for you and go better. Take Care.
 

retro_life

Well-known member
243
629
93
Location
Los Angeles, California
Hey I posted the repaired power steering bracket over on my CUCVRUS repair projects thread. Not sure if you seen it. Check it out. The package was mailed out yesterday after work. It will take a day to get moving but it is on it's way back. 24 hour turn around was the best I could do on short notice. Good Luck. I hope things calm down for you and go better. Take Care.
Man, I can’t even begin to express how much I appreciate you doing that for me. I did not expect you to get it done so fast and am blown away, man. Seriously thanks so much. Things are a little bit better today over here. Ya know everyone’s going through their own stuff and sometimes it’s easy to take it out on others. I had a short talk with them last night and assured them that I will be done real soon and they were cool about it. So I am feeling better and got my motivation back to get back to work full force.

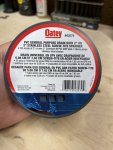
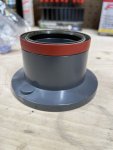
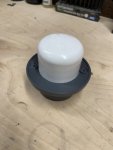
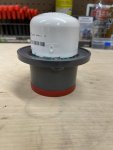
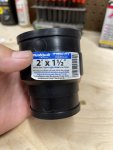
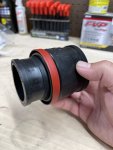
I spent some time at Home Depot earlier looking around at different pvc pipes and couplers to see if I could devise a seal driver for that crank seal to ensure I tap it in nice and even. I ended up finding a drain that sat on the seal perfectly and an end cap to go on top of it to tap on. I JB welded them together. I’m hoping it will work out, but I haven’t tested it yet. I also found a nice rubber coupler that fits into the seal tightly that I’m going to jam in there while cleaning the area to block any dirt and grime from getting inside the motor.
A5FCD8E4-0D04-4F92-8DC1-5311004C6FB3.jpeg6CA05C30-25E6-4E96-88BF-FD5E8B9BD693.jpegD9909930-7A6E-4C1E-9641-9183C585E674.jpeg69C0A37E-A2C8-4738-BE6D-91BE689604C1.jpeg515F79A4-194E-45ED-A884-F98042FAAE94.jpegD1CCEAFC-8BE2-4195-A835-4591A23BE141.jpeg
 

retro_life

Well-known member
243
629
93
Location
Los Angeles, California
I used a piece of PVC and the balancer installer with a flat plate over it. Pressed right in. Not much room for a hammer down there.

View attachment 840227
Ah yeah that’s a really nice solution. The ken Moore tool referenced in the TM to install the seal looks to be like some kinda tapping tool so that’s what I was envisioning in my mind, but yeah that could be designed for a motor out of a truck or something. I may have to rig something up like you did. Why couldn’t you post that earlier man?!? 😂. Thanks for the pic
 
Top
AdBlock Detected

We get it, advertisements are annoying!

Sure, ad-blocking software does a great job at blocking ads, but it also blocks useful features of our website like our supporting vendors. Their ads help keep Steel Soldiers going. Please consider disabling your ad blockers for the site. Thanks!

I've Disabled AdBlock
No Thanks