- 8,245
- 20,816
- 113
- Location
- Charlotte NC
Nice!! Really nice. Tires look great and the body looks great...Bought it!
Sent from my iPhone using Tapatalk
Steel Soldiers now has a few new forums, read more about it at: New Munitions Forums!

Nice!! Really nice. Tires look great and the body looks great...Bought it!
Sent from my iPhone using Tapatalk
Hi Tim. Yeah, it was only $43. I may get to try it later this week when the temperature gets above freezing. I think the grease gets solid in between the pin and the leaf spring end too. Hopefully this works. I'll be sure to report back on it.Hi Owen,
It would be really neat to know how well that tool works. I have always just been inclined to remove to old Zerk, poke around with a paperclip or a packing hook or scratch awl to remove the crusty grease... Looking forward to hearing what you discover!
Tim
That is a really nice looking Deuce! I have a brother that lives in Swampscott Mass. a little ways from Boston.Nice!! Really nice. Tires look great and the body looks great...
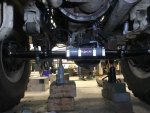
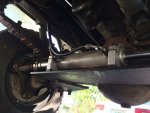
Nice, though I guess it says something about me that I'm more so drooling over your large set of cribbing blocks on the left in the picture than I am the steering setupnew steering system...

That's a really clean looking install HN6! Is that a hydraulic or an air operated cylinder?new steering system...
What pump are you using?new steering system...
Wow! That is great news Owen. Nothing like having the right tool for the job... And I'd bet the burger was a pretty good reward at the endToday, I used my new grease fitting rejuvinator/regurgitator on the grease fitting I had previously drilled out and tapped. I'll be derned, that little tool worked! I was able to get new grease in and force the old out. It took about 3 tries using PB Blaster and a light brass hammer to free it up. I would have tried some of the other fittings, but it was snowing. After that Brutus took me to Unimart to get a double cheeseburger.
Yeah Tim it's a neat little tool. Very well made. I was just tapping it with about a one pound brass hammer. Picking my nose takes more effort. Can't wait to check the other fittings out. Some others may be stuck as well.Wow! That is great news Owen. Nothing like having the right tool for the job... And I'd bet the burger was a pretty good reward at the end
.
Good to hear!Today, I used my new grease fitting rejuvinator/regurgitator on the grease fitting I had previously drilled out and tapped. I'll be derned, that little tool worked! I was able to get new grease in and force the old out. It took about 3 tries using PB Blaster and a light brass hammer to free it up. I would have tried some of the other fittings, but it was snowing. After that Brutus took me to Unimart to get a double cheeseburger.
Hydraulic double ended ram.That's a really clean looking install HN6! Is that a hydraulic or an air operated cylinder?
Pump off a 5ton.What pump are you using?
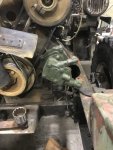
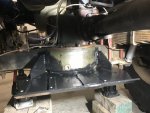
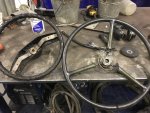
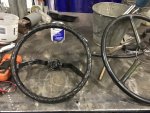

HN6 is that part of a kit or did you come up with the design yourself? The mounting bracket looks like it took a ton of fabrication. What were the pictures of the steering wheels showing?Pump off a 5ton.
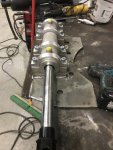
PSC 300 is the kit minus the 5ton pump and bracket. bracket was just a piece of 3/8 plate and I cut slots to weld in the mounts for the ram also just a piece of flat bar welded to the back for the lip. Pretty easy if you weld...just like anything.. easy if your used to doing it. This first install took some thinking but now it would be quick and easy.HN6 is that part of a kit or did you come up with the design yourself? The mounting bracket looks like it took a ton of fabrication. What were the pictures of the steering wheels showing?
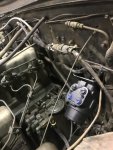
Well you did some fine job there HN6! I'm super impressed because I'm just terrible at welding. Never can seem to get the hang of it. My Brutus has power steering too. I believe it's a medium duty International Harvester or Navistar unit. Works like a champ.PSC 300 is the kit minus the 5ton pump and bracket. bracket was just a piece of 3/8 plate and I cut slots to weld in the mounts for the ram also just a piece of flat bar welded to the back for the lip. Pretty easy if you weld...just like anything.. easy if your used to doing it. This first install took some thinking but now it would be quick and easy.
Steering wheel was just showing I cut the center out of the original steering wheel and welded it into a smaller steering wheel so I could use the original steer shaft.
After the install I would say that if you are not doing a lot of off-roading then I would probably go with the Waterloo system. If I had to pay for fabrication then this kit would have been about $3500. I can now drive with my knee up the creek.
