• Steel Soldiers now has a few new forums, read more about it at: New Munitions Forums!

  • Microsoft MSN, Live, Hotmail, Outlook email users may not be receiving emails. We are working to resolve this issue. Please add support@steelsoldiers.com to your trusted contacts.


What did you do to your deuce this week?

whatadeuce

Active member
Steel Soldiers Supporter
959
38
28
Location
Loxahatchee, Florida
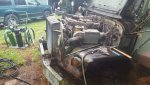
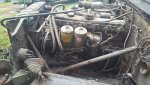
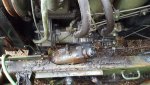
And now for today's episode on the " quick way to remove a fuel injector pump" Here we see the fender has been taken out of the way, and a portion of the steering column also been removed. The steering shaft has been torched, and the 4 steering box mounting bolts wil be removed without damaging the frame, as the frame will be retained as an engine stand...To be continued
 

Attachments

archmark

Member
267
20
18
Location
Woodway, TX
Still fiddle-farting around with getting the cab heater installed in my M185A3. Seems that the flexible heater air hoses don't want to play nice and slip onto the defroster boxes. **** hard to get up under the dash to "reshape" the inlets with a sledge hammer. I did install a locking fuel cap from Those Military Guys though. It's mostly plastic construction but it's better than nothing and having my diesel available for the taking...
 

vimby210

New member
10
16
3
Location
Casper/WY
Lets see, in the last week or so, I have finished a complete rebuild and installation of a winch on an m35a2, winch off of a gasser to a multi. Super tight drive line clearance at the bell housing and the steering gear box. Had a new skinnier drive shaft made, and still had to grind a little of the housing off. The Pto rebuild went ary, no high gear, so have to tear that back off and see what went wrong there. Installed new turn signal switch, and diagnosed no brake lights! Installed new passenger side wiper motor, to find out that it runs better than the drivers side, so now i want a new one for the drivers side. Installed new tie down as the tie downs were broken on the bed sides. So now i need to do front brakes, one rear wheel seal, and front axle shaft boots.

On a friends truck, lmtv, installed a total winch setup on his non winch LMTV. Now that folks, was a challenge! Was alot of fun, and learned alot about the truck.

On another m35a3 truck, i did front steering boots, broken alternator braket upgrade, and serviced!!! So thats been my last week or so!!!

Have fun all, and if anyone has any questions on the winch install on the LMTV, dont hesitate to drop me a line!
 
Last edited:

Valence

Well-known member
Steel Soldiers Supporter
2,131
605
113
Location
Davis County, UT
After installing a HEMTT air-ride seat:
http://www.steelsoldiers.com/showth...ce-this-week&p=1915877&viewfull=1#post1915877

and using my stock seat belts, the plastic holding the buckle and covering the seat belt mechanism broke. I probably had the bolt too tight. I first used a bit of super glue to hold the break back together. Then I used a strip of plastic from a 1-qt bottle of oil and my soldering iron and plastic welded over top of the break. Then I super-glued a large washer to the outside to further strengthen the plastic. After it was all dried, I bolted it back together only semi-loose, but just tight enough that it wouldn't fall under it's own weight.

2016-09-19 17.55.43.jpg 2016-09-19 17.55.49.jpg 2016-09-19 18.00.02.jpg 2016-09-19 18.00.19.jpg 2016-09-19 18.01.32.jpg 2016-09-19 18.02.24.jpg 2016-09-19 18.05.46.jpg 2016-09-19 18.14.04.jpg 2016-09-19 18.14.24.jpg 2016-09-20 18.20.16.jpg 2016-09-20 18.20.28.jpg
 
Last edited:

AZK9

Active member
1,083
6
38
Location
PRC, AZ
...
Anyway... I recently made and mounted a bracket for my solargizer. Since I do not like drilling holes in my
deuce, unless necessary, I took advantage of the location of the exhaust-stack clamp and fabricated an adaptor
which used the existing attachment point to secure the module in a location that ought to get enough sunlight.

View attachment 643383

So far I'm pleased with how it turned out.
AZK9 Thanks. I like your idea for locating your Solargizer. I don't like to drill holes in my Deuce either, and was looking for a spot to locate mine that didn't require drilling, and got adequate sunlight .:idea:
...
It seems to be a good location, but making up the bracket was a bit tricky since there's an angle (as the clamp sits on the exhaust)
that made my design more complicated than I had originally expected. I'm not sure that it's the same on all M35A2 exhaust stacks,
but I'm guessing that you'll probably find something similar on yours.

I dug up this (early stage) pic of the bottom side of the base plate I made for the solargizer. Hope it helps those who might do something similar.

m35-solargizer-plate-001.jpg
 

QUADJEEPER

Member
Steel Soldiers Supporter
797
6
18
Location
Winter Springs, FL
Lets see, in the last week or so, I have finished a complete rebuild and installation of a winch on an m35a2, winch off of a gasser to a multi. Super tight drive line clearance at the bell housing and the steering gear box. Had a new skinnier drive shaft made, and still had to grind a little of the housing off. The Pto rebuild went ary, no high gear, so have to tear that back off and see what went wrong there. Installed new turn signal switch, and diagnosed no brake lights! Installed new passenger side wiper motor, to find out that it runs better than the drivers side, so now i want a new one for the drivers side. Installed new tie down as the tie downs were broken on the bed sides. So now i need to do front brakes, one rear wheel seal, and front axle shaft boots.

On a friends truck, lmtv, installed a total winch setup on his non winch LMTV. Now that folks, was a challenge! Was alot of fun, and learned alot about the truck.

On another m35a3 truck, i did front steering boots, broken alternator braket upgrade, and serviced!!! So thats been my last week or so!!!

Have fun all, and if anyone has any questions on the winch install on the LMTV, dont hesitate to drop me a line!
So that all took one morning, what did you do the rest of the time? :)
 

AZK9

Active member
1,083
6
38
Location
PRC, AZ
I finished my bed "crane" build and have been testing out the lifting capability.


It's not going to lift monster items, but it will allow me to load the truck when I
set out on my NJ to AZ adventure. It's become my new 'Soldier B' and I love it! :-D
 

AZK9

Active member
1,083
6
38
Location
PRC, AZ
Where's the pics AZK9?
Ha ha! Yeah... good question! 8)

I took a few, but I'll have to hunt for them later. Right now I'm trying to get best use out of every second I can find
to work on the deuce while the weather is halfway decent... and... the mosquitoes aren't draining all... MY... fluids! LOL!!
 

AZK9

Active member
1,083
6
38
Location
PRC, AZ
Ha ha! Yeah... good question! 8)

I took a few, but I'll have to hunt for them later. Right now I'm trying to get best use out of every second I can find
to work on the deuce while the weather is halfway decent... and... the mosquitoes aren't draining all... MY... fluids! LOL!!
As noted in the photo, my small bed crane is made, in part, from scrap steel and some discarded parts from an old HF lift.

M35A2-crane-002.jpg

I also made use of an electric winch, from HF, that I mounted to a heavy slide plate.

I've been testing the lifting potential of the unit recently. It has no problem
with deuce tires, 500 LBS of sandbags (in a military container) and my empty
aux fuel tank.

While I'm working alone on the deuce in SJ... it comes in real handy! [thumbzup]
 

jbayer

Member
675
7
18
Location
St. Aug., FL/ McGrady, NC
Nice. Thats one long crane arm. So you use the winch with a stand-a-lone Batt? How short does it colapse too?(Looks like two sections colapse) Did you reinforce the bed?
Sorry, for so many ?'s. I want to do a bed crane too.
I guess your still in Jersey. Whens the plan to head west?
 

AZK9

Active member
1,083
6
38
Location
PRC, AZ
Nice. Thats one long crane arm. So you use the winch with a stand-a-lone Batt? How short does it colapse too?(Looks like two sections colapse) Did you reinforce the bed?
Sorry, for so many ?'s. I want to do a bed crane too.
I guess your still in Jersey. Whens the plan to head west?
Yup... the arm is long, but it does shorten up quite a bit. I'll have to measure it to give you the range.

Right now, to test it out, it's got a stand alone battery. In the days to come (if weather, skeeters and time allow)
I will wire it into the battery hooked to my solar panels.

I have heavily reinforced the bed and tied it into the frame as well.

My new travel 'target' is mid October, but that could easily change.
I'm doing the best I can... but... sometimes I fall short of my goals! LOL!! :mrgreen:
 

tobyS

Well-known member
4,820
815
113
Location
IN
It's a handy looking set-up. If I were you, I'd gusset the top of it where you push with the cylinder.
 

AZK9

Active member
1,083
6
38
Location
PRC, AZ
... If I were you, I'd gusset the top of it where you push with the cylinder.
Hi TobyS...

Not sure I understand. Would the 'gusset' be adjustable in length, so that once the desired height was reached...
it could be locked into position in the event that the jack fails?

I've been up working on the deuce since 1 AM, so my brain cells are very... VERY tired! LOL!! :oops:
 

cattlerepairman

Well-known member
Steel Soldiers Supporter
3,174
3,099
113
Location
NORTH (Canada)
I had my voltage regulator fail and make the alternator put out some fearsome voltage. Replaced alternator with a spare unit. Found it easier to remove the three 5/8 bolts that mount the whole alternator bracket to the engine block than mess with the 2 nut/bolt combos that hold the alternator to the bracket. Much easier to separate alternator from bracket once the assembly is out!
SAW-10799130 is the part you want to search for on the interweb for a new end cap and regulator assembly for your trusty Leece-Neville alternator (NSN ends in 2483). Can be had for under $90.
 

Wolfgang the Gray

Active member
Steel Soldiers Supporter
319
53
28
Location
New River, AZ
I also broke both return springs for the clutch and brake pedals...in the same trip...so used some short bungees to keep tension on them so they weren't dragging all the way home, which was luckily only about 20 miles.


OK, how did you break the return springs?


Top
AdBlock Detected

We get it, advertisements are annoying!

Sure, ad-blocking software does a great job at blocking ads, but it also blocks useful features of our website like our supporting vendors. Their ads help keep Steel Soldiers going. Please consider disabling your ad blockers for the site. Thanks!

I've Disabled AdBlock
No Thanks