• Steel Soldiers now has a few new forums, read more about it at: New Munitions Forums!

  • Microsoft MSN, Live, Hotmail, Outlook email users may not be receiving emails. We are working to resolve this issue. Please add support@steelsoldiers.com to your trusted contacts.


What did you do to your trailer today.

Zed254

Well-known member
866
464
63
Location
S. Hampton Roads, VA
Yes, I can be verbose.... Maybe my question got lost in all the text. :unsure:

I need some ideas for the back panel. I want it to be easy-on and easy-off.

......

I considered using door hinges, half on the panel and half on the upright, then making the hinge pin fit a little looser so it goes in and out easier. Seems like a lot of work for something that isn't the easiest/best way to do it.

Any other ideas? Seems like it should be a simple fab but I can't come up with anything. Oh, I don't weld.
How about these? https://www.amazon.com/Lonwin-Trail...s=trailer+side+brackets&qid=1598282849&sr=8-9

I'm thinking using these corner brackets for a vertical slide in tail gate section that snugs to the top of the tail gate. The exposed trailer brackets would form additional wind bracing to prevent dropping off the back of the trailer should a pair of brackets fail. Because they will be mounted to inside of box (not outside as shown) you will need spacer nuts on brackets to give you room for interlocking the now 'interior' brackets. The brackets would keep sides locked in to prevent swaying of side extensions. You would be able to drop tail gate with the wooden extension rails in place.

VERY nice looking work so far!!
 

Mainsail

Well-known member
Steel Soldiers Supporter
1,420
1,420
113
Location
Puget Sound, WA
How about these? https://www.amazon.com/Lonwin-Trail...s=trailer+side+brackets&qid=1598282849&sr=8-9

I'm thinking using these corner brackets for a vertical slide in tail gate section that snugs to the top of the tail gate. The exposed trailer brackets would form additional wind bracing to prevent dropping off the back of the trailer should a pair of brackets fail. Because they will be mounted to inside of box (not outside as shown) you will need spacer nuts on brackets to give you room for interlocking the now 'interior' brackets. The brackets would keep sides locked in to prevent swaying of side extensions. You would be able to drop tail gate with the wooden extension rails in place.

VERY nice looking work so far!!
Interesting. I have a set of those I picked up at Tractor Supply and was planning to return them. I was looking at an external mounting but that wasn't going to work because of the bow sockets (can't run bolts into the sockets or the bows won't drop in). I'll have to play around with them tonight. Thanks!
 

Mainsail

Well-known member
Steel Soldiers Supporter
1,420
1,420
113
Location
Puget Sound, WA
How about these? https://www.amazon.com/Lonwin-Trail...s=trailer+side+brackets&qid=1598282849&sr=8-9

I'm thinking using these corner brackets for a vertical slide in tail gate section that snugs to the top of the tail gate. The exposed trailer brackets would form additional wind bracing to prevent dropping off the back of the trailer should a pair of brackets fail. Because they will be mounted to inside of box (not outside as shown) you will need spacer nuts on brackets to give you room for interlocking the now 'interior' brackets. The brackets would keep sides locked in to prevent swaying of side extensions. You would be able to drop tail gate with the wooden extension rails in place.

VERY nice looking work so far!!
I gave the brackets a try but they're not going to work.

The socket in the corner is about the same width as the thickness of the wood, so I started poking around in the garage at the stuff I already have, and found this angle steel from a previous (non-trailer) project. I took the side panel off and gave it a test fit. Of course the holes don't line up, but I got one to line up and drilled two more. The two extra holes are countersunk to be flush, and I have a LOT of beveled aircraft screws in the bin. It's not as cool as if I could weld some steel there, but it's rock solid and should work.

I mocked up a 'panel' out of some scrap pieces and the fit is pretty good. It's not as deep as I might like, but the panel certainly isn't going to fall out the back. I only got one side done today but I'll work on it this week a little every day after work.

First pic is the test fit with one bolt thru the hole for the bottom slat.
Second pic shows the countersunk screw above the middle slat bolt hole.
Third and forth pics show the tailgate panel mock-up from the front and back. The long bolt are because the galvanized hardware is cheap potmetal **** that strips out like it's putty. I should have gone with stainless hardware. Anyway, the long bolts are placeholders until I can go get some more short ones.

Sides15.jpgSides16.jpgSides18.jpgSides19.jpg
 
Last edited:

Mainsail

Well-known member
Steel Soldiers Supporter
1,420
1,420
113
Location
Puget Sound, WA
Finished the other corner after work tonight. Everything went smoothly except right at the beginning when removing the side uprights one of the rivnuts started spinning 😡 
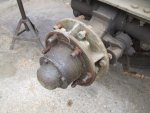
fortunately it was one of the ones I can get to the nut side and clamped some vice grips on to hold it.

I'm out of galvanized carriage bolts so the best I can do is mock it up. Tomorrow I'll go get the rest of the hardware and glue & screw the pieces that will connect the three slats to make them into one panel.

Also talked to an electrician who says he can bend the conduit to fit.

Sides20.jpg
 

Mainsail

Well-known member
Steel Soldiers Supporter
1,420
1,420
113
Location
Puget Sound, WA
UPDATE:

Tailgate panel is finished and slides in and out perfect- not so tight it's tough to get it lined up, and not so loose it flops around. It seems highly doubtful that it could wiggle its way out of the slot straight up and come off, but to be sure I needed some way to hold it down. Considered pins or a lanyard but remembered I have a bunch of these straps (for 20 years now) and a couple of those would work perfect.

I found an industrial electrician and he bent some ¾" conduit for me- made it look easy too. Mad skillz I wish I had. Anyway, came out great and all that's left is measuring for a tarp and figuring out a tie-down method.

Sides22.jpgSides21.jpg
 

TITANBOW

Member
26
51
13
Location
Longmont
I finally got my trailer painted this weekend. I'm planning on turning this into a nice all-around camping/hunting/utility trailer. The plan is to keep it pretty simple, I am leaving the axle and surge brake in place for now, and really just want to make it look nice. The trailer was already in really good shape. It had a little rust here and there, and the CARC paint was not in too bad of shape.

I spent a weekend underneath it, sanding and grinding at places where the CARC had come off (I was wearing a full respirator mask) I mainly just hit the spots where the CARC had flaked, feathering in those spots, and just overall rough sanding the rest. I hit the whole underside with Rustoleum pro flat black (brush and spray paint), and then did an additional coat of bedliner in the fender wells. For the outside, I did the same paint prep, as underneath, then mixed up Rustoleum pro Smoke Gray in about a 3 or 4 to 1 ratio with Acetone, and sprayed it with a cheap HVLP gun. It turned out great, that was actually the first time I had ever tried that. Theres a couple of spots that ran and Ill touch those up, but overall, I was really impressed with the ease and results of using rustoleum paint to do that.

I bought a universal BedRug mat that I'm going to cut to fit and lay in the bottom. I've also made lower profile bows from 3/4" conduit, and I'm going to have someone make a nice black canvas cover for it. I also am thinking of doing some sort of external rack outside of the canvas, maybe out of superstrut, so i can carry my canoe, solar panel, and Thule cargo carrier, but thats TBD. Again, I am trying to keep it pretty simple, and basically have a way to carry all our family camping supplies or hunting supplies, so I'm not going to do a RTT and all the overland accoutrements I see some folks doing.

IMG_4446.JPG
IMG_4447.JPG
 
Last edited by a moderator:

Retired1

Member
Steel Soldiers Supporter
32
52
18
Location
Woodward County, OK
It's not what I did do, it's what I didn't do....

I was inside my M105, sitting atop the ammo boxes, trying to install shelves. I slid some small ammo cans onto the tailgate* and that was all it took. It was one heck of a ride.


Lesson learned: I won't forget the outrigger again.

* = Edit / correction
Upon reflection, I first moved the small ammo cans out of the trailer onto the tailgate next to an unopened box of shelving leaving the rest of the load inside the trailer. Then I climbed up and slid onto the top of those ammo cans. My added weight was all that was needed to tilt the trailer. The ammo cans inside slid down to the rear and most caught on the lip of the tailgate and that prevented the trailer tongue from returning to rest and more of the cans striking me.
 

Attachments

Last edited:

Retired1

Member
Steel Soldiers Supporter
32
52
18
Location
Woodward County, OK
Thank you for thinking about my well being. I am okay albeit a bit sore. I am very cognizant at what might have been the outcome.

At first, I was not going to post the photos. I am still embarrassed that I did not use the rear bed support knowing full well it was there. I had not deployed the post when I parked the trailer the last time I used it as I expected to move it again soon. I thought about it again when I decided to load it but decided the tongue weight plus loading the first ammo cans in the front of the bed would be sufficient to prevent tilting. I was wrong.

I posted the photos just to show what can happen when an experienced hobbyist overlooks, or fails to take advantage of, the basic safety procedures available.
 
Last edited:

Mainsail

Well-known member
Steel Soldiers Supporter
1,420
1,420
113
Location
Puget Sound, WA
Yikes that coulda got ugly, glad you're ok!

My full weight on the tailgate of my M1101 won't do anything, but that can make me complacent. Thanks for the reminder!
 

Retired1

Member
Steel Soldiers Supporter
32
52
18
Location
Woodward County, OK
I have my first shelf unit in place and test fit with various sizes of ammo cans. The shelf Is Muscle Rack brand. It measures 30" wide x 12" deep x 60" high. It has chrome wire shelf inserts. There are Plastic caps on each uprigght to prevent cutting into the tarp. I shortened each post by 3" for clearance so I could slide the assembled shelf under the top bows. This size shelf unit is rated at 4,000 lbs. It will hold 20 cans. The shelves can be adjusted up or down.

DSCF3212.JPG
 

olemiss

New member
3
0
1
Location
Pensacola, FL
It’s been a while, but I built a new tongue for my 1101. I don’t have a picture of the Pintle in the lowest position, but, you can use your imagination.

Welded a 2.5” receiver hitch to the two 3/8” plates that bolted on the existing tongue. I can remove it and reinstall the original hitch if I want to, but I have two electric brakes sitting in my garage waiting to be installed on it.

View attachment 749526
The tongue is a piece of 2.5” x .250” walled sq tubing. It comes out and you can flip it over to accommodate a lower truck hitch, or flip it the other way for a 5 ton or higher hitch vehicle. Makes towing it close to level with any vehicle a possibility.

It also slides out another 12” (additional hole drilled in tubing to accommodate longer length) if you wanted a longer tongue, to make backing a little easier, or if you just like it longer.

I now have hitch upside down from the pic and the lunette bolted in the lowest position to pull with my truck. It’s almost level.
Is the material on the tongue steel or aluminum? I, too, want to extend my tongue a little but I am not sure of the material. I've had a boat guy tell me it's aluminum and another tell me it is steel. When I scratch paint to get to the metal it looks shiny like aluminum. Thanks.
 

Mainsail

Well-known member
Steel Soldiers Supporter
1,420
1,420
113
Location
Puget Sound, WA
The custom tarp finally arrived. Very happy with the fit. The back of the tarp comes down just over the top of the tailgate and you can see the other sides.

I had to add some loops for the 550 cord. Fortunately all the loops and screws/washers/bolts were stuff I had on hand, so no run to the hardware store.

I will stop at the BX tomorrow and pick up some figure-9 cord tighteners.

Sides25.jpgSides24.jpg

EDIT to add another pic. The tongue beam didn't allow a loop to be screwed in because of the bolt spacing. I tried just looping around the beam but that caused the 550 cord to bind so taking up the slack and getting a tight fit was difficult. I remembered I had some shorter (but taller) loops in my stash, so mounted those. They have a rough finish so the cord isn't going through as smoothly but it works.

Sides26.jpg
 
Last edited:
Top
AdBlock Detected

We get it, advertisements are annoying!

Sure, ad-blocking software does a great job at blocking ads, but it also blocks useful features of our website like our supporting vendors. Their ads help keep Steel Soldiers going. Please consider disabling your ad blockers for the site. Thanks!

I've Disabled AdBlock
No Thanks