the skull
Member
- 289
- 12
- 18
- Location
- mt victory ohio
The old 1008 is back on the road, and on the job once again!
Steel Soldiers now has a few new forums, read more about it at: New Munitions Forums!


Fair enough. I am sorry that my knowledge or lack of offends you. But as a matter of fact it is handy to have a tool and die maker as a personal friend. And on occassion we have made some of these gate parts as needed. As far as the rear window regulator NO I do not or will he attempt to make one. They are still readily available and the need and cost to fabricate one is NOT needed at this time. I will just keep a few new ones in stock for myself just in case. But if the rear window sash and guides are maintained and kept clean the regulator and rollers lubed well the regulator will last the life of the truck. Thanks for asking.I think they are want the rear window regulator. Didn't you have a buddy that could build some?


Everything is tight- no gaps between the engine/trans. No scraping inside the torque converter cavity and torque converter bolts tight to the flex plate- very easy to pry the ring gear rearward and see movement in the gear but no movement in what I can see of the crankshaft.@Pete: Check the bolts that hold the trans to the engine. I had a God Awful noise in my 1008 and thought it was the flex plate. I removed the inspection cover and found scrape marks on it where the flex plate had been hitting it. I had no choice but to keep driving it as it was my only transportation. I found out a few days later what the problem was when all **** broke loose. Turns out three of the trans bolts had loosened up and fell out causing the other three to shear off.
Thanks for the info- I am a fan of using the brain, it is our best tool! This is also my SOP when aligning transmissions when replacing a clutch- we must be brothers!Good point Colonel. But in the event that the flexplate does need changed. No need to drop the entire transmission and transfer case. I changed many flexplates with the use of 4 - 3/8" X 4" grade 8 bolts. Disconnect everything and use a floor jack / transmission jack to support the transmission and transfer case. Let the crossmember in place on the transmission. Of course you must remove everything that will not allow the transmission to slide reward 4". use the 2 side bolt holes on each side of the block. Slide the transmission and tranfer case back. Then just reach up remove the flywheel and replace it torque to spec and slide the trans back in place and put the OEM bolts back in place. You will need to remove the starter or at least bend the ear of the starter headshield carefully out of the way. It works and makes it easier then hoisting the entire assembly back in place. Of course I am assuming you don't have a lift. Use the same method on a lift. Makes it a one man job and about 4 hours. Replace the dip stick rubber seal and rear out put seal while you are there.
 opcorn:
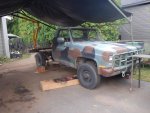
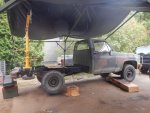
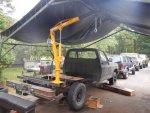
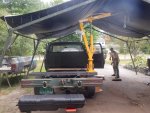
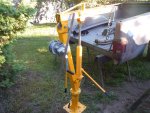
I'd love to see a detailed write-up of this project. I got my truck to be a firewood hauler, and a crane like that would be a big help in loading 36" oak rounds!Today I finished welding the frame for the crane and drilled the mounting holes and bolted it to the truck frame. I put the crane on to see what it will have for reach. Tomorrow, I'll prime and paint the frame and bolt it on for good.
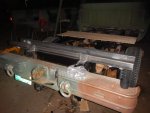
The bed should sit right over it if I made it right.
