Step 1: Read all 437 pages of this post. Wanted to get through it all before I posted something. I'd get off work at 5, work on the M1010 until 6:30 or so, eat supper real quick and get back out after until 9 or so. Then I'd come in and read read read. I mostly read this post, but I'd take a break and read the TPMs.
First off, thanks everyone for this great post I have learned a lot.
Over the past 3 months I've done the following:
The first thing I did was changed the factory fuel filter for a spin on type. I has having some air getting in and loosing prime. I had read about fixing the filter, put decided to go with a FM100 type with the primer pump on top. Works Great.
The very next thing was the dog head relay. While I was in the dash area I took the gauges out, cleaned everything, replaced bulbs, etc. It's nice to have turn signal indicators again(can't hear the clicker over the clatter).
The next big thing was swapping the 24volt alternators for 2 isolated ground 12volt alternators. The DUVAC was already removed when I received the truck. I replaced the belts while I was at it. Put in all new wiring between alternators, batteries and bus bars. Someone along the way had replaced the factory wiring with stiff 2/0 wires that were either way too long or just barely long enough. I went with 4g for alternators to batteries and 2g between batteries and to bus bars. I think cleaning the bus bar and new tight connections have made it start much better. When I first got the old girl, she'd turned over for 2-3 seconds and fire up, now she starts before you have a chance to let go of the key.
I changed the oil and greased everything. Started removing all the wasp nests I could see, I'm sure there are more....
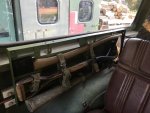
I removed the rubber floor covering and insulation, have some surface rust in places, but luckily it's solid I removed the door panels and used a hot air gun to bring the color back. Not perfect but a big improvement. Cleaned lubed the window mechanism. I need a lot of rubber parts replaced in the doors. I'm hopeful to work on that this winter when I'll have more time to take apart the vent windows.
Next step is get some new tires and start driving her more. Tires are over 20 years old, figure it's probably time for some new ones. Looking forward to driving her on some longer errands.


")


