Another Ahab
Well-known member
- 18,129
- 4,905
- 113
- Location
- Alexandria, VA
You live in some right pretty territory, Bravojmc, that's for sure. 
Last edited:
Steel Soldiers now has a few new forums, read more about it at: New Munitions Forums!


We do! Thank you.. We live in some of the best peach growing territory in the world!You live in some right pretty territory, Bravojmc, that's for sure.
We do! Thank you.. We live in some of the best peach growing territory in the world!
Cool nights and warms days! (Great wine and great peaches!)

Lol the saying around here is. " GEORGIA AINT GOT **** ON A PALISADE PEACH!" Our peaches are WAY better than


Very cool, I'm stealing your idea.
You're welcome to it; just file off the serial numbers and say it's yours.Very cool, I'm stealing your idea.
I mainly installed it cause it looks cool I dont intend to deep ford the truck. At the very least it will help keep water out of the intake if I make a big splash in shallow water.If you want it to keep water out of the air cleaner make sure you get the elbow... The airbox where the intake is attached to the duckbill is not sealed. There is a small hole right above the cabin air intake louvers. Details are in the install instructions for the fording kit.
Just curious how you plan on supporting it and why you didn't just use a factory intake pipe?I mainly installed it cause it looks cool I dont intend to deep ford the truck. At the very least it will help keep water out of the intake if I make a big splash in shallow water.
I'm pretty sure I can answer the why part for him: $10 of pipe vs $130 for an aluminum tube.Just curious how you plan on supporting it and why you didn't just use a factory intake pipe?
made a snorkel out of a 4in pvc pipe. just needs some paint and im thinking about shortening it a bit. View attachment 685541 View attachment 685542


Wire Fox hit the nail square on the head as why I dident use the factory one.Just curious how you plan on supporting it and why you didn't just use a factory intake pipe?
It looks like you didn't use the stock bracket that attaches the tube to the windshield. Looks like you just used a non load bearing piece of metal? Does the tube hold itself up pretty well?I think it will look good after you get it done. But yeah cut it down a bit. Here's mine...
View attachment 685607View attachment 685608
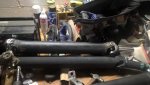
GREAT TO HEAR! I'm happy for you! Keep the good work up!Oh man, what a busy weekend! Bluehummer really hooked me up with a factory new A2 rear propeller shaft for $160 and beltfed34 got an A2 front shaft to me (which ended up being trash, but I'm hoping he will work that out with me tomorrow). The good part about that front shaft was its length, which matched one I already had around but thought was too long... All in, I replaced a worn u-joint on the front, replaced the yoke on the new rear with a 27 spline for my T/C. Got all that bolted up yesterday. I also got busy with grinding a 1" offset box wrench down to a 0.28" thickness in order to fit to the injection pump's side servo plunger bolt.
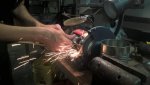
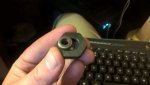
Today, I started by finishing scraping the rest of the baked-in gasket from the block. With the clean, I disassembled the servo advance assembly and fought the plunger seal for a few hours. With no immediate replacement available, I just set the side plunger bolt on the drill press, installed a modified 1/2" bit, and carefully chewed into the stuck seal cup piece. After a few presses, the seal gave way and came up with the bit. After a little bit of clean up, the 20 ton press set the new seal in place, making for the easiest step of the whole day!
Back out at the HMMWV, I crawled under with a torque wrench and grease gun to ensure the drive shafts and u-joints were all proper. Then back up top, I set down some new gaskets and put the intake assembly back into place. Just for safety sake, I pulled the glow plugs and cranked the engine to ensure there was no water in the cylinders-there wasn't! At this point, everything is back together, batteries are topped up, fluids are in check, and I'm ready to crank. Unfortunately, it's not happy with me, so it took three long attempts to get the engine started. I'm sure between working on fuel systems, the small amount of water that had intruded earlier, and the gasket material dust that I couldn't keep out, it all worked together to make the start up a difficult endeavor for the engine. Once running, it idled fine and revved fine. It also stopped and restarted with no issues or complaints.
At idle with some heat building up, I got the transmission filled the rest of the way-my harbor freight pail pump also gave out on me mid job, so it switched to a messy job of pouring into a smaller container with a funnel... With it up to proper fluid pressure, I tried to put it into drive, but no dice. Don't feel any engagement at all. (Note: This is a 4L80E...I have no electronics hooked up, as I was attempting a baseline mechanical function check.). Oddly enough, reverse engages strongly. I was able to coast in neutral down my driveway, then power back up in reverse. It was actually difficult to keep it from taking off on me... I'll be hitting the books to see if I should or should not have a proper limp mode be active even without any electronic function. My hope is that the TCM being wired up will make all right with the world, but I also would like to figure out if my transmission already needs to drop for a rebuild...
EDIT: This is an important thing to really put out there as it just set in for me. Even though it's still broken and there's more work to be done, I drove my HMMWV today! That's the first time ever for me and my HMMWV. This has really come a long way.
Congratulations!EDIT: This is an important thing to really put out there as it just set in for me. Even though it's still broken and there's more work to be done, I drove my HMMWV today! That's the first time ever for me and my HMMWV. This has really come a long way.
NOPE! No stock bracket. I made my own bracket out of a piece of aluminum extrusion. Super strong. And there is no load to bear, the pipe is Rock solid.It looks like you didn't use the stock bracket that attaches the tube to the windshield. Looks like you just used a non load bearing piece of metal? Does the tube hold itself up pretty well?


