• Steel Soldiers now has a few new forums, read more about it at: New Munitions Forums!

  • Microsoft MSN, Live, Hotmail, Outlook email users may not be receiving emails. We are working to resolve this issue. Please add support@steelsoldiers.com to your trusted contacts.

Working On The M561 Gama Goat

m38inmaine

Well-known member
2,090
45
48
Location
Maine USA
Reference the tailgate step, fig 184 in the -34P shows the bolts going through the gate to nuts/washers, doesn't appear to be captive. Enjoying the post.
 

dmetalmiki

Well-known member
5,523
2,026
113
Location
London England
That is some serious work you are carrying out there.. You will soon see the light at the end of (this very long) tunnel. Your efforts are stirring me go start working on my "fleet" for this years events.
 

mkcoen

Well-known member
Steel Soldiers Supporter
5,637
381
83
Location
Spring Branch, TX
I got in touch with the blaster yesterday and he said bring it in Tuesday. Problem is there still aren't any brakes other than the parking brake. Never fear! Keith_J and the Wonder M1031 to the rescue!

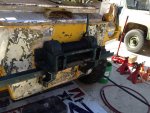
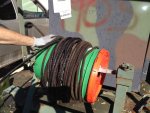
First thing we did was unwind the winch cable so they can get the winch completely blasted. Lots of cable grease and it was wound perfectly making me believe it's never been completely unwound before. Luckily I have a generator trailer sitting directly in front of where the Goat was so Keith mocked up a drum on the wire spool of the trailer from an old Chic-Fil-A pickle bucket (hey, whatever works). After we got that cleared we jacked up all 6 wheels so they were easy to rotate the drums to the bleeder valves. After a quick test to see if we were getting air flow through all the wheels we realized we had never cleared the right rear brake hose and like all the rest it was plugged tight. Off comes the hose (until you done this you don't realize what a task it really is), some thin wire and brake cleaner to rotor-rooter it out, break for lunch, come back and rooter some more, then it was done and the reinstall (worse than the uninstall) and we're finally ready to bleed it.

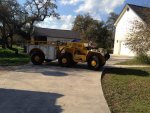
We're still having problems with the middle axle but got plenty of flow to the front and back. Nice solid pedal now. Just to try it out Keith turned it around and drove it onto the trailer. Now off to the blaster!!!

001.jpg002.jpg003.jpg
 
Last edited:

mkcoen

Well-known member
Steel Soldiers Supporter
5,637
381
83
Location
Spring Branch, TX
I wonder how well it would tow behind your deuce?

How far away is the soda blaster guy?
Since the steering wheel doesn't return to center you can't flat tow it and I don't have a trailer to haul behind the deuce.

The blaster is just inside 1604 in San Antonio so not too far to go
 

Keith_J

Well-known member
3,657
1,315
113
Location
Schertz TX
Oh, that is close. Morning traffic not fun.

On the brake hoses, the RR is pretty bad. It has four hold down fasteners, three on the hose itself and one on the steel line behind the tube nut. There is scant clearance for any wrench, the hose clamps get in the way of even 12 point sockets. So the hose clamp needs bashing to get the socket on.

The spring is in the way, the clearances for hands and arms are limited. Fortunately, minimal corrosion meant the tube fittings were easily broken. Still, it takes a few hours for a single hose removal and replacement. Then getting all,the clamps back on takes patience.

getting the hoses clear was an issue because the fittings kept stopping the wire on the shoulder of the insert. The hose fitting on the drum end has a right angle so it can only be cleaned from the upstream side. Turning the wire in the drill and manipulating it eventually got it fully cleaned. Once the brake cleaner ran freely, we knew it was done.

The middle axle will be extra special. Even more difficult access to the fittings. I might try 3000 PSI air from the hub fitting.
 
Last edited:

Another Ahab

Well-known member
17,841
4,198
113
Location
Alexandria, VA
The spring is in the way, the clearances for hands and arms are limited. Fortunately, minimal corrosion meant the tube fittings were easily broken. Still, it takes a few hours for a single hose removal and replacement. Then getting all,the clamps back on takes patience.
The day that engineers design a vehicle as much for the mechanic (doing the maintenance), as the operator (doing the driving) will be a good day.

I don't believe any vehicle has ever been designed for both.
 

mkcoen

Well-known member
Steel Soldiers Supporter
5,637
381
83
Location
Spring Branch, TX
TGI Blast Day! Drop it off this morning and they thought they'd be done by Friday. Could be we'll be seeing at least some primer on it this time next week.
 

TexAndy

Active member
1,427
15
38
Location
Bee County, Texas
TGI Blast Day! Drop it off this morning and they thought they'd be done by Friday. Could be we'll be seeing at least some primer on it this time next week.

Send me a picture of the data plate that's currently on it, if you have one available please.

And tell me before you start priming it, please. I want to make a funny.
 

Keith_J

Well-known member
3,657
1,315
113
Location
Schertz TX
The day that engineers design a vehicle as much for the mechanic (doing the maintenance), as the operator (doing the driving) will be a good day.

I don't believe any vehicle has ever been designed for both.
Aside from the priming fuel pump, the CUCV is pretty easy to service. And darn easy to drive. But it isn't a hardcore MV. The M35 is the king of your criteria. A pain to drive and slightly easier to work on.
 

mkcoen

Well-known member
Steel Soldiers Supporter
5,637
381
83
Location
Spring Branch, TX
My apologies to Keith_J. A lot of effort went in to clearing the old brake hoses on the Goat then reinstalling them once they were cleared. Two days after the last one was done I got 6 new brake lines in the mail :doh: Well we thought we'd have to revisit the issue at some point so now we have the nice new lines to use.
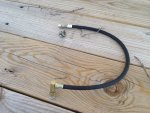
So with that, I'd like to add Riv-Rad (MuttParts.com) to the list of vendors I would (and will) use again. I've also used a lot of eBay vendors for Goat related parts and been thrilled with all of the service I've recieved from them. At this point there's only 1 I will never use again and no need to rehash that.

Still looking forward to word from the blaster on when I can pick up the Goat. Stopped by the paint shop today and picked up a gallon of self-etching primer, it's activator, and a gallon of sealer = OUCH! Hopefully the work I did on the paint stripping will take some off the blasting bill to make up for it.

I also had to spend $10 on a new tail light for the trailer that I didn't notice I had tagged on the basketball hoop yesterday. Stupidity tax.

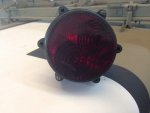
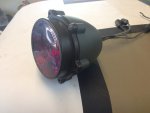
The only other thing I did today (other than mow part of the lawn) was start on the tail lights M813rc picked up for me. They're in great shape just not the right color so I sanded one of them down a bit and covered it with Rapco: 34052 Lusterless Marine Corps Forest Green.

I'll have to wait for Rory to inspect it to verify it is the correct shade but that's what it's supposed to be. I'm not going to try painting the rim of the lens as paint tends to come out differently when applied to plastic vs metal so I'm not sure it would match any way. I do need to paint all of the screw heads yet but wanted to get one together to see how it looked.


002.jpg003.jpg004.jpg
 
Last edited:

Keith_J

Well-known member
3,657
1,315
113
Location
Schertz TX
Well, WHEN we replace those lines...beg, borrow, buy or steal some crows foot wrenches. Even Hazard Fraught store brand will make the job easier. 3/8" drive size. One 5/8", the other 9/16". Or even 1/4" drive would work better. Not a bunch of torque, just a real PITA to access.

I too had to replace trailer lights, only to snap it a few days later:cookoo:. I decided to repair the new one using plastic mender stuff, like epoxy only made for plastics. Works like a champ, still have a bunch if you want to try it on yours.
 
Last edited:

Another Ahab

Well-known member
17,841
4,198
113
Location
Alexandria, VA
Well, WHEN we replace those lines...beg, borrow, buy or steal some crows foot wrenches. Even Hazard Fraught store brand will make the job easier. 3/8" drive size. One 5/8", the other 9/16". Or even 1/4" drive would work better. Not a bunch of torque, just a real PITA to access.
That's a good one; funny.
 

mkcoen

Well-known member
Steel Soldiers Supporter
5,637
381
83
Location
Spring Branch, TX
I too had to replace trailer lights, only to snap it a few days later:cookoo:. I decided to repair the new one using plastic mender stuff, like epoxy only made for plastics. Works like a champ, still have a bunch if you want to try it on yours.
Already bought an almost direct replacement. Wiring is kind of hinky and not sure what they expect you to do. Almost like "stab" style wall outlets but not sure if I need to solder on a tip to the wire to stab it or what.
 

mkcoen

Well-known member
Steel Soldiers Supporter
5,637
381
83
Location
Spring Branch, TX
It was Christmas in March this afternoon!

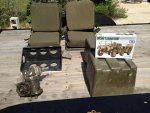
UPS man brought 3 different packages. First 2 were Goat parts and the 3rd was a M561 model by Tamiya.

The parts include a take out steering box, 2 NOS fiberglass seat shells, 4 NOS seat cushions, 2 NOS battery covers, and a take off ammo can rack. At this point the only parts that I am missing to get it complete are the pintle stub section that goes on the right front fender for the M60, a couple of lift shackles, and the 2 front tow shackles.

I love it when a plan comes together!

003.jpg
 

TexAndy

Active member
1,427
15
38
Location
Bee County, Texas
You want a teeny tiny little dataplate for it with the same info as your full-size one?

spot diameter of the laser is about .003" when focused. So it's got the resolution to do it, I think.
 
Top
AdBlock Detected

We get it, advertisements are annoying!

Sure, ad-blocking software does a great job at blocking ads, but it also blocks useful features of our website like our supporting vendors. Their ads help keep Steel Soldiers going. Please consider disabling your ad blockers for the site. Thanks!

I've Disabled AdBlock
No Thanks