• Steel Soldiers now has a few new forums, read more about it at: New Munitions Forums!

  • Microsoft MSN, Live, Hotmail, Outlook email users may not be receiving emails. We are working to resolve this issue. Please add support@steelsoldiers.com to your trusted contacts.


Working on the MKT

mkcoen

Well-known member
Steel Soldiers Supporter
5,637
380
83
Location
Spring Branch, TX
OK, so theres the batt pack I was just writing about in another thread. Is it 24vdc? Will it slave jump a deuce?
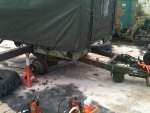
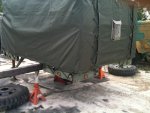
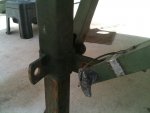
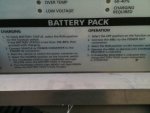
Yes it is 24v. It is designed to run in conjunction with a slave port connector on the deuce in a field environment. The slave connects to the battery pack to charge and then the MBUs run off the battery pack. Where there is "shore power" available the MBUs run through a 115/24v convertor. I doubt it could be used to jump a deuce as the power is one direction and there is no connectors to run back to the deuce batteries. Also I doubt the amperage would be sufficient. I've added a couple of additional photos of the unit so you can get a better idea of the setup.

MKCoen, I wish you had more pics of the kitchen so we could all see the components up close and how they work. I have read this thread with much interest. It is nice to get excited along with you on your project. Thanks for the writeups.
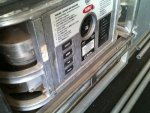
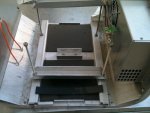
The layout is fairly simple. On the right side of the trailer (front to rear) there is a small cabinet with a cutting board top and storage under the board. This is where I keep the cooking utensils. Next is the griddle that sits on 2 MBUv3 burner units and then there are 2 "stoves" which are simply MBUs with a grate on top for sitting pots/pans. This is where I'm adding my new griddle (now I'll have 2) since I can heat a pan of water on the griddle or in the ovens any way and will now have more room to cook burgers or scrambled eggs. On the left side (frt-rr) there is a long work table with cabinet storage underneath and then 2 individual ovens, again sitting on top of MBUs. They generally came with 1 additional moveable cabinet that could be set on the folddown deck for more prep area and storage and also a large ice chest.

These are great trailers for taking to events and shows but if I was looking for backyard cooking I'd stick to a decent BBQ.

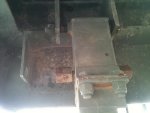
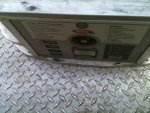
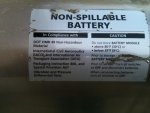
More on the battery pack. It looks to be a never used item with just some shelf wear. Anyone know the group size of the batteries?
 

Attachments

Last edited:

SCSG-G4

PSVB 3003
Steel Soldiers Supporter
5,307
3,190
113
Location
Lexington, South Carolina
The long cabinet storage space has one section (where the MBU Inverter is) that is setup for the cookie sheets as a cooling rack that will hold over half a dozen sheets. It also works as a 'flyproof' storage area for bread.

3dA, you need to come to the GA Rally in Oct (19-23) and see an MKT in operation!
 

mkcoen

Well-known member
Steel Soldiers Supporter
5,637
380
83
Location
Spring Branch, TX
Re: Batt, pack-"Do not store above 86 degrees F." Are you gonna refrigerate it all summer?:p
I've got room in the freezer ;-)

Since I doubt I'll be using it for it's intended purpose it probably won't have batteries in it. I'll use it for display at shows and maybe keep a couple of batteries at home in the event I actually need it.
 

mkcoen

Well-known member
Steel Soldiers Supporter
5,637
380
83
Location
Spring Branch, TX
Well the new trailer frame turned out to be a bust.

Sarge and I worked on it this morning. We got the old frame unbolted from the MKT, jacked the deck up, then pulled the old frame out. In order to keep from having to jack the body up too high (unstable at best and dangerous at worst) we just pulled the tires and then rolled it out on the hubs. The work space at Sarge's Farm is old indoor/outdoor carpet so it wasn't a big deal, i.e. no damage to the hubs.

Once that was out and we started working to get the new frame in we began to notice problems. 1) the new frame did not have the emergency brake away feature. I thought the reason the air tank was missing was due to the prior owner parting things out but on closer inspection it wasn't set up for it. 2) One of the clamps that holds the spring pack together (and is riveted to the springs) was broken and needs replacing. Not a big deal but one more negative. 3) One of the leafs in the right spring pack was actually broken. 4) The bolts connecting the plates between the frame and deck were smaller on the new frame. Not having the plates from the new frame meant redrilling the frame so the old bolts would fit. All-in-all not a lot of things that couldn't be overcome.

So we forged ahead, lined the new frame up, pulled the tires, slid it in to place and hit the "oh, sh*t" point. The plates were not uniformly placed between the 2 frames. These were both M103A3 frames but were completely different in how the connecting plates lined up. After some consideration it was decided that the rust wasn't bad enough to compromise the old frame structurally and could be cleaned up enough to be presentable especially now that it was out from under the deck so I could get to it.

I'm heading back to the Farm on Thursday to do some grinding and painting. I'll still have to run new brake lines and swap out the landing gear but that's a lot easier than trying to overcome all the differences between the 2 frames.

Pics:
1) Old frame loose and ready to pull out
2) MKT frameless
3) New frame - notice no air tank or left side air line
4) difference between bolts - old frame bolts 15/16" new frame bolts 9/16"
 

Attachments

Last edited:

SCSG-G4

PSVB 3003
Steel Soldiers Supporter
5,307
3,190
113
Location
Lexington, South Carolina
Mark, your 'new' frame is an older style/version of the basic trailer. It can be upgraded, but I'm not surprised that the MKT's have different cross bracing, and larger bolts. I have that on a 105 trailer I got from Montgomery - bed was only held on by four bolts because that's all the would line up - there should be 12 more. Our 'secret source' has some air tanks, I have one in the garage right now!
 

mkcoen

Well-known member
Steel Soldiers Supporter
5,637
380
83
Location
Spring Branch, TX
Our 'secret source' has some air tanks, I have one in the garage right now!
Since I'm going to stick with the original frame I don't need the air tank (already on it). It was a difference between a MKT-75 new frame and my MKT-85 original frame. I guess I thought since they were both M103A3 frames they would be identical and found out the hard (expensive) way that they aren't. Just as well since it got me to pull the original frame out which makes it easier to work on.
 

mkcoen

Well-known member
Steel Soldiers Supporter
5,637
380
83
Location
Spring Branch, TX
We got the original frame back under the MKT last week. I spent Friday morning grinding the rust off and then shot it with primer and finally with Rapco 383 Green. It went back under with no issues and then I replaced all of the bolts connecting the frame and the body. Quite a few of the original bolts came out boogered up. I don't know if that was from the Nylocks or just wear/tear. New Nylocks were $60 per hundred so I just went with lock washers and regular nuts.

I did not get any photos after the paint job and before we put it back under but I'll be picking it up at the Farm this week and bringing it home. There's still a few spots that need touch up paint and then I need to start on the brake lines so I'll get some shots then.

Edit 6/27:

We did get the new landing leg installed which is soooo much nicer than what was there. For one thing it actually works. It's a newer style than what I've had on other 105 style trailers and is extremely smooth to operate. It only takes removing 1 nylock, a couple love taps with a BFH and then slide the new in to place and bolt it back down.
 
Last edited:

mkcoen

Well-known member
Steel Soldiers Supporter
5,637
380
83
Location
Spring Branch, TX
You didn't replace the brake lines while you had the frame out?
Not broken, rusted. I didn't have the lines to bend new ones and didn't want to leave the body sitting up on jacks over the weekend. There's only 2 lines that need replaced (across the back axle) so they're easy to get to. I prefer to do it in my driveway so I have all my tools handy and a NAPA that's a little closer than the Farm's.
 

mkcoen

Well-known member
Steel Soldiers Supporter
5,637
380
83
Location
Spring Branch, TX
Back to work.

I mentioned that the right rear leveling leg was binding up quite a bit. I picked one up from the same person I bought the non-used replacement frame. I finally got around to replacing it today.

Changing out the legs is pretty simple. Earlier in the post you might have seen where I just replaced the lower portion of one on the left side that was missing the portion used to jack the leveling leg up and down. Since I was replacing the whole leg on this side there was actually less work involved.

First I undid the bolt that holds the brace that swings up and down with the leg and swung it out of the way. Then to make things easier, I lowered the lower portion of the leg so it connected with the ground and then just enough to take the weight off of the bolt the leg pivots on. Once the bolt was loose it was just a matter of laying it down. I set the new leg next to the one I just took off, extended the leg to match the length, lifted the leg up but didn't bolt in in place. You need to make sure to hook up the brace before putting the leg in it's final spot and attaching the bolt.

Pics
1) Old leg after removed
2) Bolt pivot point at top of the leg
3) Braces - one to the farthest right is the detachable leg, other brace is the one bolted and pivots up with the leveling leg.
 

Attachments

Last edited:

mkcoen

Well-known member
Steel Soldiers Supporter
5,637
380
83
Location
Spring Branch, TX
Another thing I did today was try out my new MBU.

At the Temple Air Show last month I had one burner go out and have not been able to get it going since (per the TM it seems to be fuel pump issue). I went from having 14 MBUs and no MKT to having an MKT with just six burners and now one that doesn't work. I wound up going back to a friend that I had sold 2 of my burners to and buying one from him. He went the opposite way I did by getting his MKT first and then getting way more burners than he needed.

The MBU I got back was not one of the units I sold him (which while low hours was still a used unit). He sold me a BRAND NEW unit. Zero hours! Never fueled before!

I put about a gallon of diesel in the tank and began the start up process. Should you be fortunate enough to get a BRAND NEW MBU don't be too concerned if it has issues starting the first time. The reason it might not start the first time is there is no fuel in the system any where. Either fuel it with the on board pump from a jerry can the first time or after pouring fuel in hit the "fuel" button so it cycles through the pump. It took hitting then Start button twice but the fired right up.

While all of my units are MBUv3s this one is even "newer" than the ones I have. Note the difference in the lower portion of the case. The older units are flush across the front and this one is extended out about a half inch.
 

Attachments

Last edited:

MitchG

Member
198
1
16
Location
Columbia S.C.
The one's that have the "bump" in the front are the one's that were built as V3's. The one's without the bump are usually 100's that have been converted to V3's. Speaking of which if anyone has some 100's they want to convert I have some of the new fuel block upgrades to make them V3's.
 
Top
AdBlock Detected

We get it, advertisements are annoying!

Sure, ad-blocking software does a great job at blocking ads, but it also blocks useful features of our website like our supporting vendors. Their ads help keep Steel Soldiers going. Please consider disabling your ad blockers for the site. Thanks!

I've Disabled AdBlock
No Thanks