• Steel Soldiers now has a few new forums, read more about it at: New Munitions Forums!

  • Microsoft MSN, Live, Hotmail, Outlook email users may not be receiving emails. We are working to resolve this issue. Please add support@steelsoldiers.com to your trusted contacts.


Working on the MKT

mkcoen

Well-known member
Steel Soldiers Supporter
5,637
380
83
Location
Spring Branch, TX
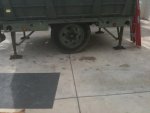
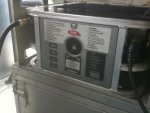
I pulled out the wrenchs and started working on the MKT this afternoon. At some point I'd like to "restore" it, at least clean up and paint what's rusted and faded, but right now it's more important just to get the bits and pieces back to a "working configuration.

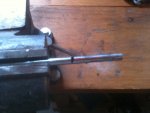
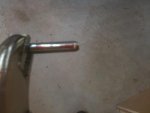
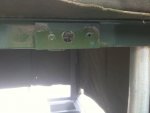
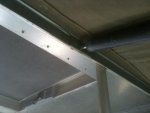
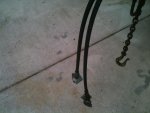
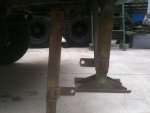
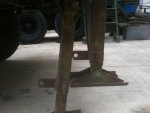
The first thing that needed done was fixing the left/front leveling leg. The knob for the cranking lever was broken off. I could raise and lower the leg with a large flat screwdriver but it wasn't really something that you could use to raise the trailer with.

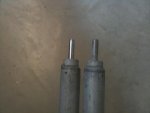
At first glance I thought I was going to have to take it to a fabrication shop to weld something on but after further investigation discovered that the knobs are on both sides of the leg (yeh I probably could have asked someone here about it but where's the learning experience in that?) so thought I could just turn the leg around. That wouldn't work because there are leg braces that face a certain direction. Fortunately all the legs are identical. It just depends on where they are on the trailer as to which way the braces face. So I could take the right/front leg and just swap it or I could take one of the rear legs and rotate it 180 degrees. I decided to just go with the left/rear so I'd be working on the same side of the trailer.

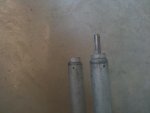
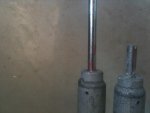
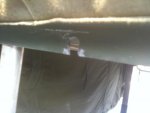
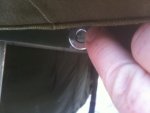
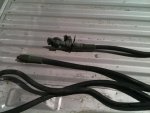
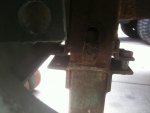
The leg is in 3 pieces: top that pivots on the trailer, middle (where the lowering knob is, and the bottom that slides up and down. I left the top connected to the trailer and just dropped the middle and bottom. They are held on with 4 bolts and then the assembly just slides out.
 

Attachments

Last edited:

mkcoen

Well-known member
Steel Soldiers Supporter
5,637
380
83
Location
Spring Branch, TX
All in all it took about 30 minutes to drop both legs and swap them out. A warning for anyone doing this, the brace that stays mounted to the leg in the "stowed" position needs to be installed prior to bolting the bottom sections of the leg back to the top. Experience is a fine teacher but the tests can really stink sometimes.

Everything works great on this part now. Tomorrow I have to work on one of the canopy braces and fix a spot in the aluminum that is broken on the top of the trailer where the brace holds the canopy up. I also need to get some parts to start the WMO to get the MBU wiring installed.
 

Attachments

Last edited:

mkcoen

Well-known member
Steel Soldiers Supporter
5,637
380
83
Location
Spring Branch, TX
Just in case you haven't had the pleasure of meeting SCSG-G4 (Mike from SC), he is the MKT guru around here.
We've swapped many PMs and a flash drive. He's working on locating a Travel Cover and the Walkway Covers for me right now. My understanding is he and Green_Gator are cooking at the FL Rally this weekend. Wish I could be there helping out versus scrubbing petrified flour and grease off of mine.
 

mkcoen

Well-known member
Steel Soldiers Supporter
5,637
380
83
Location
Spring Branch, TX
Yesterday I spent most of my time with additional cleaning on the MKT. I'm about 1/1000th of the way done as this trailer was put away very dirty and then sat for who knows how long before I got it.

Today I decided to fix a couple of minor things that will go a long way in making the unit usable. First on the list was one of the poles that holds up the walkway covers. There is a pin at the bottom of the pole that goes into a hole on the deck. I have all of the poles but one of them was missing the pin so I needed to replace that.

The 1st picture show 2 poles, 1 with the pin and 1 without. Next is the damaged pole with an appropriately sized piece of round stock fitted into the opening. Once the stock was measured I cut the piece off, chamfered the end, then epoxied the rod into the pole. Works like it was new.
 

Attachments

mkcoen

Well-known member
Steel Soldiers Supporter
5,637
380
83
Location
Spring Branch, TX
The next fix also had to do with the walkway canopy pole. At the top of the pole is a curved pin that fits into a grommet in the canopy. Then there is a tensioning rod that goes from the pole and fits into a hole in the side of the trailer roof. You twist the tensioning rod and that pushes against the roof and makes the canopy taut. There are several of these holes in the trailer roof that the bottom is blown out of so the tensioning rod won't stay up as you're tightening it. You can hold it until there is enough pressure to keep it in place but a small gust of wind can loosening the canopy and down it goes.

What I decided to do was take a washer with the same inside diameter of the tip of the tensioning rod and epoxie it to the trailer. The pictures show what I'm thinking of. Currently I don't have any washers with the correct opening so I need to get some or possibly just take a piece of flat aluminum stock and epoxie that in place and then drill the right size hole.

I'm not sure how common these two issues are but they seem easy enough to fix and once done make things a lot easier when setting the trailer up.
 

Attachments

Last edited:

Dave Kay

Active member
Steel Soldiers Supporter
497
27
28
Location
Kingman AZ
The next fix also had to do with the walkway canopy pole. At the top of the pole is a curved pin that fits into a grommet in the canopy. Then there is a tensioning rod that goes from the pole and fits into a hole in the side of the trailer roof. You twist the tensioning rod and that pushes against the roof and makes the canopy taut. There are several of these holes in the trailer roof that the bottom is blown out of so the tensioning rod won't stay up as you're tightening it. You can hold it until there is enough pressure to keep it in place but a small gust of wind can loosening the canopy and down it goes.

What I decided to do was take a washer with the same inside diameter of the tip of the tensioning rod and epoxie it to the trailer. The pictures show what I'm thinking of. Currently I don't have any washers with the correct opening so I need to get some or possibly just take a piece of flat aluminum stock and epoxie that in place and then drill the right size hole.

I'm not sure how common these two issues are but they seem easy enough to fix and once done make things a lot easier when setting the trailer up.

The trailer-roof materiel you're going to epoxy washer/aluminum-stock--- is that sheet metal? If so, why not look into rivets? Even if the materiel is some kind of composite like plastic/ABS/fiberglass, I've seen at Harbor Frieght where they have kits now to rivet that kind of stuff together... ok, maybe rivet AND epoxy both!

Anyway, I'm liking this thread 'cause I want to eventually get an MKT and make it as functional as possible... like what you're doing. Meanwhile, best of luck and we'll be cheering you on!
 

mkcoen

Well-known member
Steel Soldiers Supporter
5,637
380
83
Location
Spring Branch, TX
The trailer-roof materiel you're going to epoxy washer/aluminum-stock--- is that sheet metal? If so, why not look into rivets? Even if the materiel is some kind of composite like plastic/ABS/fiberglass, I've seen at Harbor Frieght where they have kits now to rivet that kind of stuff together... ok, maybe rivet AND epoxy both!
The roof (actually almost everything) is aluminum. That's why I'm thinking of going back with some flat aluminum stock instead of the washer. With the washer it's kind of tight to rivet but would be easy enough to do with the flat stock. JB Weld is cheap and easy to use so saves some effort with riveting. Also I'm trying to keep it as "invisible" a repair as possible so the less tampering with the original the better.

Seems like there is a GROWING number of MKT owners on here so if you're interested in one jump on in. SCSG-G4 is the MKT Guru and can help locate a lot of parts that us mere mortals would probably never find and he has a about 2gig of info collected if you send him a flashdrive.
 

mkcoen

Well-known member
Steel Soldiers Supporter
5,637
380
83
Location
Spring Branch, TX
Another day another direction. Bear with me. I don't have ADHD just some of the tendencies.

I've decided to go with the flat aluminum stock to fix the blowouts instead of a washer. I need to pick up some material before I can do that so instead I started installing the MBUs. I have 8 so 6 for the MKT and then 2 for spares or parts. So far they all seem to work fine and the highest hour on any of them is about 60 and I put 35 of those hours on it.

I haven't completed the MWO on the trailer yet but wanted to at least get the burners in to try them out. I installed the 4 right side units then fueled them up with the on board pump. I've got a couple of Scepter cans coming but until then I had to bungee cord the can part of the setup to a common civi diesel can.

All burners fueled perfectly and then after they were all full I went down the line and started them 1 at a time. I have to say with just 4 burners going and set at low/med that it got warm (and noisey) in there pretty quick. I can just see the guys at an event when I fire that up around 0700 wondering if the air show had started.
 

Attachments

mkcoen

Well-known member
Steel Soldiers Supporter
5,637
380
83
Location
Spring Branch, TX
Got the burner units into the ovens this afternoon (had to take a break to look at a deuce for a friend and turns out they had an MKT for sale there also).

All of the MBUv3s that I have work but it turns out 2 of them won't fuel from a can. Once manually fueled they start and work fine but I'd like everything to be working 100% if I'm going to use this regularly. So after swapping 1 of the oven MBUs out twice I have working (fueling) burners in all 6 slots.

Now I'm trying to decide if I want to buy this other MKT (which is a MKT-90) and sell mine. It would save me the hassle of doing the MWO on this one. Of course the replacement hassle is me convincing the wife why I need another one taking up space in the driveway.
 
Last edited:

SCSG-G4

PSVB 3003
Steel Soldiers Supporter
5,301
3,170
113
Location
Lexington, South Carolina
Mark,

If the MBU will not fuel, try raising the fueling can a bit so gravity can help once the siphon effect is overcome. The pump is 'supposed' to be powerful enough to keep the Scepter can on the ground outside the MKT, but of the 14 MBU's I have, only three will lift that far and I don't know how long they will last. To drain them for storage, pull them out set on left side (hose connection down), plug in the hose at one end and in the fuel can at the other, then open the manual fueling cap - done in about five minutes.

On the MKT-90 - make sure the inverter is present and operational, as they can be expensive to replace.
 

mkcoen

Well-known member
Steel Soldiers Supporter
5,637
380
83
Location
Spring Branch, TX
Thanks Mike.

She told me the invertor and all the cabling was there but I'll check before I tell someone else it's good to go or before I bought it (if I wound up doing that). Like all others the Travel Wrap is toast but since it was buttoned up I couldn't tell if the walkway canopy was any good or not. Since I wasn't ready to say "SOLD" I didn't want to ask to unwrap it. Maybe next week.
 

mkcoen

Well-known member
Steel Soldiers Supporter
5,637
380
83
Location
Spring Branch, TX
Back to work on the tensioning rod hole. I went ahead with riveting the aluminum stock to the trailer roof. I'm more comfortable that it'll last versus just the epoxy.

I cut the piece large enough to allow for the rod hole and also holes for the rivets, drilled it all out on the press, pre-painted the part, riveted it in place, then shot over it one more time to cover the rivets. The paint is still wet in the photo (why it's so shiney) but should dry flat. One down and hopefully just one to go.
 

Attachments

mkcoen

Well-known member
Steel Soldiers Supporter
5,637
380
83
Location
Spring Branch, TX
I have a big event coming up starting Apr 15 (besides my taxes) so thought I better start the PMCS on the MKT. Up to this point I've been concentrating on getting the "Kitchen" portion of the "Kitchen Trailer" cleaned and ready to go but want to make sure I get down the road safely.

While checking the brake air lines I found that one wasn't very flexible. When I tried to flex it more I discovered that it was now TWO lines rather than one. I doubt the "air" portion of the brakes would would work real well in this condition. Now it's off to find a couple of hoses.
 

Attachments

mkcoen

Well-known member
Steel Soldiers Supporter
5,637
380
83
Location
Spring Branch, TX
I thought about trying to find some take-off lines from another trailer but figured most of them wouldn't have been in much better shape than mine. That lead to just making a new set of lines. The hardest part was finding the correct compression fittings. Luckily the local hydraulic line shop had some and we're back in business.

It's easy enough to take these hoses apart. The toughest part of putting them back together is getting the compression collar to seat evenly.

The screws holding the frame hose clamps on were rusted through so I still need to knock them out and replace them to finish up but the hoses are nice and pliable now.
 

Attachments

mkcoen

Well-known member
Steel Soldiers Supporter
5,637
380
83
Location
Spring Branch, TX
Like I said previously, I'm not going to do a complete restoration on this trailer (the frame is pretty rough and I'll save major work on a keeper) but I wanted to dress it up a little bit.

I started by painting the tongue before I put my new data plates on. In keeping with the military I didn't bother to tape anything off just painted around it (at least that's the way we did it in the Army and judging by this former Air Force trailer is the way they did as well). I did avoid my new brake lines simply because I liked that they look new.

Once a couple of layers of Rapco 383 Rattle Can Green CARC went on I added my nice shiney new data plates from mvdataplates.com. David did an OUTSTANDING job on these. One of the things I really like is having MY initials in where the "inspected by" stamp goes.
 

Attachments

mkcoen

Well-known member
Steel Soldiers Supporter
5,637
380
83
Location
Spring Branch, TX
I got the Travel Cover from SCSG-G4 in the mail today. I was able to get 3 sides on before having to take a break and wait for the wife to get home. This is definately a 2 person job if you have any walking issues - feed a couple inches, go to the back, pull, go back to the front and feed a couple inches, etc, etc. What's on looks great and will make it so much more attractive going down the road than a "blue tarp special."

Thanks again Mike!
 

Attachments

mkcoen

Well-known member
Steel Soldiers Supporter
5,637
380
83
Location
Spring Branch, TX
One of the major problems with this trailer is the frame is heavily rusted. It was stationed at Ellington Field in Houston so was exposed to a LOT of moisture. At some point it may seem easier to get another frame and swap the kitchen portion over to it than trying to resolve the issues with this one.

I had intended to get the brakes all in order for the trip Friday but after hooking up the air lines and testing the brakes I discovered the rust issue had made it into the brake lines (fluid lines) as several leaks are now evident.

I have no doubt that I can transport the trailer safely without brakes but I would have preferred they worked. There's not enough time to run new lines before this weekend so it's going to be slow and steady up to Austin and back.
 
Top
AdBlock Detected

We get it, advertisements are annoying!

Sure, ad-blocking software does a great job at blocking ads, but it also blocks useful features of our website like our supporting vendors. Their ads help keep Steel Soldiers going. Please consider disabling your ad blockers for the site. Thanks!

I've Disabled AdBlock
No Thanks