WRMorrison
Member
- 310
- 14
- 18
- Location
- Ramsey, IL
Also forgot to add that I've got some sweet wheel adapters on the way from peashooter; can't wait to get them on!
-WRM
-WRM
Steel Soldiers now has a few new forums, read more about it at: New Munitions Forums!


")


He mentiones them in post 59.So where are those lift blocks going in the front if they're not going between the axle and the spring (which is a BAD idea)? Or are they spring mount relocator blocks?
I'm basically dropping the spring hangers 8" from the frame; I saw another member here (the name escapes me at the moment) who made his own lift and I basically made a copy of his blocks. When I get home this evening, I'll post a link to where I got the inspiration.So where are those lift blocks going in the front if they're not going between the axle and the spring (which is a BAD idea)? Or are they spring mount relocator blocks?
I love this post.I laugh everytime someone asks me how hard it was to bob my 5 ton I tell them its hard to explain, its really simple process made really difficult by the size and weight of everything your working with.As most of you already know, even though most of the work that needs to be done on this project isn't necessarily complicated, it's BIG and generally takes all day to do just about anything. This weekend I was able to flip the rear hubs. Thank Goodness for a sweet air/hydraulic press...
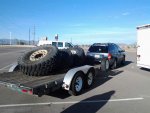
Also, the wheel adapters showed up from peashooter the other day; can't wait 'till it's time to install them! I should have the lift back from welding early this week, so with any luck I can get started installing that next weekend.
-WRM


Forgot about this, but here's where I got the inspiration to make my own lift: Ridgerunner's DeuceI'm basically dropping the spring hangers 8" from the frame; I saw another member here (the name escapes me at the moment) who made his own lift and I basically made a copy of his blocks. When I get home this evening, I'll post a link to where I got the inspiration.