• Steel Soldiers now has a few new forums, read more about it at: New Munitions Forums!
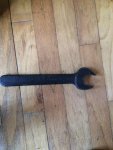
  • Microsoft MSN, Live, Hotmail, Outlook email users may not be receiving emails. We are working to resolve this issue. Please add support@steelsoldiers.com to your trusted contacts.


WSUCougarx's M561 Gama Goat Acquisition and Build Thread

Jericho

Well-known member
1,179
68
48
Location
Landaff NH
Ensure your fuel filters are properly torqued (Can suck air with out leaking) and examine the return fuel line just in side the tub on the drivers side , it is notorious for cracking and leaking usually after shut down , sucking AIR , any of the above can also lose prime and result in excessive start rotation. normal gage for pressure check is ok , they can take test cycle runs. good luck , keep us posted
 

wsucougarx

Well-known member
6,951
65
48
Location
Washington State
Gama Goat Truss Kit and BII Wrench

Well, shoot!! I've been riding the fence on this Rare piece of kit. I justified not buying the Truss kit with the understanding I could just put a spare tire in the carrier. Then I read M38inMaine's outstanding Goat thread and saw he got the remaining parts to complete his kit. Then Jericho chimed in and said " Yes, Ive looked and watched for them for ten years, The price was good considering the scarcity and they were brand new, Not a scratch in the paint ! very quick shipping and LOW shipping cost ." That's all it took for me;-) Then I remembered as a plated "Collector" vehicle in the State of Washington, I cannot have anything like a spare tire in the carrier or I would be "carrying a load" per WSP. The fine would be tonnage plus the loss of the collector plates. Definitely not something I want to risk. (Anyone in WA State with Collector plates, heed this caution!!!!) So, I justified this purchase to keep my plates and not get a hefty fine from the Washington State Patrol. This will postpone my Fuel Pump project for a couple weeks:?. I definitely didn't want this Truss opportunity to turn into one of those pants kicking "I should have...." moments.
Russ was kind of enough to list the Truss Kit on a popular auction site so I could see what was included. Looks like everything is there down to the pin retainer chains.
The pic is what was on the ad. It does include the another set of two Truss Arm components. He just pulled one out of the box. So, one more component to cross off the BII got to have lists.
I also got a NOS Fairmount 1 1/2" Engineers Wrench to go with the Truss Kit
Project Cost:
1) NOS Complete Truss Kit $250+23 shipping
 

Attachments

Last edited:

wsucougarx

Well-known member
6,951
65
48
Location
Washington State
Bus Bar (secondary)

I attempted to get to the bus bar under the radiator to no avail. I'm still wondering why they put it in such an inaccessible area. So rather than mess things up, I placed a request in the classified ad and m38inmaine came through for me! Thanks Mark!! Unfortunately, I didn't have anything to trade but we worked things out. The plan is to install this secondary bus bar on the port side of the tub. The primary reason for this additional bus bar was for the slave cable hookup point. Also, I wanted a way to hookup any 24v accessories for future (no plans as of yet).
So the plan is to assemble a bus bar out of these components and install it to the port side of the tub. Then I'm going to disconnect the positive terminal off the port side battery, pull the cable through the tub, and hook it up to the bus bar. I'm going to fabricate a 3 ft battery cable and run it out the battery from the bus bar. Then hookup the slave cable:).
Project cost:
Bus bar components $35 shipped
 

Attachments

Last edited:

wsucougarx

Well-known member
6,951
65
48
Location
Washington State
Fuel Pump Rebuild Project Part 1 (Disassemble)

Well, as you know I've been having issues with the truck. We have narrowed it down to the fuel system (hopefully). She is acting like she's not getting enough fuel all of a sudden. On the last start up, she idled like a charm. It wasn't until I hit the throttle did she start to sputtered and finally shut down. So before I start tearing into everything fuel related, I am opting to start with the fuel pump oil seals. As mentioned previously, I recollected that during her first start ups at my house, I noticed fuel was on the bellhousing. At that time, I was not versed on what parts were what on the 353. As I recalled, it was dripping from what I now know is the fuel pump.
Today, is a nice relaxing rainy day. Luckily, I've got the Goat put down for the winter in my little two car garage. I first removed the secondary fuel line from the fuel pump to the secondary fuel filter housing. I had a yogurt container and rags on standby to catch the fuel. However, the line was bone dry! Hmm, I moved to remove the primary fuel filter housing to fuel pump and she too was dry. OK, now I am relieved at this point. With all indications, we have a fuel pump issue. OK, time to remove the fuel pump! Rather than replace just the oil seals, we're going to rebuild the whole unit!
I removed the three mounting bolts and she didn't want to budge. So a little rubber mallet was needed to convince the fuel pump to move. I removed the two halves and separated them. I noticed the oil seals were hard as a rock with very little give. OK, now how am I going to remove the oil seals? Buying the DD oil seal removal tool for $40-80 was out of the question! So a little improvising was needed. I grabbed a small socket set extension coupled with a rubber mallet. A few stokes got the outer seal out in one piece. Now the fun part. How in the world am I going to get that inner oil seal out without damaging the housing? I looked around and found a paint can lid removal tool. I inserted the blade portion into the shaft way and gave her a couple blows with the rubber mallet. Bingo she came out in short order. I smelled the inner oil seal and she had a burnt rubber smell of sorts. So the inner oil seal was definitely a contributing factor to the fuel issue.
I perused a popular auction site and found just what I needed!! It is a complete Detroit Diesel 353 Fuel Pump Rebuild kit. Includes absolutely everything you need to rebuild the fuel pump for $50 shipped!!!!!!! Most of the factory DD kits I've found were north of $120. To be continued........
 

Attachments

Last edited:

wsucougarx

Well-known member
6,951
65
48
Location
Washington State
Fuel Pump Rebuild Project Part 3 (Fuel Pressure Gauge)

Since I am in the fuel system, I decided to add a fuel pressure gauge to the system. This is something I have been wanting to do for sometime. A tachometer is still on the project list as well. I saw a Gama Goat with a fuel pressure on the secondary filter housing last year and confirmed what I wanted to do. Since this gauge is going to be mounted on the engine, I opted for a fluid filled gauge to longevity sake. However, the fluid in the gauge will impact the readings as the temperature changes. This will provide a great diagnostic tool for the fuel pump and fuel filter status. I searched all kinds of gauges and came across the Marsh/Bellofram line of gauges. I saw they were a military gauge as well (NSN 6685-01-122-8071) . So that's all it took for me. As you can see, I went with the 0-100 PSI J6448P. It has the correct 1/4 NPT fitting to mount on the secondary fuel filter housing (like many as it is a common fitting). Plus the fitting was located on the backside of gauge as desired. I picked up this NOS gauge on a popular auction site.
Project Cost:
1) Marsh J6448P Fluid Filled Pressure Gauge $14.99 shipped
 

Attachments

Last edited:

Jericho

Well-known member
1,179
68
48
Location
Landaff NH
Am curious to see the results of your pump rebuild, appears to be a classic gerotor pump, They are known for being just about bullet proof, If you have time check the rotor to wall clearance with a feeler gage. Unless play is excessive they usually pump, I assume your changing packings/gaskets and putting in new gears, make sure you check your pump body wall condition, the DD manual has the clearances. am sure already on top of it. last 353 powered skidder fuel problem I had was a scarfed up pump body wall, got some trash in fuel system and it chewed it up , was REALLY OBVIOUS Ie. ( didn't need a feeler gage ) some loggers arnt know for preventive Maint! lol
 

wsucougarx

Well-known member
6,951
65
48
Location
Washington State
Fuel Leak on Return Line to Tank

Am curious to see the results of your pump rebuild, appears to be a classic gerotor pump, They are known for being just about bullet proof, If you have time check the rotor to wall clearance with a feeler gage. Unless play is excessive they usually pump, I assume your changing packings/gaskets and putting in new gears, make sure you check your pump body wall condition, the DD manual has the clearances. am sure already on top of it. last 353 powered skidder fuel problem I had was a scarfed up pump body wall, got some trash in fuel system and it chewed it up , was REALLY OBVIOUS Ie. ( didn't need a feeler gage ) some loggers arnt know for preventive Maint! lol
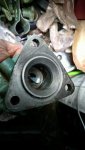
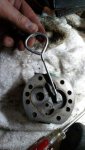
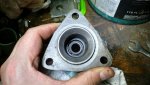
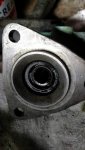
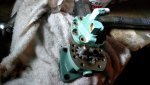
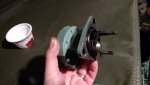
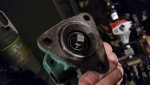
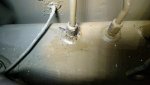
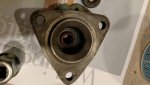
Yes sir, replacing everything including the gasket. I followed each fuel line and tightened the fittings that needed attention. I found only one problematic area so far. It was the fuel return line fitting to the fuel tank. There was a small wet spot around the fitting. I only saw it after removing the battery tray. Would that put air in the fuel system? Not sure if the fuel return terminates just below the fuel tank fitting or extends down below the fuel level.
 

Attachments

Last edited:

Jericho

Well-known member
1,179
68
48
Location
Landaff NH
I doubt it would cause the problem your describing, I had a little leak on the return line on the right hand tank for about a year , just enough to bug me, It would start hard if you let it set for a number of hours, Ie I would have to crank and crank and crank , would count to 25 slowly, then wit , then crank again and count to 25 slowly, when it started it would run fie, The leak let the pressure preload leak down and the fuel would soak back , so there was little crack pressure on the injector , until I cranked it and the fuel pump boosted it back up. R 2 ed the line and the problem was solved. I would be curious to see what your crack pressure is at the injector, If you find your Fuel system is all A-ok I would look at 2. Rack adjustment,can be a factor, the best rack set up I have seen was done by Mark ,M38 in maine, he hit his spot on, starts and runs like a dream, its easy enough to check , just not so easy for some to do, I do know he has considerable mait experience and he followed the T.O. (T.D.)to a T. but it really sounds sweet! ( mine runs fine, but his starts better,)
 

Jericho

Well-known member
1,179
68
48
Location
Landaff NH
Just a thought , do you have a one way check valve installed in line in your fuel line, Not all goats do, it was a late TCTO , not long before they got rid of them and not all were done , I have noticed they didn't seem to get through TCTOs as quickly on Goats as they did on other trucks. just a postscript, Have you done a daily drain on your tanks Any BAD diesel Ie water, in your area, , if so drain tanks until they run clear diesel. dose with diesel treatment and I always run I qt of Marvel mystery oil to a full tank Works for me,
 
Last edited:

m38inmaine

Well-known member
2,090
45
48
Location
Maine USA
I also would spend some time making sure the pickup tube in the tank is clear. According to an article I have in my archives the tube has no filter on the end and sits about 1/2" above the bottom of the tank. Depending on how clean/dirty your tank is it may be clogged. In the article they ended up cutting out the original tube and replacing it. I know mine took a lot of work to get it clean, I spent a lot of time on it as it is welded in the tank making it more difficult to clean. To compound the issue the pickup tube is behind the baffle in the tank making it impossible to reach. I would disconnect the line from the top of the tank and rig a short length of tube and attach an outboard motor fuel line with primer bulb and see how much flow you can achieve. Also check to see if there was any dirt in the pressure relief valve that was in your fuel pump.
 

Jericho

Well-known member
1,179
68
48
Location
Landaff NH
Good suggestion ! Try a little blast of air 2 to 3 psi down the DONT LEAVE THE TANK CAP ON, and watch out for back spray , you should hear bubbles and feel air exiting the tank fill
 

wsucougarx

Well-known member
6,951
65
48
Location
Washington State
BII Truss Kit

I forgot to post pics of the truss kit after I received it. Man, this kit is too nice looking to throw into one bag. Don't want to mess up the paint job. So, I'm going to put everything in three bags. Going to hang the document bag on the back of the passenger seat and have the remaining parts bags under the passenger seat.
 

Attachments

Last edited:

wsucougarx

Well-known member
6,951
65
48
Location
Washington State
Fuel Pump Rebuild Project Part 4 (Reassemble-Oil Seals)

Got the DD Fuel Pump Rebuild kit today. Was a bit disappointed to find the seller forgot to enclose the fuel pump housing gasket. I setup up my wife's kitchen counter as the assembly work bench while I watched my kids. I used a spark socket to gently place the oil seals into place. Before I inserted the gears, I put some assembly oil in there for the initial startup to prevent friction issues. No sense burning up my newly place oil seals right off the bat. I didn't have time to completely put the fuel pump together. I'll get back to that over the weekend.
 

Attachments

Last edited:

Another Ahab

Well-known member
17,826
4,161
113
Location
Alexandria, VA
Got the DD Fuel Pump Rebuild kit today. Was a bit disappointed to find the seller forgot to enclose the fuel pump housing gasket. I setup up my wife's kitchen counter as the assembly work bench while I watched my kids. I used a spark socket to gently place the oil seals into place
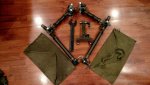
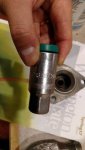
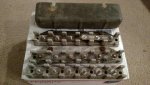
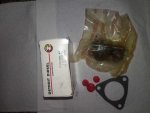
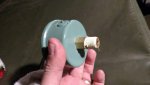
Nothing more frustrating than waiting for the package of parts, getting all fired up to see it at the door, and be ready to put it all to work only to find that your missing ONE critical little part. Man, that's the worst; survivable, but no fun. :burn:aua
 
Top
AdBlock Detected

We get it, advertisements are annoying!

Sure, ad-blocking software does a great job at blocking ads, but it also blocks useful features of our website like our supporting vendors. Their ads help keep Steel Soldiers going. Please consider disabling your ad blockers for the site. Thanks!

I've Disabled AdBlock
No Thanks