• Steel Soldiers now has a few new forums, read more about it at: New Munitions Forums!

  • Microsoft MSN, Live, Hotmail, Outlook email users may not be receiving emails. We are working to resolve this issue. Please add support@steelsoldiers.com to your trusted contacts.


WSUCougarx's M561 Gama Goat Acquisition and Build Thread

Amer-team

Well-known member
1,706
28
48
Location
Centralia/WA
Mike, if you need to go that way, there is a place in Chehalis, Industrial specialties, 360-748-0247. They make hoses and tubing and can make just about anything you need. I had them make the air line off the compressor in the M54, just a bit over 6 feet long, stainless braid with kevlar lining. It was a bit pricey, but will never have to be done again in my lifetime.
 

wsucougarx

Well-known member
6,951
65
48
Location
Washington State
Armored Dome Light and Passenger Dash Grab Handle

Had a couple boxes dropped off today to help accessorize my cab. I've been wanting some sort of interior light and grab handle for the passenger side. I looked and I looked and came across of pic on the internet of exactly what I wanted. I am not going to put my light and grab bar in the same location but it helps show what I was after. Somewhere in the area, I am also going to mount a C-2299 and C-2742 boxes.
I bought a NOS M151A2 Dash Grab Handle (Safety Bar) NSN: 2540-01-038-8295 P/N:11598950 for $26.84 Shipped
I also bought NOS Armored Vehicle Dome Light FSN 6220-7354524 P/N:MS-51073-1 for $53.30 Shipped.
I didn't want to pay that much for the dome light but have been unable to find a unit with a red lens. I've got a couple of blue lensed dome lights in the garage but really wanted the red one. It was a bonus to actually find on in NOS condition. Is there a reason why there are so many blue/white dome lights as compared to the red/white dome lights?
Project Cost:
1) M151A2 Safety Handle $26.84 shipped
2) Armored Vehicle Dome Light $53.30 shipped
 

Attachments

Last edited:

wsucougarx

Well-known member
6,951
65
48
Location
Washington State
Bumper Auxillary Driving Lights and IR Lights

I wasn't going to do this project but I had these four NOS lights hanging around the garage. I decided to put them to use and mount them to the Gama Goat's bumper. I thought about mounting them higher but found the aluminum panels would probably be too thin to hold the jarring weight of these lights. I simply used four "L" brackets from The Home Depot electrical section where all the conduit is sold. They were about $1.79/bracket. I like these brackets because they are readily available, tough, and somewhat inexpensive. However, they are non-USGI and kills me to use something that was not originally equipped with these trucks. I haven't seen these light mounted on a Goat either. So, this will be a first;-) This truck also came with one LED headlight and one incandescent headlight. Probably going to swap out the LED for a regular headlight.
Project Cost:
1) Light Brackets (THD): $7.16
2) USGI IR Lights $50/pair
3) USGI Aux Lights $50/pair
 

Attachments

Last edited:

wsucougarx

Well-known member
6,951
65
48
Location
Washington State
M561 Steering Column, Air Filter, & Misc M561 Parts Lot

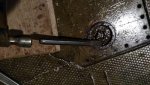
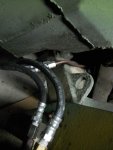
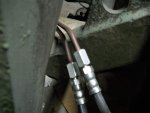
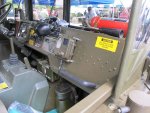
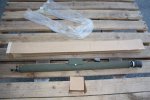
I was draining my steering box out last week. I decided to spin the steering wheel from one side to the other to get any stubborn fluid out of the box. Upon doing so, I noticed there an audible grinding in the steering column. It was a sound like metal to metal sound from being used too long or something. I also noticed the horn was inop. I figured a new steering column was in order.
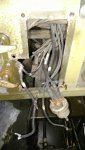
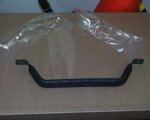
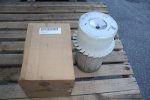
The air filter in the Goat was OK and probably has a few 1,000 miles left in her. But figured since there was an air filter to be had for $15, I might as well snatch that up as well. I bought both items from TNJ Murray thru E***.
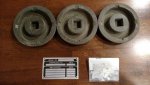
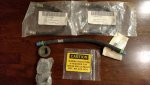
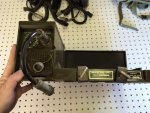
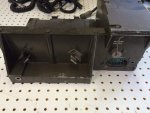
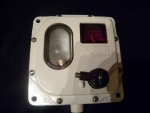
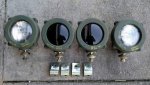
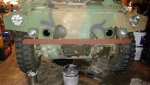
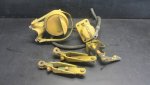
While buying the two items, I noticed a misc parts lot being sold off the right of the screen. The blackout light was a dead giveaway. I contacted the seller of the items and found out it was the same guy I bought my Gama Goat through. I snatched up the misc M561 parts lot as well.
Project Cost:
1) NOS M561 Steering Column w/horn parts $51.17 Shipped
2) NOS M561 Air Filter $34.24 Shipped
3) M561 Misc Parts (Blackout Light w/mount, Slave Cable Plug, Mirror Arm Mount w/U bracket, Rifle Forearm Mount) $36.50 Shipped
 

Attachments

wsucougarx

Well-known member
6,951
65
48
Location
Washington State
I will definitely keep Mark in mind should I get rid of the blackout light. Presently I do have plans to mount it to have dual blackouts. I've tried driving with one blackout and wasn't sure it was even on (it was on, but old eyes have troubles seeing).
2,387
 
Last edited:

wsucougarx

Well-known member
6,951
65
48
Location
Washington State
Rear Steering Box Access Cover Battle

Well, over the weekend I remembered I hadn't drained the rear steering box. So to get a better look at what I had I decided it would be a good idea to remove the large panel in the carrier. Well, the good thing about this project was the idea. I'm not sure if that panel was ever removed during it's life since 1971. Those screws were rusted shut and wouldn't budge. I had initially soaked the entire area with Zeps Penetrating oil about two months ago. I figured that would have been enough time for that oil to get deep down into the threads. Well, I was wrong. I managed to get all but 6 screws out. The last remaining 6 screws were all free spinning. Apparently they were so seized, the darn nutsert that they sat in broke and thus causing the free spin. So with this defeat, I attemped to remove the filler hole access plug....hahahaha. Yah, that turned out be the second battle in this little war. Again, the threads were seized once again. I tapped and beated the panel and plug to try and get things loose...didn't work. Then I had the great idea of using my big impact tool for the job....big mistake. In a matter of a couple seconds, the impact wrench had broken 2 out of the 4 sides in the square socket on the plug. Now what I thought. Well, I reached into my tool bag and grabbed my big chisel tool. I lodged it the plug and just started to whack the heck out of it. Luckily it worked!!! I drained the gear oil and found it was probably the original gear oil. It was OLD!!!! It was thick like maple syrup on a cold winter day and was about the same color. The smell was OLD as well.
I was originally going to put John Deere Cornhead grease in there but I think I'll cycle some fresh gear oil through the box to get the old stuff out first. A big thanks to Quarkz for giving me three tubes of this grease!!
 

Attachments

Last edited:

wsucougarx

Well-known member
6,951
65
48
Location
Washington State
Side Mirrors and dash dismantling

I finally got some time to put my side mirrors on the truck. I got the adjustable mirror arms from Eastern Surplus. I got the mirror arm bracket from the guy I bought the Goat from (Shawn). I got the mirrors off ebay.
I continued dismantling my dash. I noticed the rotary switch was a meal to some kind of rodent as had been chewed on pretty good. Luckily I have a huge box full of these switches for this project. I also plan on replacing all electrical switches as well.
 

Attachments

wsucougarx

Well-known member
6,951
65
48
Location
Washington State
Tractor Drain Plugs

After many searches for weeks on end I finally found a source for the ever elusive drain plugs for the tractor unit. TNJ Murray had exactly what I needed. I bought a few of the wire band labels for future projects. As well as a data plate to keep track of the MWO's I do on this M561. The drain plugs P/N: 11594513 were $35 each. The data plate was $10 and the wire labels were #5/$1. Pretty good score!!!
Tonight I held my breath when I went out to test out the plugs. To my relief the plugs went on no problem. I was hoping that no one had cross-threaded the plugs in the previous life of this Goat....whew!!!!!!!
Project Cost:
1) Drain Plugs x3 at $35/each
2) Overhaul/MWO dataplate $10
3) Band Wire M-series $5/#25 labels
4) Misc Ground wire $5
 

Attachments

Last edited:

wsucougarx

Well-known member
6,951
65
48
Location
Washington State
Coolant Hose, Air Hose, Brake Drum Plug, Hearing Protection Sticker

Got a few things from Equipment Part Sales off E***. Everything I bought had a 10% off deal going on. I didn't quite need these items but figured I'll eventually need them. So why not buy them when I can save a couple bucks. I got a couple Carrier Air hoses (NSN:4720-00-880-4108), Radiator Cooling Hose Line (NSN: 4720-00-823-7127), couple Caution Hearing Protection Decal (7690-00-510-0365), and three brake drum plugs (5365-00-497-9648). Total was $65.80 shipped. Though the hoses were manuf in the '80's, they were in great shape. Sure beats what's presently mounted on the Goat.
Project Cost:
1) Carrier Air Hose $13.05 each
2) Radiator Cooling Hose $13.05 each
3) Caution Hearing Protection Decal $7.20/2 decals
4) Brake Drum Plug $9.45/3 plugs
 

Attachments

Last edited:

wsucougarx

Well-known member
6,951
65
48
Location
Washington State
Brake Master Cylinder Fluid Inspection

Today, I decided to crack open the master cylinder to see what I had. I really had no reason to as this truck stops on a dime and seems to be good to go. Upon opening the lid, I was a bit surprised at what I found. I saw a nice bilayer of fluid with junk in the middle. Hmmm, what do we have here? We obviously have two fluids that don't mix well with each other. Now the question is what do we have? I got the turkey baster out to suction off some fluid. I got a couple dosing cups to separate out the fluid. The top layer was clear yellow and the bottom was a cloudy brownish maroon colored fluid. One thing that came to mind was some yahoo mixed DOT-3 with DOT-5 but which layer was which. I didn't see any yellow military BFS decals anywhere near the master cylinder nor on the plate that cover the compartment. So I assume the military didn't convert this truck over to DOT-5. But who knows.
I got another set of dosing cups and added about 5 ml's of water to each one. I slowly added the mystery fluids to see what I had. The brownish maroon fluid mixed right away with the water. Whereas the clear yellow did not and the separation of water droplets was evident. So it appears the lower brownish fluid is DOT-3 and the top clear yellow is DOT-5. Now, the next question is how much, if any, of the DOT-5 made it into the brake lines? As you know, DOT-3 and DOT-5 don't mix well with each and can clog the brake lines. So it appears the unknown factor is there. My next task is to replace the master cylinder with a fresh once as well as the brake cylinders at each hub. Before putting the new stuff on, I'm going to run some pressurized air through the lines to clear them out. Followed by some rubbing alcohol to further clear out the lines followed again by pressurized air. I'll need to order a new master cylinder first before I tackle all this. Though more expensive, I am going to run DOT-5 through this truck. I like having a hydrophobic brake fluid in a truck that will not be driven as much as it should. Especially when I live in the rainy PNW.
2.674
 

Attachments

Last edited:

Amer-team

Well-known member
1,706
28
48
Location
Centralia/WA
Good testing procedure. Other than an unhappy mixture of fluids, the MC looks pretty good in side. Doesn't look like replacement time to me. If your system purge goes well, when clean, fill it up and go with it. But it never hurts to check the wheel cylinders for rust.
 

wsucougarx

Well-known member
6,951
65
48
Location
Washington State
Am-2060

Slowly accumulating VRC-12/VIC-1 equipment and Gama Goat parts. Today I received a piece that I've been looking for. Been looking off/on for about 2 years now. The price of these units seem to hover north of $200 whenever I got really seriously about searching. I saw this unit and planned on just watching it to see what the market was on it. So last Tuesday, I knew the ad on E*** was going to end that afternoon. The plan was to watch the countdown and watch the crazy bidding at the end. So earlier in the day, I decided to take my M35A2C to my in laws to stretch the trucks legs out. I was in town for a good 2 hours and decided to swing by my kids school to pick them up in style. The truck did get some attention with the kids. I got home and backed the truck into her stall. After shutting down the truck I walked to the back of the truck. At that time, I then remembered I was going to watch the closing bidding. I got the ole smart phone out and pulled up the auction. To my surprise, I opened up the item with 12 remaining seconds left. The bid held firm at $100. I threw down a bid of $105 with 2 remaining seconds (didn't try to snipe, it was all the time I had to bid). Then boom! I ended up winning it for $103.61+44.40 shipping.
This AM-2060 is in outstanding shape. Looks like she was overhauled/rebuild by Tobyhanna and hardly used after that. I do plan on buying a PRC-77 to go with this setup and have an RT-246a/VRC right next to her in the carrier.
These are actually the E*** pics on the ad. She is actually cleaner than what you see in the pics. Once I start installing the gear, I'll post more pics of what I have and how I'm installing each component. I decided not to go the S-250 route. I want the space in the carrier for the family to have fun in. Plus I'd like to keep the space open to show off the radio equipment for shows.
2,817
 

Attachments

Last edited:
Top
AdBlock Detected

We get it, advertisements are annoying!

Sure, ad-blocking software does a great job at blocking ads, but it also blocks useful features of our website like our supporting vendors. Their ads help keep Steel Soldiers going. Please consider disabling your ad blockers for the site. Thanks!

I've Disabled AdBlock
No Thanks