• Steel Soldiers now has a few new forums, read more about it at: New Munitions Forums!
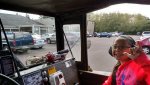
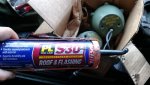
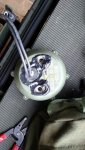
  • Microsoft MSN, Live, Hotmail, Outlook email users may not be receiving emails. We are working to resolve this issue. Please add support@steelsoldiers.com to your trusted contacts.


WSUCougarx's M561 Gama Goat Acquisition and Build Thread

Gamagoat1

Active member
745
43
28
Location
Kiowa, Colorado
After cleaning out the engine bay of oil, pine needles, and grime, I was convinced quickly that all that air box drainage needs to go somewhere other than the engine bay. I looked around the garage and found two brass fittings and a metal container that onced had denatured alcohol in it. I just repurposed the container to catch all the oily 353 drippings. It fits perfectly between the bulkhead and steering shaft tunnel.
Do the same for the air box drain.
 

wsucougarx

Well-known member
6,951
65
48
Location
Washington State
Rear Blackout Lights and Rear Carrier Antenna Mounts

Tonight I squeezed in an hour of work on the ole girl. My NOS black out lights came in. I found this pair on e*** for $70 shipped for both. I also finally mounted the rear carrier antenna mounts. I made sure I sealed the bolt holes with caulking to make sure she was watertight.
 

Attachments

wsucougarx

Well-known member
6,951
65
48
Location
Washington State
Stencils stencils

Just finishing up my last stencil for this project. I printed my stencils on cardstock and painstakingly cut each and everyone out by hand using an X-acto knife. Thanks for the offer on the stencil machine Peter. I did the stencils in my downtime here and there. I'll post pics of all the stenciling on the Goat when I'm completed. I've got a bit of writer's cramp at the moment.
So if anyone's interested. I bought the thick cardstock at Walmart. Printed off the stencil from the computer. I then used packing tape to "laminate" both sides of the cardstock. The reason is as soon as you start painting, the cardstock will absorb the paint and start to curl on you. I plan on stowing these stencils for touch up later on down the road. I'm using just regular Rustoleum Flat Black rattle can. If spraying over Behr paint, you must make sure you "rinse" the Behr paint to get the soapy stuff off first. If you don't then your stenciling will appear semi-gloss to gloss in appearance. Just a little tidbit from lessons learned.
 

Attachments

Last edited:

wsucougarx

Well-known member
6,951
65
48
Location
Washington State
Fuel neck gasket and ABC-M11

This Goat came with the ABC-M11 bracket mounted to the port side of the Goat. However the way it's mounted, the fuel level sending unit impedes the bottle from seating in the bracket. So I installed another mount on the fender. I also mount two footman straps to the fender to strap down gear and a PRC-77 radio. This would serve as a temporary mount of any. Saw a pic where this was done so why not.
Also, when i was going through this truck, I found that the fuel tank filler neck gasket was cracked and hard as a rock. I put it on the back of my mind to replace the gasket. When I was perusing E*** I saw that Saturn Surplus had some for sale. They are much thicker than the ones they replaced.
 

Attachments

m38inmaine

Well-known member
2,090
45
48
Location
Maine USA
That location above the fuel tank is the correct location for the M11, although it is tight as you say. Be careful on that fender mounted one, don't catch your shoe on it and take a header! Actual footage of Operation Urgent Fury shows the MERDC painted goat with a yellow bridge plate. Stencils look good, that took a lot of work.
 

Attachments

wsucougarx

Well-known member
6,951
65
48
Location
Washington State
I actually bought a NOS yellow bridge plate for this truck but it just didn't look right. The M11 on my truck was definitely mounted way too low. They even bent the cantilever on the strap so it couldn't be used. I've seen several Goats with the bottle mounted on the fender so that's why I went that route. I was going to remount the existing mount higher but didn't want to punch anymore holes in the tub.

Sent from my XT1254 using Tapatalk
 

Amer-team

Well-known member
1,706
28
48
Location
Centralia/WA
The stencils look good, but you are a glutton for punishment. The 1/2 inch machine was made in 1915 and last weekend at the McChord Airshow, the kids probably punched out over a hundred names with it. The 1" machine is a 1914 with a Marine Corp inventory tag on it. I use cereal boxes for card stock but do have some of the waxed paper that was used. The cereal boxes last for awhile and to avoid any high spots or to contour better, use small magnets to help hold the stencil tight to the work, plus push it firm and use painters tape to help hold it down, before you mask around so you don't get overspray. I can put up to four lines on one piece with the 1/2 and 3 lines with the 1".
 

mkcoen

Well-known member
Steel Soldiers Supporter
5,637
380
83
Location
Spring Branch, TX
The cereal boxes last for awhile and to avoid any high spots or to contour better, use small magnets to help hold the stencil tight to the work, plus push it firm and use painters tape to help hold it down, before you mask around so you don't get overspray. I can put up to four lines on one piece with the 1/2 and 3 lines with the 1".
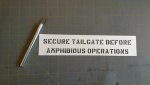
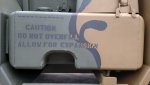
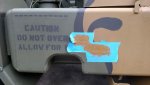
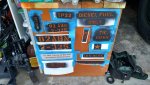
Good advice but most of Mike's vehicle (other than the fuel tank and tailgate) is aluminum so the magnets don't work so good :)
 

m38inmaine

Well-known member
2,090
45
48
Location
Maine USA
I have a 3 ring binder from a retired motor pool mechanic who was a big fan of the Goat. It contains every PS magazine article ever published on the goat, also every known article published in the various military vehicle magazines. My plan is to publish a goat book with them. Must be 200+ tips on Goat repairs, would be lost without it, it's the definitive guide to what's right. I did not have the book when Mark had his project underway, got it shortly after I started mine. This is how I found the information on the correct location to mount the bridge plate. Notice that PS magazine also shows a yellow plate on a MERDC painted goat.
 

Attachments

Last edited:

wsucougarx

Well-known member
6,951
65
48
Location
Washington State
The plan is to road test her today on the highway to church. My daughter said she feels left out for not having been out in the Goat. So I'll make an AAR.

Sent from my XT1254 using Tapatalk
 

wsucougarx

Well-known member
6,951
65
48
Location
Washington State
It also shows a yellow fuel tank on a MERDC truck....:) 
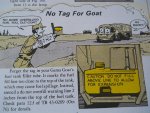
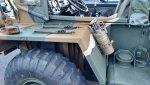
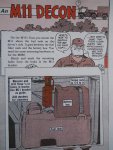
Thoughout the PS Magazine they highlight the part they are talking about. Though PS Magazine shows what is "right". They didn't address the several mods done on the M561 while at the unit level. I knew the "right" bridgeplate location but opted for the location I found in a pic. I wanted that bridgeplate as far away from center for a future project. I also went for the IR lights, again with a pic I saw. I was really only wanting to mount the driving lights but thought the IR lights would add that cool tactical look.
 

Another Ahab

Well-known member
17,825
4,157
113
Location
Alexandria, VA
I have a 3 ring binder from a retired motor pool mechanic who was a big fan of the Goat. It contains every PS magazine article ever published on the goat, also every known article published in the various military vehicle magazines. My plan is to publish a goat book with them. Must be 200+ tips on Goat repairs, would be lost without it, it's the definitive guide to what's right. I did not have the book when Mark had his project underway, got it shortly after I started mine. This is how I found the information on the correct location to mount the bridge plate. Notice that PS magazine also shows a yellow plate on a MERDC painted goat.
That is a killer resource you have there.

You know with self-publishing operations "out there" there might be more than a few people interested in copies of your book, to use on their own.

If you took a poll and added a little mark-up to make it worth your while, that might just be a win-win project for the Goat Herd. Who knows?
 

wsucougarx

Well-known member
6,951
65
48
Location
Washington State
Highway Road Test...success!

As the title suggests, I took the ole Goat out on her first highway road test. Being Sunday, naturally I had to take her to church. The video below is from church to home. On my way to church, she did get up to 60mph +. However pulling hills was a different story. She bogged down to 40mph in third gear. She held steady on the inclines. Once levelled out, she took off again. I had absolutely no issues. She did outstanding!!
The pic below shows hub temps and dash readings after shut down.
https://youtu.be/70PCWNQrlqY
 

Attachments

Another Ahab

Well-known member
17,825
4,157
113
Location
Alexandria, VA
She sure does sound s-w-e-e-t!

And your Soldier B looks plenty on-the-ball, too. A salute to the two of you for a fine post of the old Goat. [thumbzup]
 
Last edited:
Top
AdBlock Detected

We get it, advertisements are annoying!

Sure, ad-blocking software does a great job at blocking ads, but it also blocks useful features of our website like our supporting vendors. Their ads help keep Steel Soldiers going. Please consider disabling your ad blockers for the site. Thanks!

I've Disabled AdBlock
No Thanks