• Steel Soldiers now has a few new forums, read more about it at: New Munitions Forums!

  • Microsoft MSN, Live, Hotmail, Outlook email users may not be receiving emails. We are working to resolve this issue. Please add support@steelsoldiers.com to your trusted contacts.


WSUCougarx's M561 Gama Goat Acquisition and Build Thread

wsucougarx

Well-known member
6,951
65
48
Location
Washington State
Highway Road Test...success! From my 6

My wife provided chase to record the smoke signature if any. Let's me know the status of the engine. She smoked at first but it dissipated once she was warmed up and on the road. Turn down the volume as you'll hear the 4 year gold's music video.
https://youtu.be/xA4LXvEAcO8
 

wsucougarx

Well-known member
6,951
65
48
Location
Washington State
I have a 3 ring binder from a retired motor pool mechanic who was a big fan of the Goat. It contains every PS magazine article ever published on the goat, also every known article published in the various military vehicle magazines. My plan is to publish a goat book with them. Must be 200+ tips on Goat repairs, would be lost without it, it's the definitive guide to what's right. I did not have the book when Mark had his project underway, got it shortly after I started mine. This is how I found the information on the correct location to mount the bridge plate. Notice that PS magazine also shows a yellow plate on a MERDC painted goat.
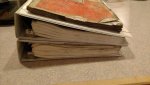
Hope this helps. You'll also have to remember there were still CARC'd M35A2's with yellow bridge plates. Though there was a 1976 PS Magazine article addressing getting rid of the yellow bridge plates, they still existed. So in regard with this, having a subdued Forest Green bridge plates is "right":)
 

Attachments

Last edited:

Amer-team

Well-known member
1,706
28
48
Location
Centralia/WA
That is an interesting historical sidenote. My 68 M54 was brush painted CARC woodland camo and it had a yellow bridge plate in the grill and the one on the right door had been obliterated. This was an original truck. It probably went out of service sometime in the late 90's. It did go to Desert Storm.
 

combat32

Well-known member
1,639
106
63
Location
Booneville AR.
I don't remember bridge plates even being discussed much during my time in the Army.

Saw some old ones still around up to the early 90's but usually on old trucks.

They didn't survive well in combat arms units, too easy to get torn off in the field. Usually only still survived on vehicles that were motor pool queens, it was certainly not a priority in the units I was in, parts money was spent on keeping vehicles operational, shoot, move, communicate.

Personally I think either would be correct, as most vehicles didn't have one at all.
 

dodgedougak

New member
Steel Soldiers Supporter
419
0
0
Location
Joseph, OR
I have worked on a lot of Detroit's. They tend to smoke when cold, especially if they have a few miles on them. It usually cleans up when they warm up. Try a block heater if you can. Plug it in for a couple of hours before start-up. It might keep the neighbors off your case.
 
150
12
18
Location
BNE, Oz
My wife provided chase to record the smoke signature if any. Let's me know the status of the engine. She smoked at first but it dissipated once she was warmed up and on the road. Turn down the volume as you'll hear the 4 year gold's music video.
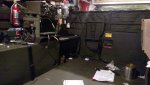
Looks like she sits well on the road, what sort of speed did you get to on the 55 stretch?
Also notice you have blinker functionality, is this with the solid state unit installed or was it standard function, mine seems to be a solid light up only.

Spock
 

wsucougarx

Well-known member
6,951
65
48
Location
Washington State
She was going 60+ plus on the stretch. I swapped the blinker out for a solid state one. I didn't even give the stock blinker unit a try. I figured while I had everything ripped out, it was a good time to replace it.

Sent from my XT1254 using Tapatalk
 

wsucougarx

Well-known member
6,951
65
48
Location
Washington State
Detroit Diesel Manuals

Got a nice surprise from a co worker today. Her husband retired from Weyerhauser a few years ago. His job was diesel mechanic and fix it guy for all the equipment in the yard. Well, he accumulated a number of manuals throughout his 30+ years. Now that he's retired, he has no need for the plethora of manuals. So last week she asked me what my recent project was and if this project had an engine. So I told her and then she brings in these three manuals and asked what else I had:)
 

Attachments

wsucougarx

Well-known member
6,951
65
48
Location
Washington State
Small Victories...Lug Wrench!!

In my quest to find and procure parts, any parts found is a small victory with these trucks. I haven't perused the internet for a week or so. Today I decided to check and finally found a lug wrench for the ole Goat. Got this rusty thing for $12. With a little sanding and scrubbing, I think she'll clean up well.
Also, VRC12/VIC-1 Install is now underway. Pics to follow when she's done.
 

Attachments

wsucougarx

Well-known member
6,951
65
48
Location
Washington State
Gama Goat Trip Anniversary

Well without anything really to report on, I remembered today marks the 1 year anniversary on our journey to pick up this truck from Great Falls, MT. Now, I'm not one of those date remembering emotional cats. Today, I celebrate another day of significance and reminded my son of our trip last year. I've been working on a in-cab rack mount for my VIC-1. I show picks when I get her completed.
 

Jericho

Well-known member
1,179
68
48
Location
Landaff NH
have you looked at the TM 11-2300-475-13 and P-4 its mostly install in the carrier, dated sept87 for an AN/GRC 193-A set up.
 

wsucougarx

Well-known member
6,951
65
48
Location
Washington State
Winch Installation

This afternoon I got started on my winch installation. I started the arduous job of stripping the once completed cab. I removed the seats, doghouse, and an air duct panel from the passenger side.
First order of business was installing the PTO. It was a bit of a contortionist job. You've got to straddle over the tranny and transfer case as you shimmy the PTO into place. Naturally it had to get hung up on the plethora of cables and linkages. The only issue I ran into, with regard to the PTO install, was the instructions called for reusing the bolts from the removed flange. Well the top two corner bolts didn't fit. They were too long. Luckily I found a couple bolts that were short enough to fit. Before I mounted the PTO, I added some Lucas Oil Stabilizer to the unit to add some lubrication.
The winch shaft was yet another contortionist job. Once you get the shaft seated into the PTO, you've got to get real low to install the shear pin. As well as installing the winch driveshaft seal, and bolt. There's nothing like getting down low and crammed under the dash only to have a hamstring and calf cramp.
Next, rather than following the gov't instructions of using a bunch of said measurements from the front tow hook center to the top of this that and the other. I thought I'd simplify things and just put the 2" hole dead center in the reinforced 3" collar. I simply printed off a 2.75" circle cut it out, found the center, cut out small center, and used it to mark the dead center with a pencil. I drilled a pilot hole and used my 2" carbide tip metal drill bit and went to town.
 

Attachments

Last edited:
Top
AdBlock Detected

We get it, advertisements are annoying!

Sure, ad-blocking software does a great job at blocking ads, but it also blocks useful features of our website like our supporting vendors. Their ads help keep Steel Soldiers going. Please consider disabling your ad blockers for the site. Thanks!

I've Disabled AdBlock
No Thanks