2ndchance
New member
- 55
- 1
- 0
- Location
- Glendale, AZ
Let me start off by saying that this site is a fantastic resource and you are all a great bunch of folks! I've been on here for awhile now, gathering data and prepping my rebuild.
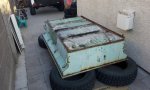
The restoration continues. I thought I would take a moment to share some of my parts finds and give a little insight[/U][/I].
Parts Located
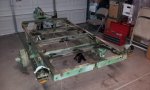
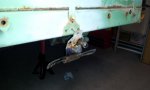
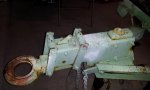
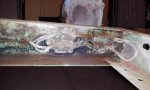
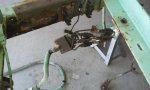
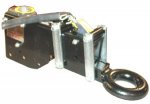
Surge Brake:
I found that the master cylinder from "53-64 CJ-3B" can work. I found it at Kaiser Willys (Part #805223) for $50.00. The surge brake system on mine is made by Toledo Hydro-Act and is still currently in production. Their replacement cost is $130. The one I received from Kaiser Willys was perfect. One thing though.. they painted it, then machined it. All the machined areas are NOT rust proofed. You will need to paint the master cylinder prior to install. Rustoleum spray paint is your friend.")
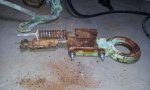
Surge Brake Dampener Shock:
The only place I've been able to find a replacement for these are with Toledo Hydro-Act. I found that eTrailer.com sells them for $61.00 (Part #1844-2). Worked like a charm. CroftTrailer.Com had a better price. I found it after my build.
As mentioned in other posts. Replacement nylon pivot bushings for the surge is also a Toledo Hydro-Act part. eTrailer.com sells them for $5.09 each ( Part #1745). eTrailer has a good selection of parts for the Toledo Hydro-Act surge system. CroftTrailer.com also had these, at a cheaper price.
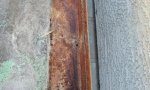
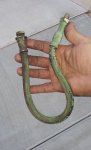
Leaf Spring C-Shackles:
I think we all know now that the one of the rear shackles has a right-hand loosy, instead of the common left-hand loosy. Not much info out there so I will state it here. The REAR-RIGHT shackle is a Right-hand loosy (just the one that holds the leaf spring). Mine took some damage and the rubber bushings were destroyed. I found that Kaiser Willy sold them for $13.00 each. You'll have to order a passenger AND driver side (Part #: 802062 and 802061). Again, from a "53-64 CJ-3B". These ended up being slightly taller, but not by much. That's not a bad thing... It improved my ground clearance by 1/2". Remember, the REAR-RIGHT is the Right-hand loosy. Ignore what the package tells you.
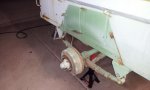
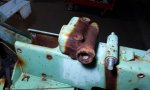
Race, Bearings, Oil Seal:
Originally I had listed the races, bearings and oil seal for a M416. Later I learned that they are NOT the same for the M416A1. M416A1 has a tapered spindle, where the M416 is a straight one. Basically, the inner is larger than the outer, where the M416 are the same. The correct numbers are:
larger inner: bearing #L68149 and race #L68111.
smaller outer: bearing #L44649 and race #L44610.
The oil seal is standard. You can get a complete kit at eTrailer.com for $12.00 per side. Stock # BK2-100. It's a bearing kit for a #84 type spindle. The nut washer they provide may not fit, so reuse yours.
I want to mention something about grease. You could use the standard grease that is out there. I chose to use a Marine Grade grease. The M416s are designed to float if you have less than 500lbs of cargo. With Marine Grade grease, you can feel more comfortable in taking your trailer across rivers, streams, or go float in the deep blue sea. The grease helps to repel the water better than regular bearing grease. I applied this grease onto every Zerk fitting on this trailer. Checker Auto, O'Riley's, NAPA.. they all carry it. O'Riley's was the cheapest.
Shocks:
Already mentioned. Napa (Part #RR 9403") is a good value @ $17.67 each. I'm going to start with these. If my trails get really rough, I may switch to one with a coil over the shock. As of right now, $75/shock is a bit expensive.
is a good value @ $17.67 each. I'm going to start with these. If my trails get really rough, I may switch to one with a coil over the shock. As of right now, $75/shock is a bit expensive.
The new shocks have a thicker bushing on both ends of the shock. I struggled to get them on. At the end, I replaced the original washers with some thinner ones I found at Home Depot. I also replaced the cotter pins with longer ones. The thinner washers helped, but it was still impossible to get the cotter pins in without help. Here's my fix..
After seating the shock I slipped on the washer. I then placed an open-end wrench against the washer with the open end facing the cotter pin hole. Using a large C-clamp, I compressed the open-end wrench until the cotter pin hole was visible. Then, I dropped in the cotter pin. Simple! You just need a BIG C-clamp and something to protect the outer frame. I used some scrap wood. It also helps if a 2nd person is there to help hold the C-clamp, as some positions may cause the clamp to move around on the frame.
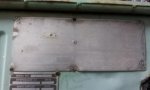
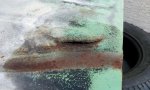
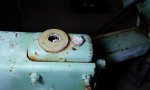
M416-A1 Date Plate:
M416 plates are everywhere, but M416-A1 is hard to find! I was able to find a company Machine Plates Online that can reproduce them but at a cost of $150. Ouch. However, they do offer a lasered etching on stainless steel. No more fading like the original silk-screened on aluminum. Hey, maybe we M416-A1 owners can do a group-buy! UPDATE: I am searching for another company to get these done. I obtained a really good PDF file of the Parkhurst data plate.
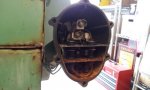
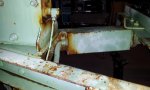
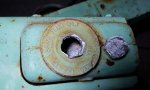
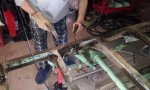
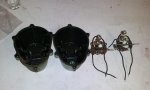
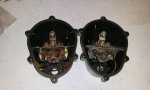
Wheel Cylinders:
The wheel cylinders are the same as the ones used on 10"-12" drum for marine trailers. I found a suitable replacement and it's CAST metal, like the original. They are made by Redline and is sold at eTrailer.com They look the same, and the inside diameter is 1", just like mine. The cost is $21.95 each. Right Hand Part #: BP17-020. Left Hand Part #: BP17-030.
UFP also makes an aluminum one and is a few bucks cheaper. Pacific Trailers sells them for $19.95 each. Right Hand Part #: U1012WCR. Left Hand Part #: U1012WCL.
I went with this one. I figured for a few bucks more, I can avoid rusting and reduce the weight by a few ounces. My backplate must have been slightly bent, as one of the wheel cylinders didn't quite fit. A grinder took care of that. These suckers are beefy so it could take a little grinding.
Again.. CroftTrailer.Com had the lower price at $18.00 for each standard cylinder. Part number: 1906 and 1907. Hind sight is 20/20...
12v bulb conversion:
I tossed the original wiring and went with a conventional 4-wire setup. This required bulb replacements. For the brake/turn signal, I used a 21.5-watt Sylvania #7506. Others have used #1156, which is a 26.5-watt bulb. The driving lights I used 5-watt Sylvania #7007. Others have used #98, which is a 8.5-watt bulb. I probably should have went with the brighter #98, but this was what I found at the time. You can use whatever wattage you want. When searching for a bulb, just remember that you need a single filament bulb, and the bayonet pins are the same height and at opposite ends. The diameter of the connections is pretty common. It's a Ba15S connector. The original bulbs consist of one big one and 4 small ones. I wired the big one as my brake/turn signal. All the others will be driving lights.
insight:
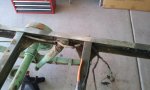
I didn't see it mentioned, but I discovered that the front bolt for the leaf spring is pressed in, much like a tire lug. So, I removed the cotter pin, backed out the castle nut to the end of the bolt, and hammered away til the bolt came out. I used a large punch to drive it the rest of the way out. LOL. I didn't figure this out until I ran my 30gal compressor empty trying to turn the darn bolt.
It's worth mentioning again. The REAR-RIGHT shackle is a Right-hand loosy (just the bottom one that holds the leaf spring).
When working on my spindles, I noticed that I didn't have a lock washer or locking nut. It was just the spindle nut and a cotter pin. The spindle nut used a 29mm socket to take off. This was the same socket I used to remove the big bolt to drop the safety chain and the bolt for the landing leg.
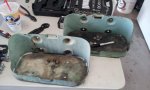
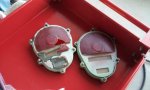
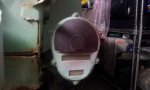
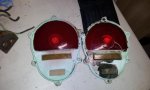
I had planned or buying new composite rear lens covers, as mine were sun faded. By accident, I oversprayed some carb cleaner and it landed on the lens. To my surprise, that cleaned/cleared up the lens! Carb cleaner eats away at plastics. Therefore, I blasted the front/rear of the lenses, then quickly blew off/dried off the liquid with my airgun. The results were instant. I was able to touch the lens after 3 mins. I didn't want to touch it before, as the plastic may still be soft and I didn't want to risk smudging the newly restored lens.
Final Note: I completed my restoration on April 5, 2012. I'm updating the original info for accuracy. Have fun on your build!
The restoration continues. I thought I would take a moment to share some of my parts finds and give a little insight[/U][/I].
Parts Located
Surge Brake:
I found that the master cylinder from "53-64 CJ-3B" can work. I found it at Kaiser Willys (Part #805223) for $50.00. The surge brake system on mine is made by Toledo Hydro-Act and is still currently in production. Their replacement cost is $130. The one I received from Kaiser Willys was perfect. One thing though.. they painted it, then machined it. All the machined areas are NOT rust proofed. You will need to paint the master cylinder prior to install. Rustoleum spray paint is your friend.
Surge Brake Dampener Shock:
The only place I've been able to find a replacement for these are with Toledo Hydro-Act. I found that eTrailer.com sells them for $61.00 (Part #1844-2). Worked like a charm. CroftTrailer.Com had a better price. I found it after my build.
As mentioned in other posts. Replacement nylon pivot bushings for the surge is also a Toledo Hydro-Act part. eTrailer.com sells them for $5.09 each ( Part #1745). eTrailer has a good selection of parts for the Toledo Hydro-Act surge system. CroftTrailer.com also had these, at a cheaper price.
Leaf Spring C-Shackles:
I think we all know now that the one of the rear shackles has a right-hand loosy, instead of the common left-hand loosy. Not much info out there so I will state it here. The REAR-RIGHT shackle is a Right-hand loosy (just the one that holds the leaf spring). Mine took some damage and the rubber bushings were destroyed. I found that Kaiser Willy sold them for $13.00 each. You'll have to order a passenger AND driver side (Part #: 802062 and 802061). Again, from a "53-64 CJ-3B". These ended up being slightly taller, but not by much. That's not a bad thing... It improved my ground clearance by 1/2".
Remember, the REAR-RIGHT is the Right-hand loosy. Ignore what the package tells you.Race, Bearings, Oil Seal:
Originally I had listed the races, bearings and oil seal for a M416. Later I learned that they are NOT the same for the M416A1. M416A1 has a tapered spindle, where the M416 is a straight one. Basically, the inner is larger than the outer, where the M416 are the same. The correct numbers are:
larger inner: bearing #L68149 and race #L68111.
smaller outer: bearing #L44649 and race #L44610.
The oil seal is standard. You can get a complete kit at eTrailer.com for $12.00 per side. Stock # BK2-100. It's a bearing kit for a #84 type spindle. The nut washer they provide may not fit, so reuse yours.
I want to mention something about grease. You could use the standard grease that is out there. I chose to use a Marine Grade grease. The M416s are designed to float if you have less than 500lbs of cargo. With Marine Grade grease, you can feel more comfortable in taking your trailer across rivers, streams, or go float in the deep blue sea. The grease helps to repel the water better than regular bearing grease. I applied this grease onto every Zerk fitting on this trailer. Checker Auto, O'Riley's, NAPA.. they all carry it. O'Riley's was the cheapest.
Shocks:
Already mentioned. Napa (Part #RR 9403
The new shocks have a thicker bushing on both ends of the shock. I struggled to get them on. At the end, I replaced the original washers with some thinner ones I found at Home Depot. I also replaced the cotter pins with longer ones. The thinner washers helped, but it was still impossible to get the cotter pins in without help. Here's my fix..
After seating the shock I slipped on the washer. I then placed an open-end wrench against the washer with the open end facing the cotter pin hole. Using a large C-clamp, I compressed the open-end wrench until the cotter pin hole was visible. Then, I dropped in the cotter pin. Simple! You just need a BIG C-clamp and something to protect the outer frame. I used some scrap wood. It also helps if a 2nd person is there to help hold the C-clamp, as some positions may cause the clamp to move around on the frame.
M416-A1 Date Plate:
M416 plates are everywhere, but M416-A1 is hard to find! I was able to find a company Machine Plates Online that can reproduce them but at a cost of $150. Ouch. However, they do offer a lasered etching on stainless steel. No more fading like the original silk-screened on aluminum. Hey, maybe we M416-A1 owners can do a group-buy!
UPDATE: I am searching for another company to get these done. I obtained a really good PDF file of the Parkhurst data plate.Wheel Cylinders:
The wheel cylinders are the same as the ones used on 10"-12" drum for marine trailers. I found a suitable replacement and it's CAST metal, like the original. They are made by Redline and is sold at eTrailer.com They look the same, and the inside diameter is 1", just like mine. The cost is $21.95 each. Right Hand Part #: BP17-020. Left Hand Part #: BP17-030.
UFP also makes an aluminum one and is a few bucks cheaper. Pacific Trailers sells them for $19.95 each. Right Hand Part #: U1012WCR. Left Hand Part #: U1012WCL.
I went with this one. I figured for a few bucks more, I can avoid rusting and reduce the weight by a few ounces. My backplate must have been slightly bent, as one of the wheel cylinders didn't quite fit. A grinder took care of that. These suckers are beefy so it could take a little grinding.
Again.. CroftTrailer.Com had the lower price at $18.00 for each standard cylinder. Part number: 1906 and 1907. Hind sight is 20/20...
12v bulb conversion:
I tossed the original wiring and went with a conventional 4-wire setup. This required bulb replacements. For the brake/turn signal, I used a 21.5-watt Sylvania #7506. Others have used #1156, which is a 26.5-watt bulb. The driving lights I used 5-watt Sylvania #7007. Others have used #98, which is a 8.5-watt bulb. I probably should have went with the brighter #98, but this was what I found at the time. You can use whatever wattage you want. When searching for a bulb, just remember that you need a single filament bulb, and the bayonet pins are the same height and at opposite ends. The diameter of the connections is pretty common. It's a Ba15S connector. The original bulbs consist of one big one and 4 small ones. I wired the big one as my brake/turn signal. All the others will be driving lights.
insight:
I didn't see it mentioned, but I discovered that the front bolt for the leaf spring is pressed in, much like a tire lug. So, I removed the cotter pin, backed out the castle nut to the end of the bolt, and hammered away til the bolt came out. I used a large punch to drive it the rest of the way out. LOL. I didn't figure this out until I ran my 30gal compressor empty trying to turn the darn bolt.
It's worth mentioning again. The REAR-RIGHT shackle is a Right-hand loosy (just the bottom one that holds the leaf spring).
When working on my spindles, I noticed that I didn't have a lock washer or locking nut. It was just the spindle nut and a cotter pin. The spindle nut used a 29mm socket to take off. This was the same socket I used to remove the big bolt to drop the safety chain and the bolt for the landing leg.
I had planned or buying new composite rear lens covers, as mine were sun faded. By accident, I oversprayed some carb cleaner and it landed on the lens. To my surprise, that cleaned/cleared up the lens! Carb cleaner eats away at plastics. Therefore, I blasted the front/rear of the lenses, then quickly blew off/dried off the liquid with my airgun. The results were instant. I was able to touch the lens after 3 mins. I didn't want to touch it before, as the plastic may still be soft and I didn't want to risk smudging the newly restored lens.
Final Note: I completed my restoration on April 5, 2012. I'm updating the original info for accuracy. Have fun on your build!
Attachments
-
 33.2 KB Views: 127
 -
 37.4 KB Views: 131
 -
 44.4 KB Views: 141
 -
 49.2 KB Views: 162
Last edited: