

- 1,764
- 2,413
- 113
- Location
- Rosamond, CA
Return lines headaches.If I remember correctly one of the big vendors sells a "kit" of these return lines, rated for diesel fuel.
Here's the POOP from my experience on the fancy, green or black, no clips, slip on, with a woven outer jacket, general web sites kits or bulk lengths. At first this magic hose seemed to work (but I had my doubts) Give it a year or two and the leaks will show up. The ends fray, hose splits at the injector barbs, and the cabin fills with diesel fumes while it drips on the exhaust. This played out this morning on a return trip camping. It is not the first time seeing this on rigs the guys and I run.
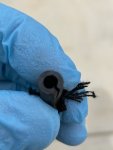
I carefully cut the braid back to get a good look. It does fray and detaches near the cut ends. I never had an issues with the OEM and clips... even on 30 years old engines. YMMV... but I'am done with easy magic hose. And note just try and work a clip/clamp between it and the injector.

Close up of the ends

It is NOW banned for any use on my rigs. AC Delco GM 14066305 hose and clips 1238007 for factory.
Camo at Camoteksystems.
Attachments
-
 37.1 KB Views: 8


")
