• Steel Soldiers now has a few new forums, read more about it at: New Munitions Forums!

  • Microsoft MSN, Live, Hotmail, Outlook email users may not be receiving emails. We are working to resolve this issue. Please add support@steelsoldiers.com to your trusted contacts.

Just won an auction - M1088A1

dwlindsey

Active member
Steel Soldiers Supporter
131
87
28
Location
California
I guess that would depend on which line it is:)
It must be the one from the remote control valve, since the AOH pump is gone and the air springs work when I depress the knob on the manifold

I'm thinking that I should cap the line from the remote control valve, until I can delete it
 

dwlindsey

Active member
Steel Soldiers Supporter
131
87
28
Location
California
I'm learning a little about pneumatic switches. The "P" port is Pressure Inlet. The "A" port is Pressure Out. The "R" port is Pressure Release.

I'm guessing that one of the 1/8" lines is Pressure In and the other is Pressure Release. Now how to sort out which one is which? Absent better advice, I'll hook them up and see if it works. If it doesn't, I'll reverse it.
 

Ronmar

Well-known member
4,305
8,154
113
Location
Port angeles wa
I'm learning a little about pneumatic switches. The "P" port is Pressure Inlet. The "A" port is Pressure Out. The "R" port is Pressure Release.

I'm guessing that one of the 1/8" lines is Pressure In and the other is Pressure Release. Now how to sort out which one is which? Absent better advice, I'll hook them up and see if it works. If it doesn't, I'll reverse it.
Well if you start the truck, as soon as the wet tank exceeds ~85PSI, the supply line will start to flow air...

For cab suspension, one of the lines is supply pressure from the wet tank, the other line is out to the cab suspension height control valve. The R port Vent is on the back of the hydraulic control valve module and does not have a line attached to it...

Think of the cab valve like a single pole double throw switch that switches a common connector between two other connectors. Supply pressure comes in on one of the two switchable connections(P), the load/cab suspension is on the common connection(A) and the second switchable connection is the vent or release port(R).

A switches between P and R. When you switch the valve to the P port, pressure flows in thru p and out the common port A to feed the load, and the ride height valve uses this pressure to inflate or deflate the bags to control height. When you switch the A from P to R, this seals the P port and connects the A port to the R port, and any air in the cab suspension flows back and vents to atmosphere thru the R port... In my picture you can just see a sintered bronze filter in the R port where the air vents out when deflating the system. this is to keep debris and insects out of that port...
 

dwlindsey

Active member
Steel Soldiers Supporter
131
87
28
Location
California
Think of the cab valve like a single pole double throw switch that switches a common connector between two other connectors. Supply pressure comes in on one of the two switchable connections(P), the load/cab suspension is on the common connection(A) and the second switchable connection is the vent or release port(R).
Well if you start the truck, as soon as the wet tank exceeds ~85PSI, the supply line will start to flow air...

For cab suspension, one of the lines is supply pressure from the wet tank, the other line is out to the cab suspension height control valve. The R port Vent is on the back of the hydraulic control valve module and does not have a line attached to it...

Think of the cab valve like a single pole double throw switch that switches a common connector between two other connectors. Supply pressure comes in on one of the two switchable connections(P), the load/cab suspension is on the common connection(A) and the second switchable connection is the vent or release port(R).
I think the missing 4th air hose from the manifold is the hose that went to the AOH Pump, which is now completely naked without hydraulic or air hose attached. I disconnected that several weeks ago, so memory faded, but that must be the one that's gone.

So I'm thinking that the 1/4 inch tube going into the mainifold must be the supply. I'll put that in port P. Then one of the two remaining 1/8 inch tubes will be the air springs. I'll put one of them in port A. And if the air bags don't inflate, then I have the wrong 1/8 inch tube connected and I'll change it.

I'm missing one fitting, which should arrive tomorrow, so I'll hook up the new valve tomorrow.
 

dwlindsey

Active member
Steel Soldiers Supporter
131
87
28
Location
California
Small progress today. One of the air fittings hasn't arrived, so I worked on removing the AOH pump and the spare tire lift. One bolt removed from the spare tire lift, 4 bolts removed holding the AOH pump. All 5 bolts very annoying to remove, difficult to get the wrench on the nuts. But a little progress.

I may need to back the truck out of the garage to get at the remaining bolts on the spare tire lift, I think at least one of them will require tilting the cab up and I can't do that in the garage. That's for another day.

Now I'm starting to think about the hatch on the cab. Most of the bolts are halfway in . . . so removing them will be easier . . . Then, I believe I'll clean the surfaces, thread the bolts barely in and have a 3 props, small wooden props, maybe pieces of 1x2 or a couple of paint sticks, holding the hatch off the roof while I apply Sikaflex 252. Then one at a time, remove the props and fill in 252. Then turn in the bolts tightly and clean up with Sika remover 208.

That should be waterproof, but after it cures, I'll do another bead of caulking.

Sound OK? Better suggestions?
 

dwlindsey

Active member
Steel Soldiers Supporter
131
87
28
Location
California
I'm working on the passenger side front brake today. Almost done, then I'll get the tire back on.

While I'm in there, I'm seeing what I think is a wire and connector for the ABS. I've got an ABS light on the dash and this truck has obviously been in mud up over the axles. So I'm thinking that I should clean the connectors while I've got the tires off. Maybe some Deoxit? Question: How do the connectors come off? Straight up perpendicular to the axle? Just pry them off with a flathead? I won't touch them until I have some more knowledge about how the connectors work and are removed.
 

dwlindsey

Active member
Steel Soldiers Supporter
131
87
28
Location
California
I've made some progress and I've got some issues.

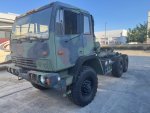
The brakes are serviced, the new tires are on (2022 date codes), the CTIS hoses are on, Christian Platzer's CTIS controller is hooked up and working. The tires air down and air up, taking a bit longer than I thought they would, but it works.

I backed it out of the garage (tight fit) and drove it around the block. While maneuvering the air pressure gauges went to 90 pounds, still in the green zone I got a low air light. When the air gauges started to read 65 or 70 pounds, I got a park brake light. The parking brake did not come on. And of course I had a loud alarm buzzer.

I was idling and applying the brake a lot, it's very tight getting out of the garage without breaking something, so I guess the 90 pounds and 65 pounds might be OK, but it seems that the low air and parking brake light shouldn't be on at those pressures. I'll appreciate any hints about what's going on and what to do about it.

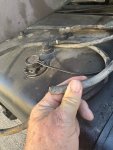
The next issue that comes to my attention is that there are three ports in the top of the fuel tank. Two of them are hooked up and the truck runs fine. Those must be fuel supply and fuel return. There's a third port with a hose that's just cut, see picture below. It seems that hose is not needed to run the truck. What's it for?

Fuel tank with cut hose.jpgTruck with new tires July 15 2025.jpg
 

aw113sgte

Well-known member
Steel Soldiers Supporter
880
1,377
93
Location
La Crosse, WI
If you use the brakes a lot, you will drop pressure but the compressor should build the pressure back up pretty quickly.
Fuel lines are supply, return, and vent. Just a service item but the fuel hoses in these things rot easily, my 2007 return line was falling apart. They can be replaced by heavy duty truck shops.
 

aw113sgte

Well-known member
Steel Soldiers Supporter
880
1,377
93
Location
La Crosse, WI
I'm working on the passenger side front brake today. Almost done, then I'll get the tire back on.

While I'm in there, I'm seeing what I think is a wire and connector for the ABS. I've got an ABS light on the dash and this truck has obviously been in mud up over the axles. So I'm thinking that I should clean the connectors while I've got the tires off. Maybe some Deoxit? Question: How do the connectors come off? Straight up perpendicular to the axle? Just pry them off with a flathead? I won't touch them until I have some more knowledge about how the connectors work and are removed.
Abs are press fit and can be removed with pliers. Often antisoeze is used for easier removal
 

dwlindsey

Active member
Steel Soldiers Supporter
131
87
28
Location
California
If you use the brakes a lot, you will drop pressure but the compressor should build the pressure back up pretty quickly.
Fuel lines are supply, return, and vent. Just a service item but the fuel hoses in these things rot easily, my 2007 return line was falling apart. They can be replaced by heavy duty truck shops.
But why am I getting a low air light at 90 pounds and a park brake light at 65 pounds? Both are in the green zone of the pressure gauges.
 

Ronmar

Well-known member
4,305
8,154
113
Location
Port angeles wa
The tank vent typically runs up to the cab suspension arch and is loosley folded over and zip tied with the latch hydraulic line.

on the A0 they use an electric pressure sensor for the pri and sec gauges. It also incorporates the low air switch set for ~85PSI

the park/emergency lights in the dash are driven by a haldex low brake pressure switch behind the grill/under the drivers floor. That sw is 66PSI which is the FMVSS standard low pressure alert required pressure, so our low air alarm triggers 20PSI higher than the minimum legal requirement.

the general rule with air brakes is ride them a little more than you typicaly would hydraulic car brakes. You vent air at every pedal release, so a rapid series of press and release cycles will trip the buzzer. Especially in trafffc, Better to apply as needed but think about it a little before you fully release in case you need to apply, as you will use less air repressurizing brakes that already have some air in them. Slow speeds low rpm takes longer to refill…

Park on level ground and chock the wheels, make a gladhand adapter to hook up shop air to the front red gladhand . My old covers had a NPT threaded vent cover so I removed the wobble cap vent and connected a air hose quick detach fitting. Applying shop air to the red gladhand will charge the airtanks AND release the parking brake. Then you can look for air leaks and make sure everything is tight while applying the brakes. Way easier to chase leaks without the kitty purring… Also make sure the rear glad-hands are completely sealed as leaks there will dump a lot of air when applying the service brakes…

the second phase of this testing is to make an adapter to interface with the air line coming out of the compressor to fully test the supply plumbing and dryer not tested in the first test…
 

dwlindsey

Active member
Steel Soldiers Supporter
131
87
28
Location
California
The tank vent typically runs up to the cab suspension arch and is loosley folded over and zip tied with the latch hydraulic line.

on the A0 they use an electric pressure sensor for the pri and sec gauges. It also incorporates the low air switch set for ~85PSI

the park/emergency lights in the dash are driven by a haldex low brake pressure switch behind the grill/under the drivers floor. That sw is 66PSI which is the FMVSS standard low pressure alert required pressure, so our low air alarm triggers 20PSI higher than the minimum legal requirement.

the general rule with air brakes is ride them a little more than you typicaly would hydraulic car brakes. You vent air at every pedal release, so a rapid series of press and release cycles will trip the buzzer. Especially in trafffc, Better to apply as needed but think about it a little before you fully release in case you need to apply, as you will use less air repressurizing brakes that already have some air in them. Slow speeds low rpm takes longer to refill…

Park on level ground and chock the wheels, make a gladhand adapter to hook up shop air to the front red gladhand . My old covers had a NPT threaded vent cover so I removed the wobble cap vent and connected a air hose quick detach fitting. Applying shop air to the red gladhand will charge the airtanks AND release the parking brake. Then you can look for air leaks and make sure everything is tight while applying the brakes. Way easier to chase leaks without the kitty purring… Also make sure the rear glad-hands are completely sealed as leaks there will dump a lot of air when applying the service brakes…

the second phase of this testing is to make an adapter to interface with the air line coming out of the compressor to fully test the supply plumbing and dryer not tested in the first test…
Thanks Ron
 
Top
AdBlock Detected

We get it, advertisements are annoying!

Sure, ad-blocking software does a great job at blocking ads, but it also blocks useful features of our website like our supporting vendors. Their ads help keep Steel Soldiers going. Please consider disabling your ad blockers for the site. Thanks!

I've Disabled AdBlock
No Thanks