• Steel Soldiers now has a few new forums, read more about it at: New Munitions Forums!

  • Microsoft MSN, Live, Hotmail, Outlook email users may not be receiving emails. We are working to resolve this issue. Please add support@steelsoldiers.com to your trusted contacts.


Bonedoc's M35A2 modification thread

bonedoc

New member
502
1
0
Location
Bangor, PA
More clutch and trans pics. Took about 3 entire cans of brake cleaner to clean the bellhousing up.
 

Attachments

Last edited:

bonedoc

New member
502
1
0
Location
Bangor, PA
Trans/Clutch pics. Here you can see my old trans and new sitting on the floor. New rear main seal, locking tab clips, and pilot bushing. The new one is nice and clean!! There is one pics here that has my make shift tools to remove and install the pilot bushing. I used a 3/4" hitch pin to remove it. Worked perfect. Filled the old bearing with grease, inserted the pin. Smacked it with a hammer a few times and it popped out. The 3/4" bolt, nut, and washer was used for install. I set the washer with the nut just a bit shorter than the new pilot bushing. Tapped it into the hole and when the washer bottomed out it is set perfectly flush with the crank surface.
The rest of the pics also a new addition added to the trans, a PTO. I had acquired a complete winch kit, which also inspired to me to finally get this job done. The last pic is after the PTO was installed, filled the trans from the top to about 1/2" below the fill hole and then installed the top cover.
 

Attachments

bonedoc

New member
502
1
0
Location
Bangor, PA
I like the caterpillar disconnect switch, do you know what one you used?
Absolutely, it is
CATERPILLAR SWITCH A 7N0718, Cat 7N-0718. I found it on Ebay. I had used the same one you had used originally. It worked great...lol...till it didn't. I think I just drew way more current through it than it was made for. This one is heavy duty, used on heavy equipment with this type of draw.
 

bonedoc

New member
502
1
0
Location
Bangor, PA
Unfortunately I just found a few pics I missed, these are of the flywheel install then the clutch disc and pressure plate. The sad thing is I though I had a few pics of the wiring install for my reverse switch. I have rear work lights on the back and side of truck. They are on separate switches. I tied into the wiring for the rear ones so they will work in reverse or with the switch. Just have to be careful not to shift into reverse with the dash switch on....that could be bad.
Also a couple pics of what is next.
 

Attachments

bonedoc

New member
502
1
0
Location
Bangor, PA
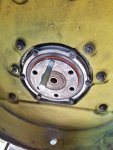
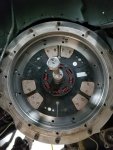
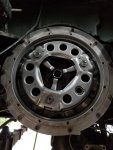
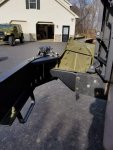
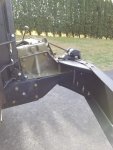
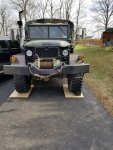
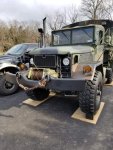
Alright...time for the part 2 of this project....LOL. The winch install. Removed everything from the front of the truck. Took the frame extension, bumper beam and pieces, shackles, grill, etc to a local shop and had them blasted and powdered a flat black. Installation was very straight forward. Getting any of the needed hardware wasn't easy. Had to order most of it from a local Fastenal. The 10.5" bolts, 2- 5/8" and 4- 1/2" that go all the way through the bumper, frame extensions, etc and sandwich it all together I ordered from McMaster Carr. The kit I purchased had a custom made PTO shaft with it. I opted not to grind my bellhousing and purchased a NOS multifuel shaft from Ken Kublo.
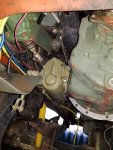
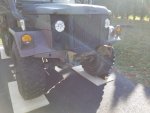
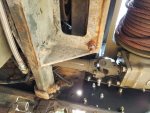
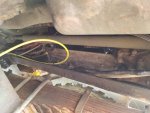
The most complicated parts of the install were the fact that my frame was about a 1/4"-3/8" to narrow for the install. I spread it by loosening my front crossmember bolts and using a pipe, some threaded rod, and some washers made a simple unit to spread it apart. To my surprise it spread very easily. The other issue was my fuel line. Some may recall that I ran my fuel line from my primary filter to the injection pump up on my front crossmember. This worked great but was in the way of the winch PTO shaft. I has to redirect it. Brought I over the PTO shaft, down along the left side of the radiator and then across the bottom of the front crossmember just behind it in front of the oil pan, then up to the primary filter. It is still safe, shielded by the crossmember.
 

Attachments

bonedoc

New member
502
1
0
Location
Bangor, PA
I recently aquired a new OEM motor in the crate. This is going to be sitting stored in the back of my garage till needed. Not sure it is a job I want to tackle anytime soon but if needed...I have the motor now.
I'm also rebuilding my old transmission. I'll post pics of that soon. It is completely disassembled and currently the case is being repaired. It had a cracked that was 'repaired' by someone by smearing epoxy over it. It seeped constantly and though it functioned fine was the reason for me replacing it. I ordered a new bearing kit from Tom Bauer, also got new synchros, seals and gasket kit. All the gears looked fine. Will reassemble it, wrap it up and store it till needed.
 

Attachments

77 AMG

Active member
403
62
28
Location
Owingsville, KY
Wow. Lots of high-quality, OCD driven work going on here! Hopefully, My Deuce will be close to this level of "reworked", at some point. Do you still intend to post the pictures showing the back up light switch install?
 

MudMarine

Member
117
15
18
Location
Jacksonville NC
Stayed up way too late reading this thread from the beginning, outstanding work! Definitely going to be returning here a bunch as I start to freshen up my new Deuce
 

bonedoc

New member
502
1
0
Location
Bangor, PA
Wow. Lots of high-quality, OCD driven work going on here! Hopefully, My Deuce will be close to this level of "reworked", at some point. Do you still intend to post the pictures showing the back up light switch install?

The install is very simple. Once you mount the switch housing in the top cover of the transmission. I took my power lead from the 'hot' side of the brake light switch on the air pack. I for get which number it is supposed to be. Mine weren't labeled. My rear lights are LEDS so draw is minimal. Then ran a line from the other side of the switch to my the line that feeds my rear lights. My rear lights have 2 feeds now. I can operate them via a switch on the dash which is nice when parked and working around truck and by shifting into reverse. The only thing I have to do is make sure I DON'T have the dash switch on then shift into reverse or vice versa. I would assume that would be bad because they I would be backfeeding power and would short something. I'll get some pics, raining today.
 

77 AMG

Active member
403
62
28
Location
Owingsville, KY
Okay, that is simple enough. Another thing to consider about having the lights on while moving- in alot of places the LEOs' aren't fond of people with rear facing white lights being ON while driving, something about possibly blinding following traffic.
 

rustystud

Well-known member
9,071
2,388
113
Location
Woodinville, Washington
Okay, that is simple enough. Another thing to consider about having the lights on while moving- in alot of places the LEOs' aren't fond of people with rear facing white lights being ON while driving, something about possibly blinding following traffic.
I got into trouble with that years ago. I installed air-craft landing lights in the back of my 1972 Chevy truck. All I need do was flip the switch and POW ! I lite up the road behind me ! I only used it a few times on ass's who wouldn't turn off their high beams. Though the last time I did that there was a cop watching ! He pulled me over and read me the riot act ! I didn't get a ticket though. He knew the guy behind me was being an ass with his high beams so he let me go, but warned me to remove the lights.
 

bonedoc

New member
502
1
0
Location
Bangor, PA
Well after my trans/clutch and winch project were completed I still had my old trans to do something with. The trans operated fine but always seeped oil. Upon inspection shortly after I got the truck several years ago, I found what appeared to be repair work to the case where it was always wet. That led to me purchasing new trans and with me seeing that my rear main was leaking finally making time for a swap.
So that being said I decided it couldn't hurt to tear down the old trans, see how bad the case damage was and rebuild it. Worst case would be if the case was unrepairable I'd find a donor case and install my rebuilt internals into.
As you would of seen from the clutch install my old trans was a dirty oily mess. So the first order was to clean it as I disassembled it. I had never disassembled one of these transmissions before and have to say the TM was my friend for the whole process!! Disassembly went very smoothly. I was in no rush and took my time, cleaning, bagging, and labeling parts. The internals looked very good. There was expected wear on the synchros but all the other gears looked very good. No broken teeth or odd wear patterns. I wasn't worried about the synchros as they were being replaced. The bearings all felt good as well but since it was apart I was going to replace all of them and the 2 thrust washers on the reverse idler shaft.
I ordered my synchros off of Ebay. I'd like to say thank you to Tom Bauer of Waterloo Specialties, for providing me with all the bearings and thrust washers and helping an amateur with a lot of questions. Thank you very much.
After the trans was disassembled and cleaned I could see what appeared to be a crack in the bottom of the case and a rather hasty repair that turned out to be nothing but epoxy smeared on the outside of the case. The hardest part of the disassembly was removing the reverse idler shaft. The TM tells you to use a slide hammer...not happening. Tom from Waterloo told me how to do it and I ended up making a puller with threaded rod, pipe, washers, and nuts and using the puller while tapping the shaft from the opposite side and that got it out. Once it breaks free and and moves about 3/4" it slides right out.
 

Attachments

bonedoc

New member
502
1
0
Location
Bangor, PA
I dropped the case off at a welder I know who is very knowledgable and experienced. He said he would look at it and let me know what he can do. He called me a few days later and said "I have great news"!! It turns out there was no crack, the leak was from the drain plug threads. He had removed the epoxy and had spent several days doing water tests to see where the leak was. He thinks they saw the leak and maybe a casting mark or something and assumed it was a crack and just epoxied over it. The marks on the inside were just casting marks. Anyway, he cleaned up the drain threads and installed a plug with some tape and let it sit for several days and there was no leak.
All right...good to go. Let the reassembly begin!! Reassembly was very straight forward. Unfortunately I didn't have the right pullers/tools to disassemble the mainshaft and input shaft to change the 2-3 gear synchro and bearing. I took these parts to a local trans shop and they were able to quickly swap them for me. The rest is straightforward with basic hand tools. The hardest part again was the reverse idler shaft. Aligning all the holes, trying to keep everything lined up AND make sure the shaft is positioned correctly when seated was interesting. For anyone doing this. Don't worry about the orientation of the milled end of the idler shaft when first installing it. Once it is in through the bearings, gear, etc. before you seat it the last 3/4" or so you will be able to turn it to its proper orientation before tapping it the rest of the way in. My first time...so I didn't find this out till I did it.
After that the rest of the assembly went very smooth. Still waiting for a few parts. My input bearing retainer was sent to M-series Rebuild for their input seal modification. I know this is something that had been kicked around and done a few different times on here by many members. They have been doing it for several years with excellent success, figured for $65.00, couldn't hurt to try it. My companion flange isn't back on yet because according to the TM, there should be a washer under the nut that holds the flange in place, mine didn't have one. Also waiting for the reverse shifter shaft seal, clutch lever seal, and a new throw out bearing.
 

Attachments

bonedoc

New member
502
1
0
Location
Bangor, PA
Merry Christmas to you all!! Hope you all had a great holiday. I received my upgraded input bearing retainer on Sunday and got some time on Christmas day to install the bearing retainer and clutch housing. All bolts were sealed, lock-tighted, and torqued per the TM specs.
Just waiting for a couple extra parts, the reverse shifter seal, clutch lever seal, and throwout bearing and assembly will be complete. Then will clean it up the case some more and add a coat of fresh green and finally strap it to the dolly and move it to a climate controlled area I have for storage till needed.
 

Attachments

Top
AdBlock Detected

We get it, advertisements are annoying!

Sure, ad-blocking software does a great job at blocking ads, but it also blocks useful features of our website like our supporting vendors. Their ads help keep Steel Soldiers going. Please consider disabling your ad blockers for the site. Thanks!

I've Disabled AdBlock
No Thanks