• Steel Soldiers now has a few new forums, read more about it at: New Munitions Forums!

  • Microsoft MSN, Live, Hotmail, Outlook email users may not be receiving emails. We are working to resolve this issue. Please add support@steelsoldiers.com to your trusted contacts.


cHucv Soup: The animal to be

ODw/envy

New member
310
0
0
Location
Deltona, FL
More on the floor later.

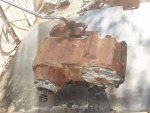
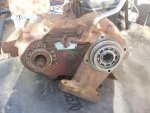
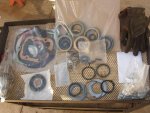
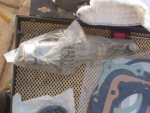
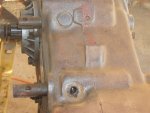
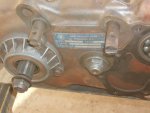
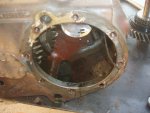
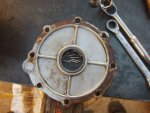
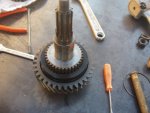
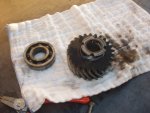
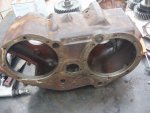
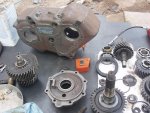
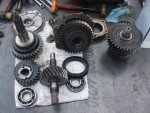
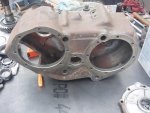
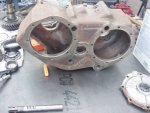
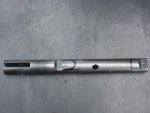
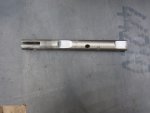
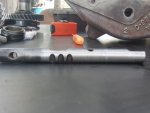
What follows is a montage relating to the rebuild and modification of my NP205. This unit already had a 32 spline rear output shaft - not stock. I elected to open it and install a 32 spline front shaft as well. Why?

The 32 spline shaft has a larger radius than the factory 10 spline unit and, thus, is stronger.
Availability for 32 spline flanges and yokes is far better supported in both the OE and after markets.
I swiped the 32 spline front output flange off of my np208, which would have cost me almost the same as the shaft.
I was disassembling it anyway, to do the shift rail mod and put in new seals.

I did have to get a Dodge front output seal to accommodate the 32 spline NP208 front output flange.
 

Attachments

ODw/envy

New member
310
0
0
Location
Deltona, FL
Pulling the critter apart is easy!

Before and after of the rear shift rail.

Beware those that call it a selector or range rail. Those are misleading terms and misnomers, and can confuse the uninitiated. The rail closest to the input side controls the rear output shaft only (High Neutral Low). The rail closest to the front output controls the front output shaft only (H N L). Thus, the twin sticks and, now, independent control of the front and rear axles.

The above applies only to the NP205. Other transfer cases vary.
 

Attachments

ODw/envy

New member
310
0
0
Location
Deltona, FL
A few mare pictures of the NP205 rebuild.

First a comparison of the 10 spline shaft and the new 32 spline unit. Notice the increase in diameter.

Those external bearings are a pain to put in. The little ones inside the shafts are difficult too.

The mounting plate for the secondary cross-member.

111012b (72).JPG111012b (73).JPG111012b (76).JPG111012b (77).JPG111012b (83).JPG111012b (84).JPG111012b (86).JPG
 

ODw/envy

New member
310
0
0
Location
Deltona, FL
Here is a comparison of the factory 10 spline yoke (NP205) and the factory 32 spline yoke (NP208).

The twin stick set in it's initial iteration. I decided to run them in the factory CUCV t-case shift hole. More on the custom bracket later.

The spacer that goes between the 700R4 and the TH350/NP205 adapter.

The tail of the 700

111412 (31).JPG111412 (33).JPG111412 (34).JPG111412 (35).JPG111412 (36).JPG111412 (37).JPG111412 (38).JPG111412 (40).JPG111412 (41).JPG
 
Last edited:

ODw/envy

New member
310
0
0
Location
Deltona, FL
The spacer/adapter I ordered was not supposed to require trimming of the output shaft. Well guess what. I did have to remove 3/8 of an inch for the correct 7/8" stick-out that is required. A little angle grinder action and we are in business. I also had to order $25 worth of threaded rod so that I could make the uper studs. The ones supplied were only long enough for the bottom. I could only find grade B7 3/8 threaded rod in 3 foot sections (Fastenal).

Initial mock up of the tranny and installation.

The NP205 is almost a direct swap, from a cross-member stand point. I had to drill new holes 3/4" aft of the originals.

View attachment 393216View attachment 393217View attachment 393218View attachment 393219View attachment 393220View attachment 393221View attachment 393223View attachment 393224View attachment 393225
 

ODw/envy

New member
310
0
0
Location
Deltona, FL
111412 (50).JPG111412 (51).JPG111412 (52).JPG111412 (53).JPG111412 (54).JPG111412 (55).JPG111412 (56).JPG111412 (57).JPGA little comparison of the drive shafts. I had a SuperDuty drive-shaft laying around. So I am having it shortened and a custom flange made to fit the Ford flange and also accommodate the parking brake. The larger one is the SuperDuty with 1410 U joints. The other two are 1350 and 1310 Rear and front factory shafts. Also, a shot of the Chevy 3R CV shaft.
 

ODw/envy

New member
310
0
0
Location
Deltona, FL
I bought my shaft from Off Road Designs. It is new production. I have been seeing them come up on Ebay ever sense, used. I did not have time to hunt for one though. Thanks for the insight.

Here is the fabrication process of the twin stick mounting bracket.

111412 (1).JPG111412 (58).JPG111412 (82).JPG111412 (85).JPG111412 (87).JPG111412 (88).JPG111412 (91).JPG111412 (92).JPG
 

ODw/envy

New member
310
0
0
Location
Deltona, FL
I scored a receiver hitch off of the parts Blazer and a 31 gallon fuel tank (The factory one was 25, both of which are finding homes under the cHucv. I have a lot of irons in the fire, due to delays on parts and the short amount of time available.

I am having to modify the factory skid plate to accommodate the larger tank. That is what I am working on tomorrow.

111412 (64).JPG111412 (75).JPG111412 (78).JPG111412 (74).JPG
 

ODw/envy

New member
310
0
0
Location
Deltona, FL
Which brings us, finally, to today. I modified the floor pan to accommodate the transfer-case mounted brake that will be coming from High Angle Drive Lines.

Actually, I modified the floor to accommodate my center console. I just had to have cup holders. It does give me a nice platform to mount to.

Additionally, I finished cleaning up and closing the various holes the previous owners had made.

111512 (1).JPG111512 (2).JPG111512 (3).JPG111512 (4).jpg111512 (5).jpg111512 (6).jpg
 

ODw/envy

New member
310
0
0
Location
Deltona, FL
It would seem I am behind again. I had been doing a lot of busy work while waiting on my custom flange and parking brake system to arrive.

I have a few relevant pictures.

The modified skid plate. I added 3.5 inches of .125 plate. It now fits the 31 gallon fuel tank nicely.

I installed the Warn locking hubs. Included a comparison of the two. It is easy to see why the Warn Premiums are preferable.

The bottom of the finished transmission tunnel with undercoating spray.

P1010008.JPGP1010009.JPGP1010011.jpgP1010013.jpgP1010014.JPGP1010016.jpg
 

ODw/envy

New member
310
0
0
Location
Deltona, FL
I have the, next to final, mock-up of the twin stick setup finished. I am waiting on some 5/16" - 24 stainless steel rod to complete the final install. Moving the shifters forward required quite a bit of modification to the original setup.

I am quite pleased with the fit and function of the final install. The shifts are very crisp and precise. I also modified the floor pan - closed the hole an inch -to accommodate the shift boot.

112212 (11).jpg112212 (12).jpg112212 (14).JPG112212 (18).JPG112212 (20).JPG112212 (21).JPG112212 (35).JPG112212 (36).JPG112212 (37).JPG
 

ODw/envy

New member
310
0
0
Location
Deltona, FL
I pulled apart the instrument cluster, though I have not decided what to do yet. I know I hate the idiot lights and I will have need of boost, pyrometer, and voltage gauges. I also pulled out the gear indicator to switch with the one from the donor.

I installed the rear air bags. Jack found some real nice tires for my truck and some heavy duty Dodge wheels to match my rear axle. I did get the rear brakes plumbed-no pics though.

112212 (23).JPG112212 (25).JPG112212 (28).JPG112212 (29).JPG112212 (30).JPG112212 (32).JPG
 

ODw/envy

New member
310
0
0
Location
Deltona, FL
Today I did the mock up on the front drive shaft. To my dismay-relatively little- the 3R Saginaw CV did not clear. One of the reasons I chose the spacer for the t-case was to avoid this issue.

Only one choice, clearance the pan. I did some research to see what others had done: 1) let the drive shaft "self clearance" - Uh no, 2) Smack the corner of the pan with a hammer and hope I don't damage the valve body - Uh no, 3) Hire a metal worker to modify it for me - Uh resounding no.

I came up with my own method; gasp, it requires a welder, plumbers putty, and some fabrication skill.

I am happy with the result and will post pics of the painted product tomorrow. Now I have gobs of room for the future 1350 cv shaft.


112212 (46).JPG112212 (49).JPG112212 (51).JPG112212 (53).JPG112212 (56).JPG112212 (57).JPG112212 (58).JPG112212 (60).jpg112212 (64).JPG112212 (66).JPG
 
Last edited:

ODw/envy

New member
310
0
0
Location
Deltona, FL
It has been too long sense I updated. Suppose it is time for some catch-up.

Installed the remote Trans filter and the cooler off of the K30.

Finally got the HAD parking brake setup and installed that. Most of my time was spent poking around with the cable routing. It works very well!

Also, a few side by side shots of the factory 1350 components VS. the SuperDuty 1410.

I had the rear drive shaft set up and I installed it. 120412 (51).jpg120412 (52).JPG120412 (55).JPG120412 (60).JPG120412 (61).JPG120412 (62).JPG120412 (53).JPG
 
Last edited:

ODw/envy

New member
310
0
0
Location
Deltona, FL
A few shots of the secondary cross-member install as well as the rear driveshaft and the E-brake setup. I like the way it turned out.

120412 (1).JPG120412 (2).JPG120412 (5).JPG120412 (6).JPG120412 (69).JPG120412 (70).JPG
 

ODw/envy

New member
310
0
0
Location
Deltona, FL
A better look at the plumbed Dana 60. I ran out of SS lines (had almost enough from a previous project), so I am using the OE lines from the front at present.

The newly painted reciever hitch is in, as is the modified skid plate. It is unfortunate though, that I will have to drop the tank again. I hate idiot lights (more on that later). I am growing rather fond of Rustoleum flat black.

120412 (56).JPG120412 (57).JPG120412 (58).JPG120412 (66).JPG120412 (67).JPG
 
Last edited:

ODw/envy

New member
310
0
0
Location
Deltona, FL
Thanks for the vote of confidence BR. Missed you on Sat. Oh well, another time.

I am expecting a shipment on Friday that should help get this critter rolling under her own power. The plan, subject to change.... again, is to have her a Jack's by Monday.

I have a plot twist brewing, so stay tuned. I should have made that plural.

On a side note; did you ever wonder what that ratty old hunk of cracked plastic and foam riding atop your gauge cluster was hiding underneath? The plot thickens, cue the cheesy dramatic "find out what happens on the next installment" music.

Here is a clue.

120412 (7).JPG120412 (8).JPG120412 (9).JPG120412 (68).JPG
 
Top
AdBlock Detected

We get it, advertisements are annoying!

Sure, ad-blocking software does a great job at blocking ads, but it also blocks useful features of our website like our supporting vendors. Their ads help keep Steel Soldiers going. Please consider disabling your ad blockers for the site. Thanks!

I've Disabled AdBlock
No Thanks