• Steel Soldiers now has a few new forums, read more about it at: New Munitions Forums!

  • Microsoft MSN, Live, Hotmail, Outlook email users may not be receiving emails. We are working to resolve this issue. Please add support@steelsoldiers.com to your trusted contacts.


Exterior Latex/Acrylic House Paints

Beerslayer

Well-known member
Steel Soldiers Supporter
1,054
53
48
Location
Tualatin, Oregon
Allowing for tint being off due to my monitor and your camera - - -

That's very interesting because it's darker than most 383 formulas I've seen posted as well as my spray cans from Gillespie. It looks almost exactly like the green on my 101A3 and many of the other parts.

What did you use for a matching sample?

Steve
The sample I used is in the second picture, partially obscured by the sample card. It is a floodlight off of a tank.

The lighting is a bit off, but I agree with you that it is darker, it is the exact shade I wanted.

I have noticed that some of the more recent examples of 383 Green CARC coming out of GL are darker, looks like there is more black in them. I like that color better than the more yellowish tinted green so that is the color I matched.
 

ABN173

Active member
1,842
11
38
Location
FT Bragg, NC
Ok fellas,

I just won my first Deuce from GSA, I discussed this briefly with Mike (wsucougarx) but I plan on using the IMP code for desert sand. This truck was last used by the Snohomish County Fire Department so it's RED. My question is since this was most likely a civilian paint used what would I need to do in order to prepare the truck for painting?

Sand blaster?

Solvents/striper agents?

Self etching primer over existing paint?

Scuff up existing paint, clean it, then just paint over?

Other suggestions?

Just looking for input, I am still deployed and will not see it myself for some weeks yet. Mike and I will compare notes and figure something out but I figure I would ask the masses as well.

Scott (srodocker) and Dan (AN/ARC186) are going to recover the truck later today, so they may have some input as well.

Thanks,
Dale
 

Attachments

SteveKuhn

New member
1,227
4
0
Location
Hasbrouck Heights NJ
It's most likely alkyd. Latex/acrylic sticks best to flat. Sandblasting is always best because it'll expose rust under the paint. Otherwise I'd scuff, prime w/ rusty oxide, allow 2 -3 weeks to cure then paint.

Others will likely have other ideas, but. . .

Steve
 
1. Get yourself a 12 pack.
2. Detergent wash truck with brush in all corners possible.
3. Go and chip, wire brush, flap disk sand rough spots and rusty areas. (use mask and glasses!!)
4. Repeat step 1 and let dry in sun.
5. Cover areas in step 2 with "rusty metal primer".
6. Prep truck for paint job with tape and remove or cover wheels.
7. Paint in sun to allow bake with at least 60 degree weather.

Each person will have their own way or require more perfection. So you will have to figure out how much work and what the end result will be either a museum piece or daily driver.

Most important part is the prep work and the baking process in my opinion.


Ok fellas,

I just won my first Deuce from GSA, I discussed this briefly with Mike (wsucougarx) but I plan on using the IMP code for desert sand. This truck was last used by the Snohomish County Fire Department so it's RED. My question is since this was most likely a civilian paint used what would I need to do in order to prepare the truck for painting?

Sand blaster?

Solvents/striper agents?

Self etching primer over existing paint?

Scuff up existing paint, clean it, then just paint over?

Other suggestions?

Just looking for input, I am still deployed and will not see it myself for some weeks yet. Mike and I will compare notes and figure something out but I figure I would ask the masses as well.

Scott (srodocker) and Dan (AN/ARC186) are going to recover the truck later today, so they may have some input as well.

Thanks,
Dale
 

ABN173

Active member
1,842
11
38
Location
FT Bragg, NC
1. Get yourself a 12 pack.
2. Detergent wash truck with brush in all corners possible.
3. Go and chip, wire brush, flap disk sand rough spots and rusty areas. (use mask and glasses!!)
4. Repeat step 1 and let dry in sun.
5. Cover areas in step 2 with "rusty metal primer".
6. Prep truck for paint job with tape and remove or cover wheels.
7. Paint in sun to allow bake with at least 60 degree weather.

Each person will have their own way or require more perfection. So you will have to figure out how much work and what the end result will be either a museum piece or daily driver.

Most important part is the prep work and the baking process in my opinion.
1. Get your self a 12 pack.
lol I have been deployed for awhile now, pretty sure I'd be passed out under the truck with a 12 pack.......what the underside needs prep work too right?

2. Detergent wash truck with brush in all corners possible.
3. Go and chip, wire brush, flap disk sand rough spots and rusty areas. (use mask and glasses!!)
2&3 check, I have done this before, I helped srodocker paint his about a year or so ago. check on the safety stuff CARC dust is not ok to breath.

4. Repeat step 1 and let dry in sun.
see comment number 7...
5. Cover areas in step 2 with "rusty metal primer".
checksh
6. Prep truck for paint job with tape and remove or cover wheels.
to easy

7. Paint in sun to allow bake with at least 60 degree weather.
#4 & 7 Since I live in Washington: check wait until July/August :mrgreen:

Kinda what I had in mind, thanks sneaker.

-Dale
 

Scrounge41

Member
167
1
16
Location
St. Augustine, Fl
It's most likely alkyd. Latex/acrylic sticks best to flat. Sandblasting is always best because it'll expose rust under the paint. Otherwise I'd scuff, prime w/ rusty oxide, allow 2 -3 weeks to cure then paint.

Others will likely have other ideas, but. . .

Steve
What Steve said. A lot of the decision making depends on current condition and desired results. Sandblasting is probably not necessary unless you have a lot of rust or are going for a museum quality restoration. You can spot treat rust by scraping then sandblasting or using phosphoric acid/rust converter then priming. I will say one of the best tips I have gotten on SS is to use a piece of trim coil (used for soffit/fascia/siding) about 8"x24" to use as a painting shield when shooting the wheel rims. It is so easy compared to masking off the rubber and a much better look than the over spray without masking. Thank you for your service and good luck.
 

ABN173

Active member
1,842
11
38
Location
FT Bragg, NC
Sandblasting is probably not necessary unless you have a lot of rust or are going for a museum quality restoration. You can spot treat rust by scraping then sandblasting or using phosphoric acid/rust converter then priming. I will say one of the best tips I have gotten on SS is to use a piece of trim coil (used for soffit/fascia/siding) about 8"x24" to use as a painting shield when shooting the wheel rims. It is so easy when its compared to masking off the rubber and a much better look than the over spray without masking. Thank you for your service and good luck.
Cool tip about using the trim!

Depending on the condition I may wait to sand blast. I say this because in the Fall I am due to PCS to Texas, where I'm sure the weather is better for painting (when its not to windy of course) I'll only have about 5 months before the PCS move so I may just have to spot treat any rust and just shoot it. I might need the extra time to work any mechanical issues out before I move.

-Dale
 

Beerslayer

Well-known member
Steel Soldiers Supporter
1,054
53
48
Location
Tualatin, Oregon
Just a quick update as the sun came out and I am going out to paint.

The Sherwin Williams code I posted up is too green. They corrected it for me and the results are just beautiful. I will put the corrected mix up in the next day or so.

I won't be using oil based paints except for primer again on any of my MVs.

Thanks to you gentlemen who were pioneers on this!
 

Beerslayer

Well-known member
Steel Soldiers Supporter
1,054
53
48
Location
Tualatin, Oregon
Other suggestions?
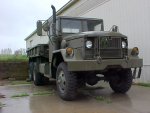
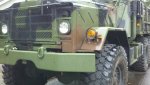
Both of my trucks have typical military paint jobs. CARC applied with runs, flaking off in some places with OD showing underneath plus those rusty patches.

It is obvious that not much if any surface prep was done before painting. All that taken into consideration, that paint stayed on there pretty good for quite a few years before it even started to fall off.

Consider what you have. A $3900 deuce doesn't really warrant a $5000 paint job unless you are doing an offf frame restoration. Then it will be nicer than it ever was from the factory and not correct.

You will have just as much or more fun with it if you just get some green paint on it. Once some of it starts to peel off and show the red underneath, you can scuff that spot up and brush some green paint on it and it will look all pretty again.

This has been pretty well covered, but here's what I would do.

Pressure wash the crap out of it. Scuff up anything you can get to with Scotchbrite pads, and maybe some 80 grit where the paint is thick. Remove whatever rust you can get up the time and enthusiasm for, treat with phosphoric acid or just paint over it with Rustoleum rusty metal primer.

Here's the thing. If you just wash it good and scuff up the parts that are easy, paint over everything but the glass and rubber, paint right over the rust, in a year or two it will look like every other military truck out there. That will get it pretty right now, and you can deal with the rust later. No big deal, it is a 40 year old truck that already has multiple layers of paint here and there. If it looks good from 10 feet you are good to go.

As for paint choice, I decided this weekend that I am never using oil based paint again on my trucks except for primer. That Sherwin Williams house paint looks better than anything else I have tried, Rapco, etc.

I have what I think is the perfect mix for 383 Green. If you want to use Sherwin Williams, I will hook you up with wholesale price to boot. I have used a lot of Home Depot paint, it's not bad. Sherwin Williams is just better. Most professional painters will agree. Oh yeah, you get it mixed by a professional.
 

Beerslayer

Well-known member
Steel Soldiers Supporter
1,054
53
48
Location
Tualatin, Oregon
383 Green

New formula for 383 Green from Sherwin Williams. I will edit the older post to point to here. Photos are the mix codes for Sherwin Williams. The NOS headlight I used for color match, notice that the color on the left matches perfectly? The lighter color on the right was the first mix we tried. Photo of the truck with the freshly painted bumper. Closest match I have ever seen.
 

Attachments

Beerslayer

Well-known member
Steel Soldiers Supporter
1,054
53
48
Location
Tualatin, Oregon
Yes, it is the same headlight I used for the first attempt at matching 383 Green. The Sherwin Williams guy put a lot of effort into getting it just right.
 

SteveKuhn

New member
1,227
4
0
Location
Hasbrouck Heights NJ
That's what I thought from the shape. On my monitor, the 1st photo of it is much darker than the 2nd. Photos on here can be misleading. The proof is in the light, in person.

Thanks. Steve
 

Beerslayer

Well-known member
Steel Soldiers Supporter
1,054
53
48
Location
Tualatin, Oregon
But Wait! There's More!!!

Here we have the lovely Beige I had formulated for a place to stencil black bumper numbers. Also is the Sherwin Williams formulation for what for lack of a better name, they called Army Truck Brown.

If anyone has the proper name for the black and brown, please let me know and I will edit the posts.
 

Attachments

silverstate55

Unemployable
Steel Soldiers Supporter
2,068
855
113
Location
UT
Originally Posted by Heavysteven - What primer would you guys reccomend?

Some people seem to get away with less, but I play it really safe.

Rustoleum doesn't contemplate using latex or acrylic over top so there are no directions but the ones that do usually specify 2 weeks curing before latex. I do at least that and prefer 3 - 4 esp in colder/damper weather. Insufficient cured primer can cause a load of problems.

If I can't give that amount of time on metal I remove loose rust, treat with rust converter/etch, then use a direct-to-metal (DTM) industrial acrylic. That's a 24 - 48 hour prep window.

Steve
Typically, with oil-based enamels, they don't fully cure ("gas out") for at least 3 weeks after application. Low temperatures and higher humidity levels will extend this curing time.
 

mattg2448

New member
328
4
0
Location
Port Huron, Michigan
Just bought a couple test quarts of Behr 383 green and brown to test, also bought the interior/exterior harbor freight air sprayer, tested it out, it worked good but was too smooth, need to not thin it as much..
 
Top
AdBlock Detected

We get it, advertisements are annoying!

Sure, ad-blocking software does a great job at blocking ads, but it also blocks useful features of our website like our supporting vendors. Their ads help keep Steel Soldiers going. Please consider disabling your ad blockers for the site. Thanks!

I've Disabled AdBlock
No Thanks